
Start a project without a quote
Start a project from a project template with its answers, system, price, payments, and files, and move it to production when it's ready.
Use New Project to start a project that no quote sold. You pick a project template, answer the questions it asks, and enter the system, price, and payments a quote would have carried. Save it as a draft while something is missing, or create it in production when it's ready.
Before you start
- You need the Create Projects permission.
- The project template you want must be Enabled. See Finish, enable, and publish a project template.
- To choose an Owner other than the default, you need the Reassign Project Owner permission.
- To add files, you need the Upload Media permission.
Open New Project
- Go to Operations → Projects.
- Click New Project.
The drawer has five pages: Basics, Project fields, System, Price and payments, and Files. Their names run across the top. Click Next to move on and Back to go back, or click a page's name to jump to it. Save as draft is on every page. The panel on the right sums up the project as you answer.
Basics
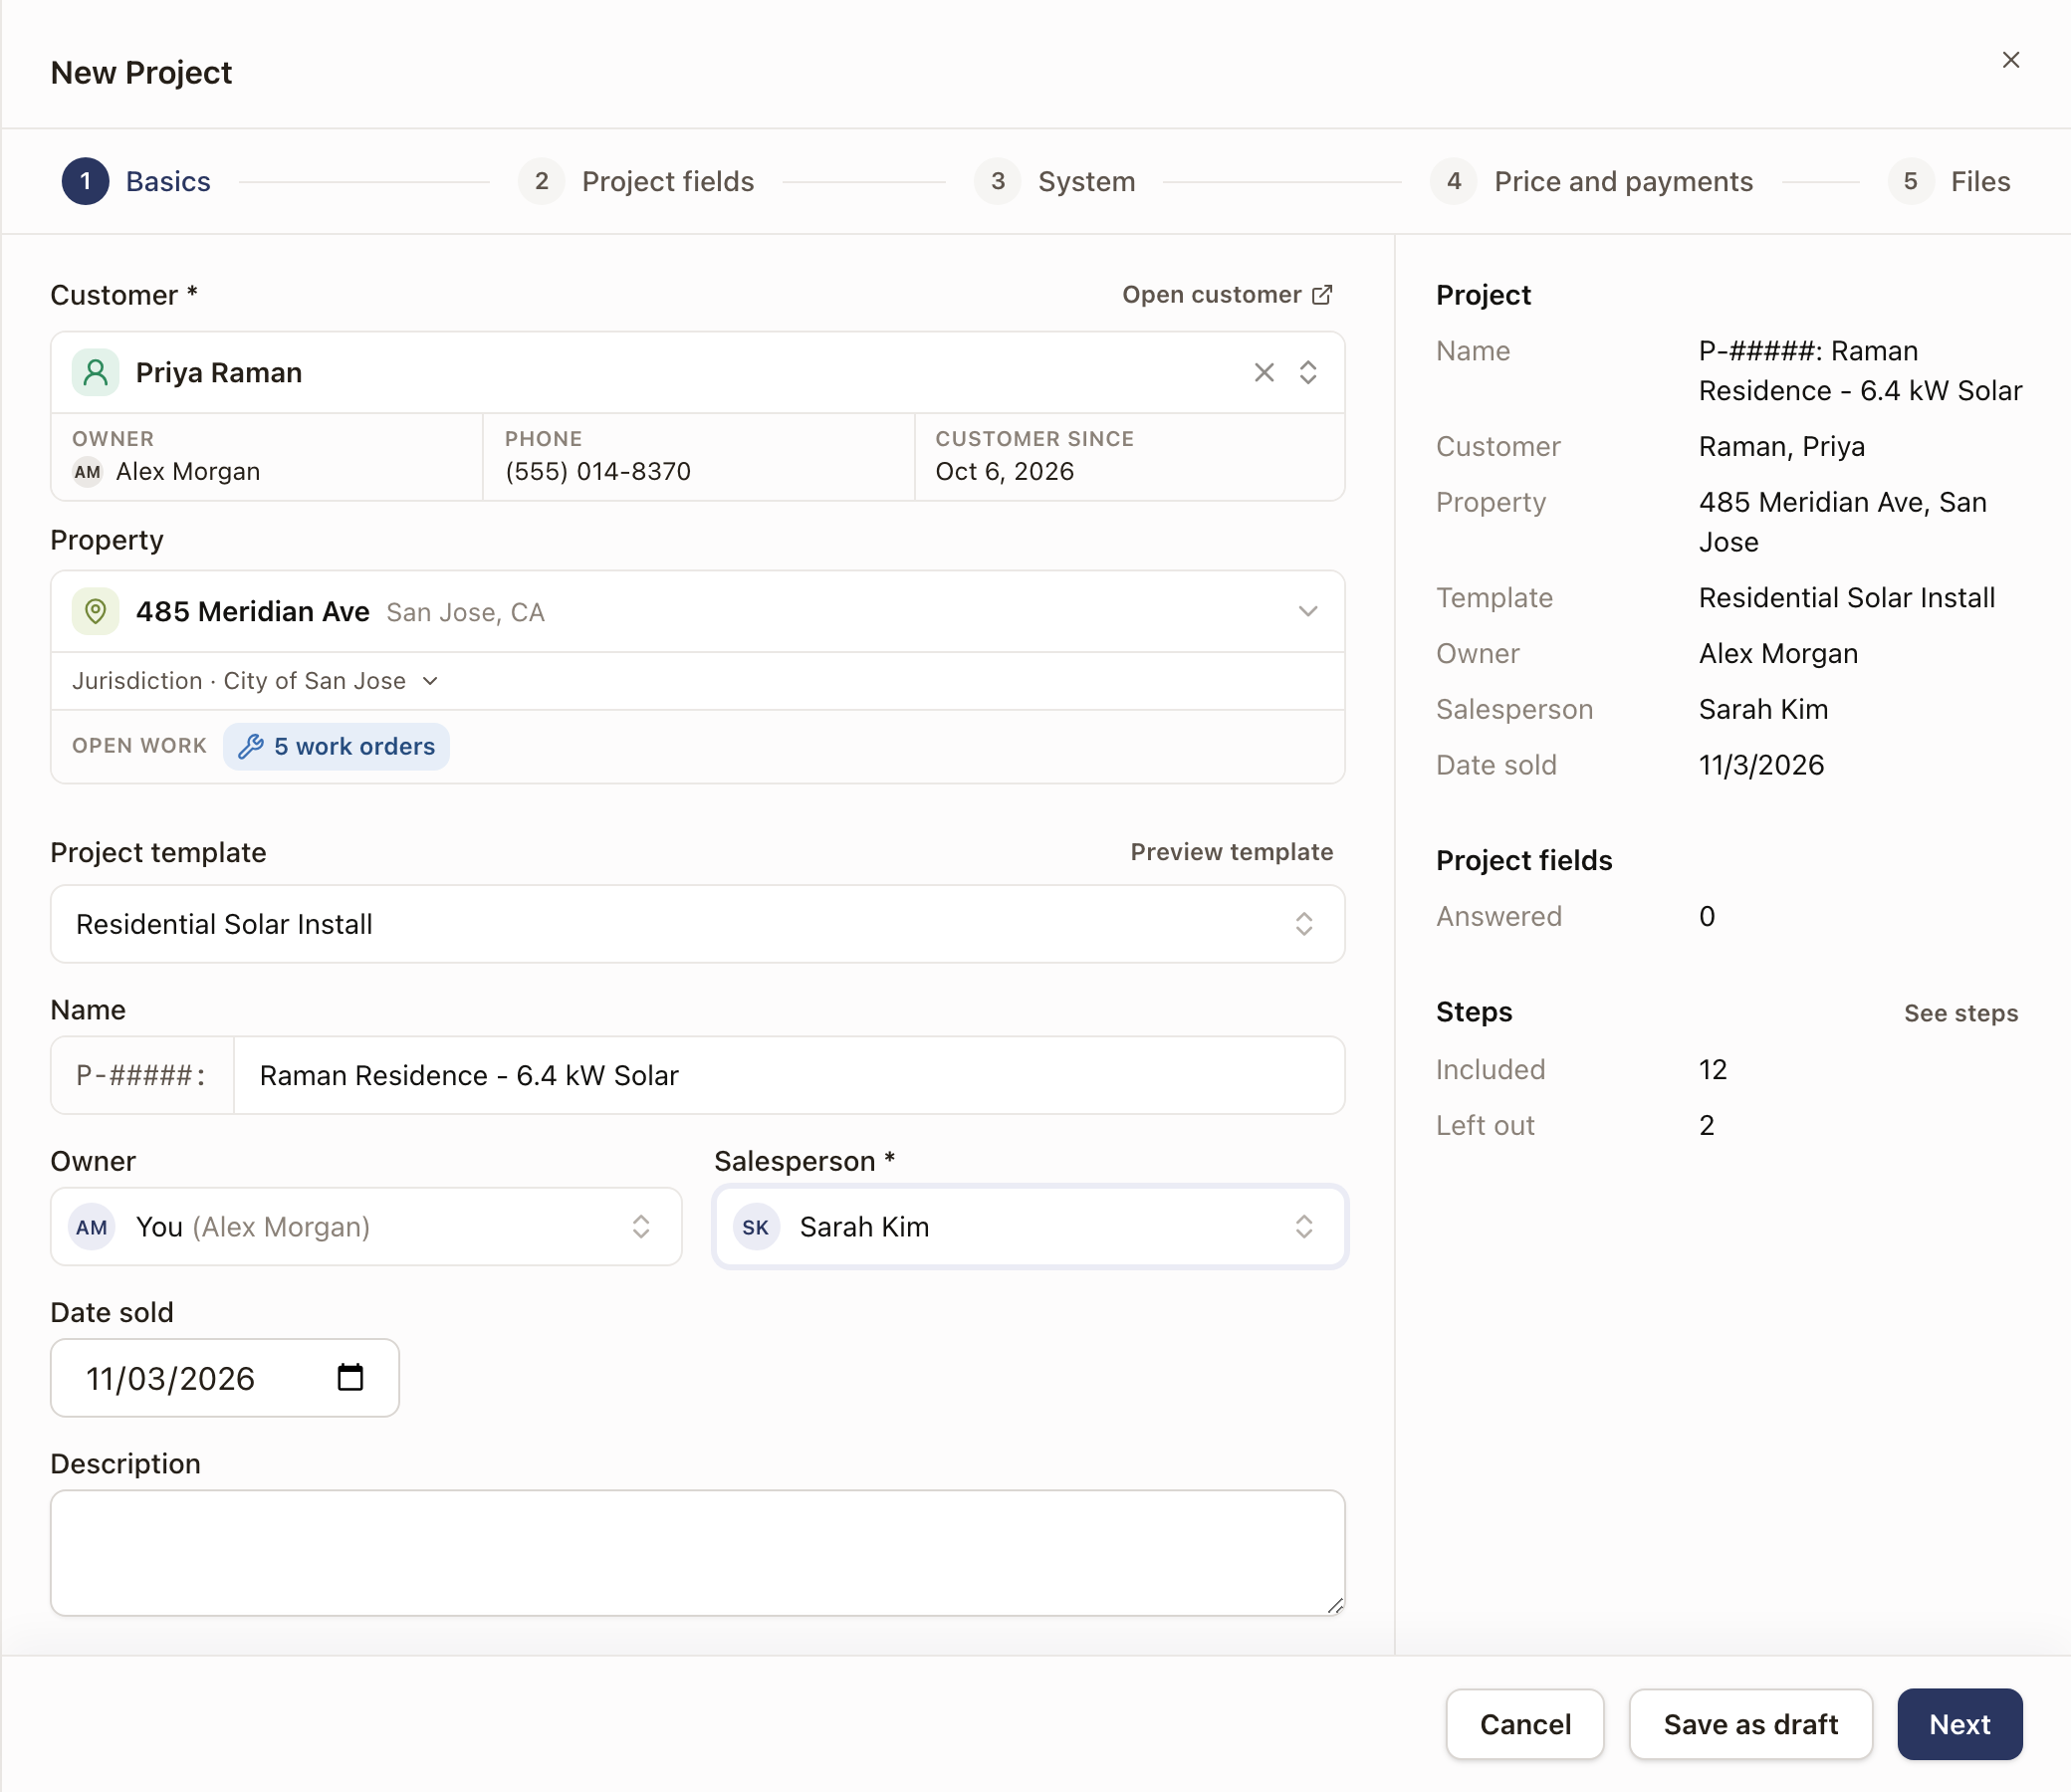
- Search for the Customer, or click New Customer to create one. If you pick a Contact, it becomes a Customer when the project is created, and the page asks for its Last name if it has none. If the customer has no property, the page asks for the Property address.
- Choose the Property. The Open work row shows what is already going on at that address.
- Under the property, the jurisdiction row names the property's jurisdiction. Click it to pick another. The change applies to the property and to its open projects.
- Choose the Project template. Type to search. Only enabled templates are listed.
- Click Preview template to see the template's stages and steps as your answers make them. A step your answers leave out is marked Left out, with the reason.
- Type a Name, or leave it blank to name the project after the customer. The project number comes first, for example P-00042:.
- Choose the Owner. It starts as the template's project manager when it has one, otherwise you.
- Choose the Salesperson. It is required and has no default.
- Set Date sold. It starts as today. An earlier date doesn't change when the project's steps fall due: they count from today.
- Add a Description if you want one.
You can't leave Basics until the customer, template, and salesperson are chosen. A message names what is missing.
To change Date sold later, open the project's ⋯ menu, click Edit project, and change Date sold.
Project fields
This page asks the template's fields, grouped under the template's section names. Each row has the field's name on the left and the answer on the right.
- Needed marks a field the template needs before production.
- A split icon marks a field that decides which steps are included. Hover over it to read Decides which steps are included. Preview template updates as you answer.
- From the property under an answer means the property already had it. Change it if it's wrong.
- A field the template places without a section is asked first, with no heading.
- Quote details is always open. It holds fields your quotes capture that the template doesn't place. A line under the heading says a quote normally fills them in, they're optional here, and you can fill them in later on the project's Scope tab. None of them is marked Needed.
- A field that follows Pay with moves to Price and payments and reads From Pay with.
An answer to a property field is saved on the property, so the next project at that address starts from it. See Find, add, and place fields in the Field library.
If the template has no fields, the page reads This template has no project fields.
System
This page is optional, and it shows on every template. Enter the system that was sold: PV Module, Panel Count, Battery, and Battery Count. Any other solar field the template asks for follows them. An Inverter is asked only when the template itself places one.
PV Module and Battery are searchable lists of the products in your catalog. See Set up your product and service catalog. Panel wattage and battery capacity come from the product you pick. Once a product is picked, click the X beside the list to clear it. If the template asks for an Inverter, it is a list too, and a microinverter counts as one per panel.
The panel on the right adds up the Size, Panels, Batteries, and Inverters. When you answer any of these, the project gets a System tab. Its As sold section reads Entered by hand.
Price and payments
Choose Fixed price or By the hour.
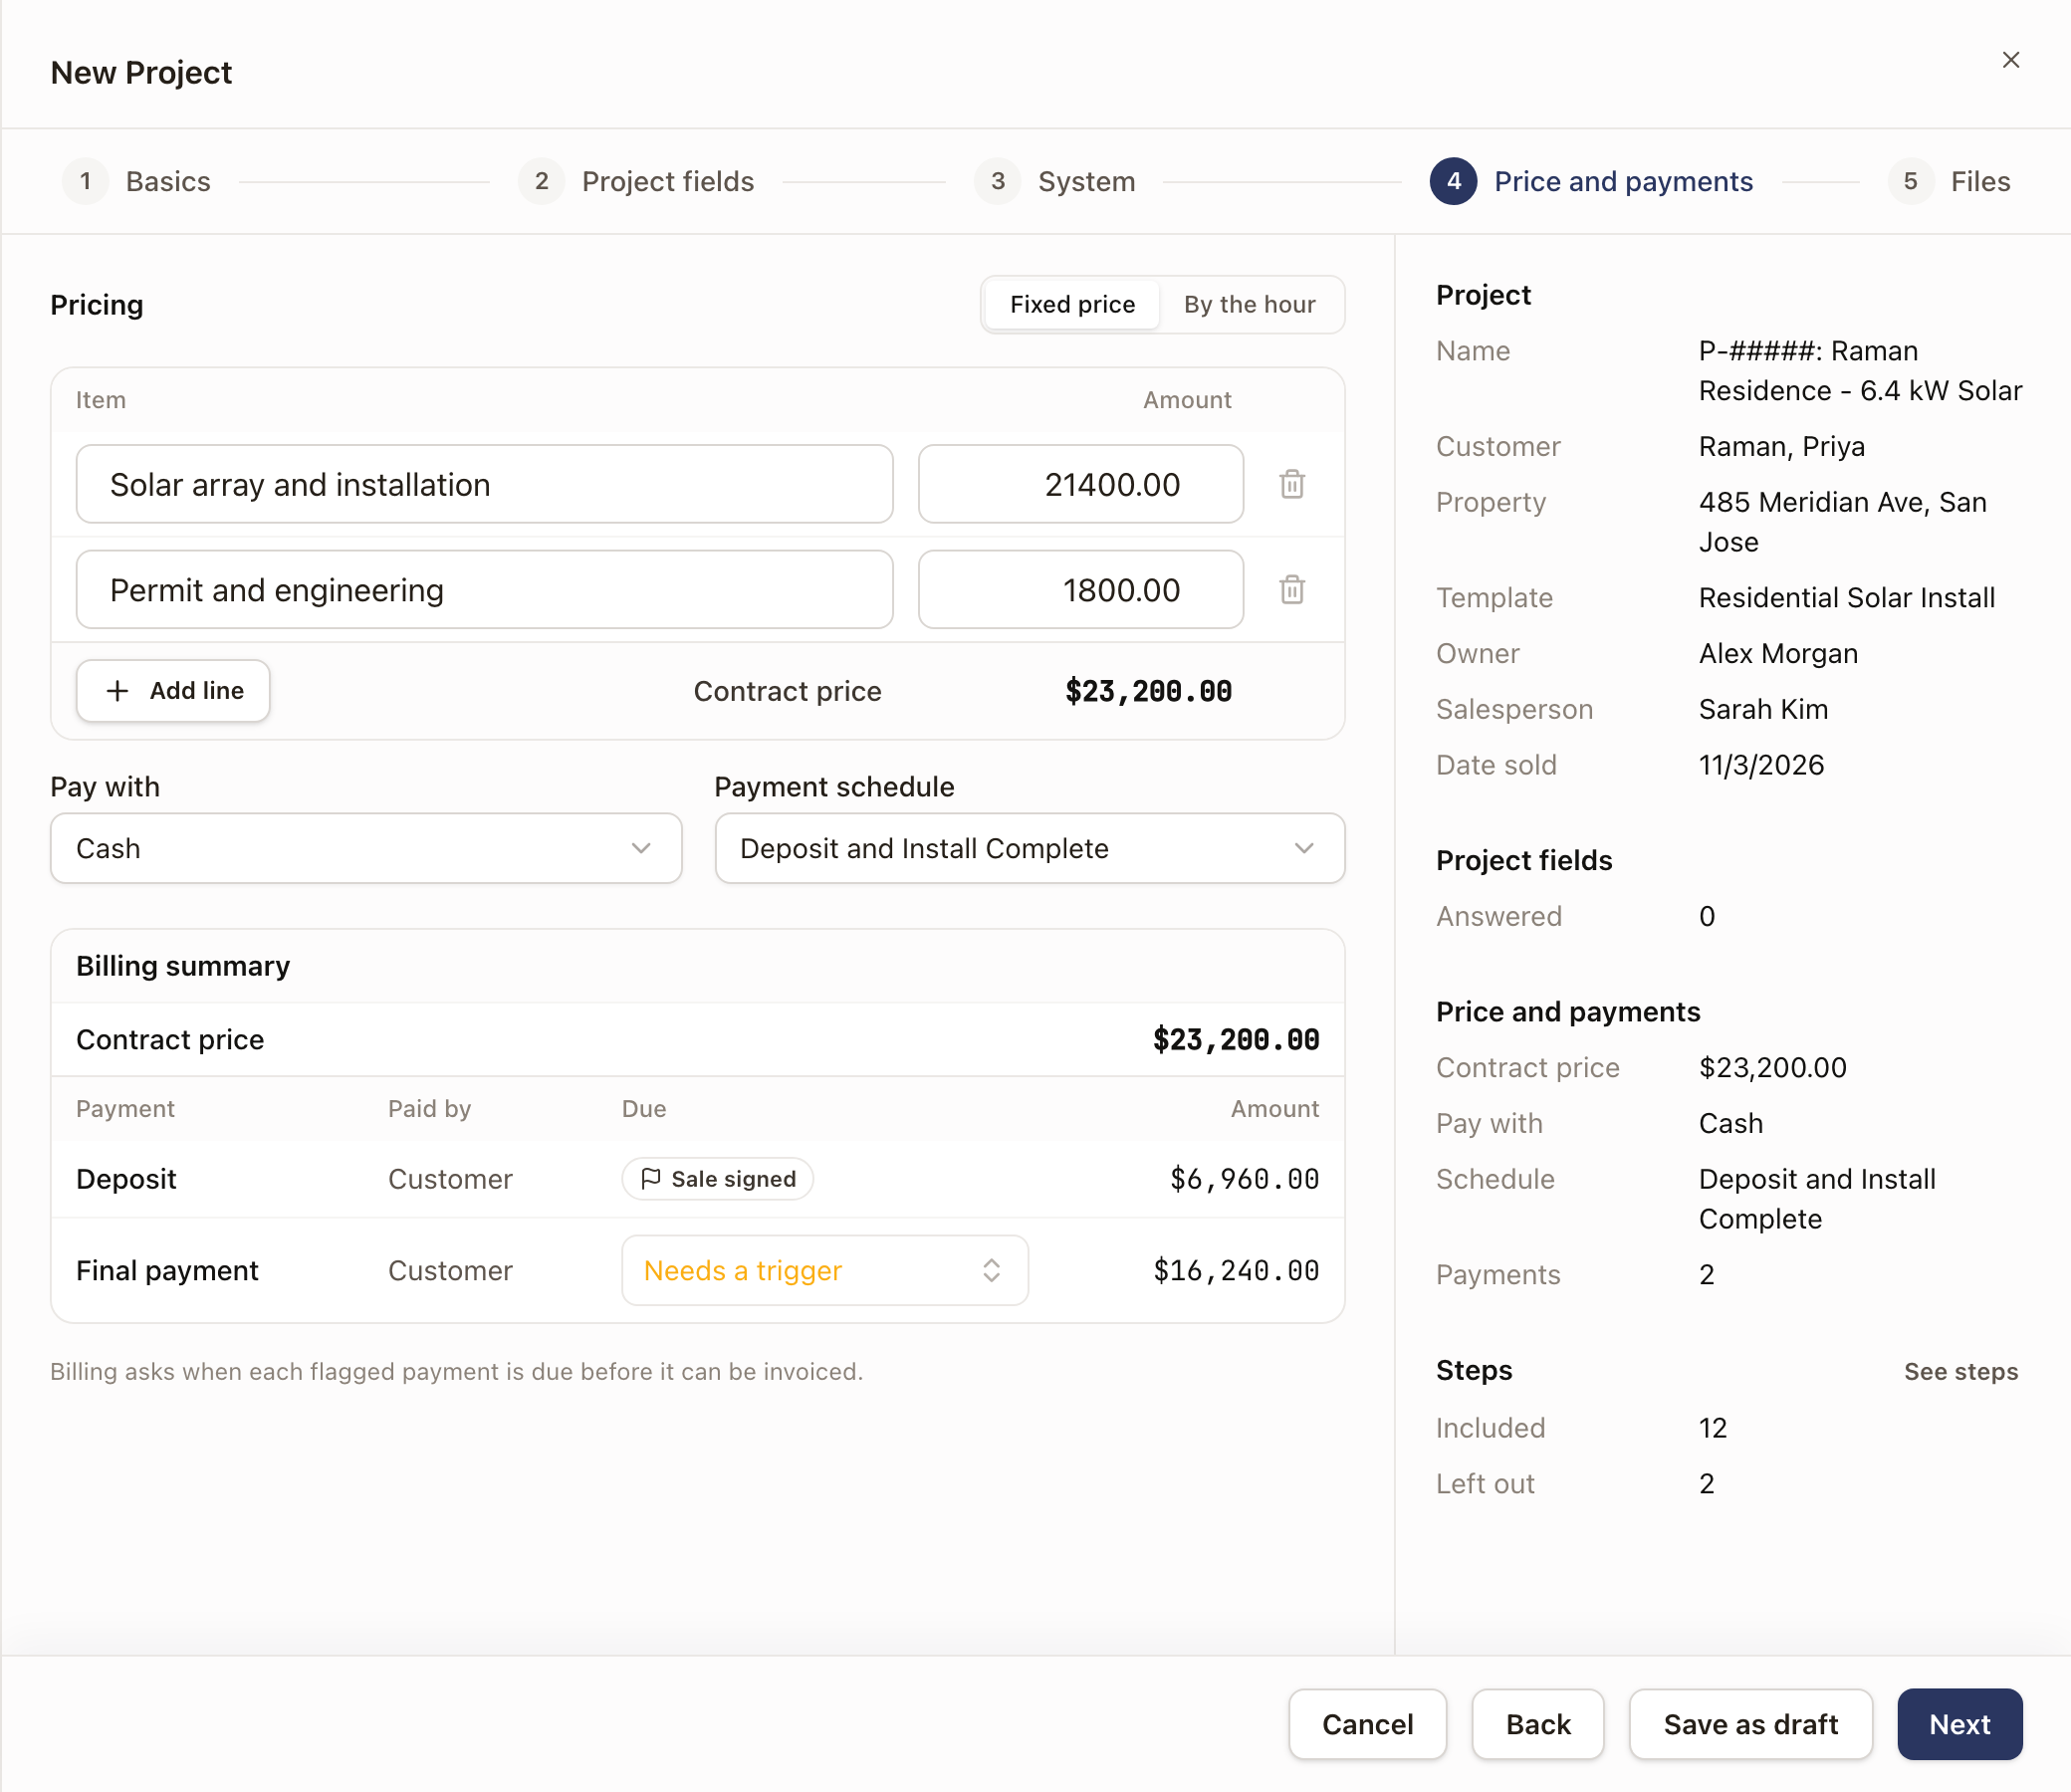
Fixed price
- Under Item and Amount, enter a line for each part of the price. Click Add line for more. The lines add up to the Contract price. Every line with an amount needs a name.
- Choose Pay with: Cash, or one of your financing options. A financing option asks for the amounts it needs, such as Paid in cash, Expected from the lender, Expected from the provider, Provider's contribution, and Customer's share paid by.
- Choose the Payment schedule for the customer's share, or None.
The Billing summary lists the payments with Payment, Paid by, Due, and Amount, and what each payer owes above them. See Build payment schedules and connect financing.
A payment that reads Needs a trigger has a schedule that doesn't say when it's due. Click its Due cell and pick a payment event, such as Sale signed, or a step. Type to search. If you leave it, Billing asks when the payment is due before it can be invoiced. See Set up payment events.
By the hour
Enter the Hourly rate and Labor limit. Enter the Estimated hours and Minimum hours if you have them. The project has no contract price, payment schedule, or financing. The Billing summary shows one payment, Hourly billing, at the Estimated total. With no estimate, its amount reads By hours worked. See Price and bill work by the hour.
The project's Billing tab shows the same price and payments. See Read and manage a project's Billing tab.
Files
This page is optional. Click Add files, or drag files onto the page. You can add up to 50. Click the X beside a file to remove it.
Files upload when the project is created, and they appear on its Files tab. If one fails, the project is still made, and a message names the file. Add it again from the Files tab. Without the Upload Media permission, the page reads Your role can't upload files.
Save as draft or create in production
- Save as draft keeps the project as a Draft. It is on every page.
- Create in production is on the last page, Files. It makes the project Active. It stays off while a field marked Needed is blank. The footer counts them, for example 2 needed before production.
The new project opens.
What a draft holds back
A draft is saved but not yet being worked. Until it moves to production:
- Its steps don't appear in My Work, Tasks, All Work, or Team Dashboard. They still show on the project's own page.
- Its work orders aren't ready to schedule.
- The records its first steps need, such as permits and plan sets, aren't made.
- Its team isn't told about their assignments.
- It isn't in the All projects list. Click the Draft chip at the top of Operations → Projects. If you don't see one, click Filter and choose Draft under Status.
Move a draft to production
- Open the draft. Under the header, Needed before production lists the template's needed fields, with a count such as 1 of 3 needed. Click an answer to edit it. Press Enter or click away to save. You need the Edit Projects permission.
- Click Move to production at the top right of the header, or in the ⋯ menu.
While a needed field is blank, the header button is off. Hover over it to read which fields to answer first. Clicking Move to production in the ⋯ menu shows a message that names them.
A message reads Moved to production. The project is Active. Its steps appear in the lists above, its work orders can be scheduled, its first steps get their records, and its team is told about their assignments.
A project with no template
Choose No template at the bottom of the template list. The drawer is one page: the customer, property, Name, Owner, Date sold, and Description. Click Create Project. The project has no steps and starts as a Draft. Click Move to production to make it Active.
Check it worked
The new project opens. A draft reads Draft. A project created in production reads Active. The Quote box in the summary row reads No quote, with Sold and the date under it. The Files tab lists the files you added.
Common problems
- Next stays on Basics. A message says what's missing: Choose a customer, Choose a project template, Choose a salesperson, or Enter a project name.
- Create in production is off. A field marked Needed is blank. Answer it on Project fields or System, or click Save as draft and answer it later.
- I can't find a draft. Drafts aren't in the All projects list. Use the Draft chip, or Filter and then Status.
- A file didn't upload. The project was made. Add the file from the project's Files tab.