
Work an application and its milestones
Send an application and work it through its milestones, fill in the fields it needs, read its status, and deny, expire, cancel, or reopen it.
An application is a filing to someone outside your company, such as a lender, a utility, or an HOA. The application holds who it goes to, its reference number, and its type. Its work is its milestones, in order. The first milestone is usually sending the application. Later milestones, such as a permit package or a final sign-off, are the next checkpoints of the same filing.
Every application has at least one milestone. An application whose type has no milestones, or that has no type, gets one of its own named Application.
Before you start
You need the Edit Projects permission (Owner, Admin, Sales Manager, Operations Manager, and Operations User have it by default). Application types and their milestones are set up in Settings → Application types. See Set up application types.
Open the application
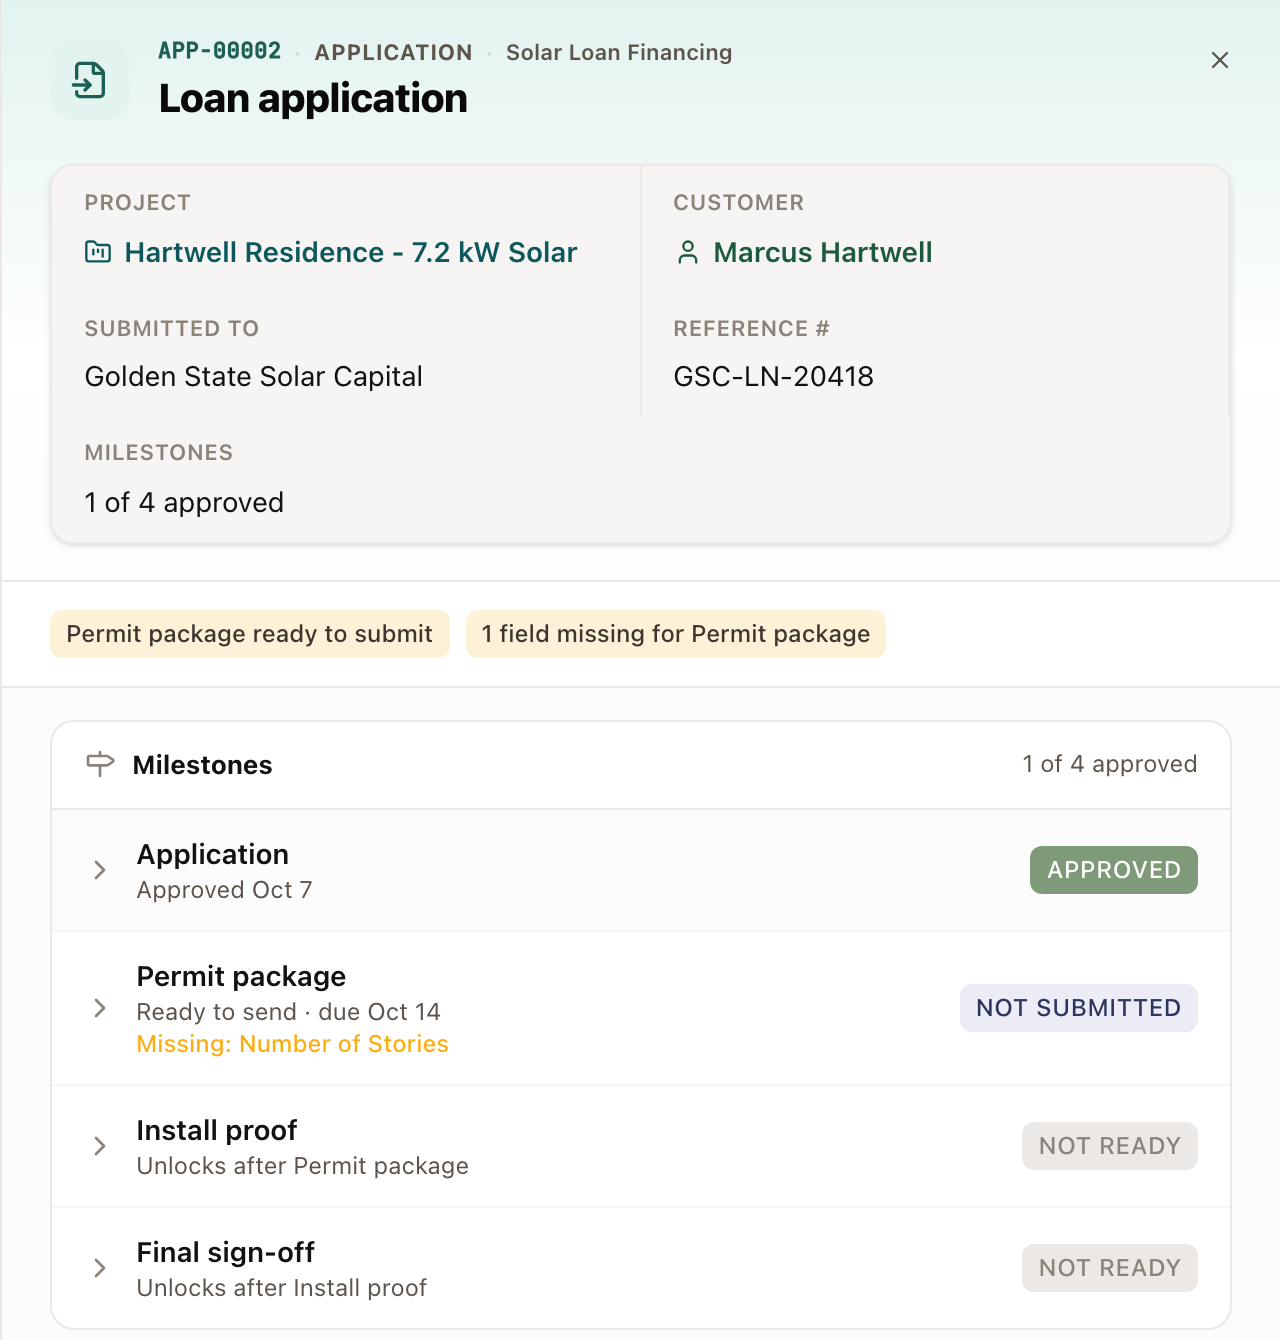
On the project's Work tab, click the Application step, for example Loan application. Its drawer opens on milestone 1. The top shows who it's Submitted to, the Reference #, and how many Milestones are approved. The application's status is below that. Below the milestones are its Fields, Documents, Details, and the type's Instructions.
On the Work tab, the Application step and each later milestone step show the type's name and the milestone's place, for example Solar Loan Financing · 1 of 4 on the Application step and Solar Loan Financing · 2 of 4 on the next one. The step of an application with one milestone doesn't show this.
Read the application's status
An application's status is worked out from its milestones. You don't set it by hand, except to end the application.
| Status | Meaning |
|---|---|
| Not submitted | Nothing has been sent yet. |
| In progress | At least one milestone has been sent, and not every milestone is approved. |
| Needs more | The recipient asked for more on a milestone. |
| Approved | Every milestone is approved. |
| Denied, Expired, Cancelled | The application has ended. See End or reopen an application. |
While an application is in progress or needs more, its status names the milestone that matters most:
- Permit package needs more: the recipient asked for more on that milestone.
- Permit package submitted: it's been sent, and you're waiting to hear back.
- Permit package ready to submit: it's the next milestone to send, and its step is ready.
- Permit package not submitted: it's the next milestone to send, and it has no step in the project's plan.
- Permit package approved: the last milestone that was approved, shown while the next one, such as Install proof, waits on other work in the project.
An application with one milestone shows the plain status, for example Submitted or Needs more.
The same status shows on the application's page, in the Applications list, and on the project's Related tab. The Status filter on the Applications list uses the seven statuses in the table.
Send and work each milestone
Each milestone row shows its name, where it stands (for example Ready to send · due Oct 14 or Unlocks after Permit package), and its status: Not submitted, Submitted, Needs more, or Approved. A milestone whose step still waits on earlier steps reads Not ready with Unlocks after and the step it waits on. It has no Mark submitted until those steps finish. The status menu still moves it.
- Click a milestone to open it. It shows its Submitted and Approved dates and its own What to send checklist. Tick each item as you gather it.
- Click Mark submitted and check the Date submitted. Under Expected, type how many days you expect the recipient to take, or leave it blank to use the usual time. Click Save. The date you pick starts the clock.
- If the recipient asks for more, click Needs more, type what they need, and click Save. The note is required.
- When you send it again, click Mark resubmitted, check the date, and click Save. It has the same Expected box.
- When they accept it, click Mark approved, check the date, and click Save.
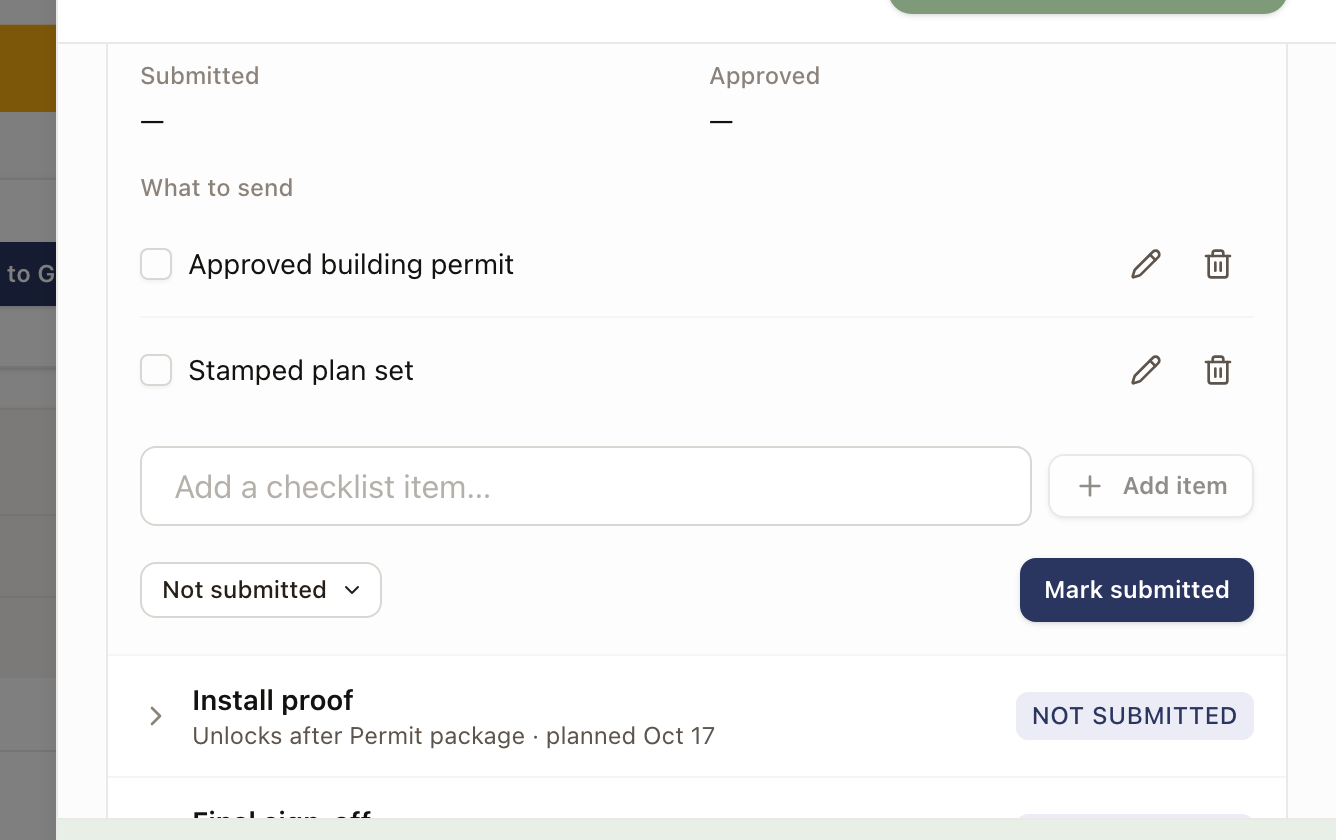
The status menu beside the buttons moves a milestone to any status. A move off the usual order, such as approving a milestone that was never marked submitted, shows a warning and still goes through.
If fields needed for the milestone, or for an earlier one, are blank, Mark submitted and Mark resubmitted name them, for example 1 needed field is blank: Number of Stories. When the status menu moves a milestone to Submitted, the same line shows after the move. It's a warning only: you can still save. See Fill in the application's fields.
Check it worked: the milestone's status changes, the application's status updates, and steps waiting on that milestone become ready.
Milestone 1 belongs to the Application step. The Application step is done when milestone 1 is approved, or when it's submitted if your project template says so. Each later milestone is its own step in the plan, with a Do Next prompt such as Send Permit package to Golden State Solar Capital.
When a milestone needs more, its step needs you. In My Work the card reads, for example, Golden State Solar Capital needs more for Permit package, with the first line of your note under it. Add follow-up tasks to the project for anything you need to do before you resubmit.
An open milestone shows a clock at the top right of its panel, for example Waiting 2 days · 5 expected. When it runs past its Expected time, the clock turns amber, then red at twice the time, and the step needs you. A submitted milestone's Expected time comes from its Expected days on the application type. If that is blank, it comes from your company's time for Submitted under Settings → Operations → Expected times. See Read and reset the clock on waiting work.
Fill in the application's fields
If the application's type lists fields, the Fields section below Milestones shows each one and its answer, in the type's order. Answers come from the project, its customer and property, and its solar design. To choose the fields, see List the fields an application needs.
The count beside Fields covers the fields needed for the next milestone to send and for the milestones before it, for example 4 of 5 needed for Permit package. When they're all filled, it reads All needed for Permit package filled. An application with one milestone, or with every milestone sent, leaves the milestone's name off.
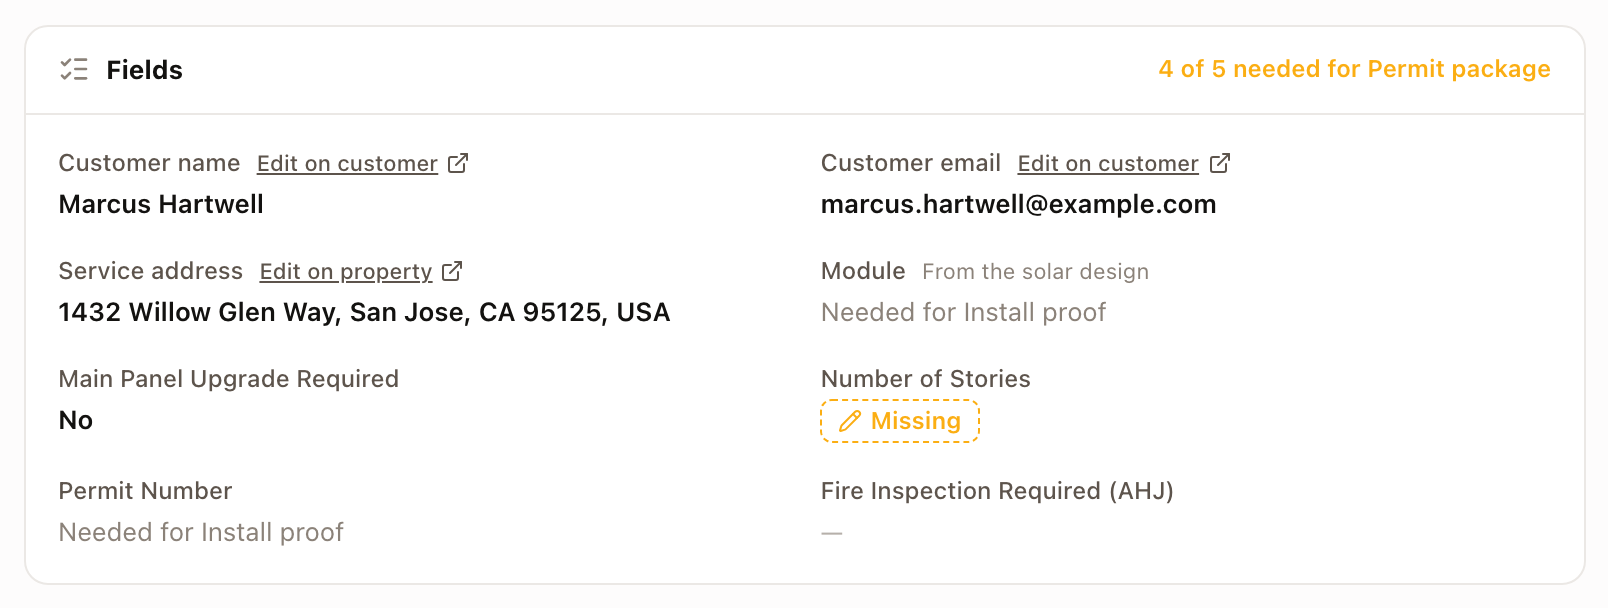
A blank answer shows one of these:
| Shows | Meaning |
|---|---|
| Missing | Needed for the next milestone to send, or an earlier one. |
| Needed for Install proof | Needed for a later milestone. It isn't counted yet. |
| — | Not required. |
Beside a field's name, Edit on customer or Edit on property opens the customer or property, where that value is changed. From the solar design means the value comes from the project's sold solar design. Point at an answer and click Copy to copy it.
An application that isn't on a project shows Not linked to a project.
Fill in a blank
With the Edit Projects permission, you can fill in or change a field's answer right on the application.
- Click the field's answer. On a blank field, click Missing, Needed for, or —.
- Type or pick the answer.
- Press Enter or click away to save. Press Esc to cancel.
The answer saves to the project, and the count updates. Customer and property values can't be changed here: use their Edit on customer and Edit on property links. Solar design values, and fields that are read-only on the project or need a change order to change, can't be changed here either.
See what's missing
While needed fields are blank, the application also shows:
- A pill beside its status, for example 1 field missing for Permit package.
- A Missing: line on the milestone's row, for example Missing: Number of Stories.
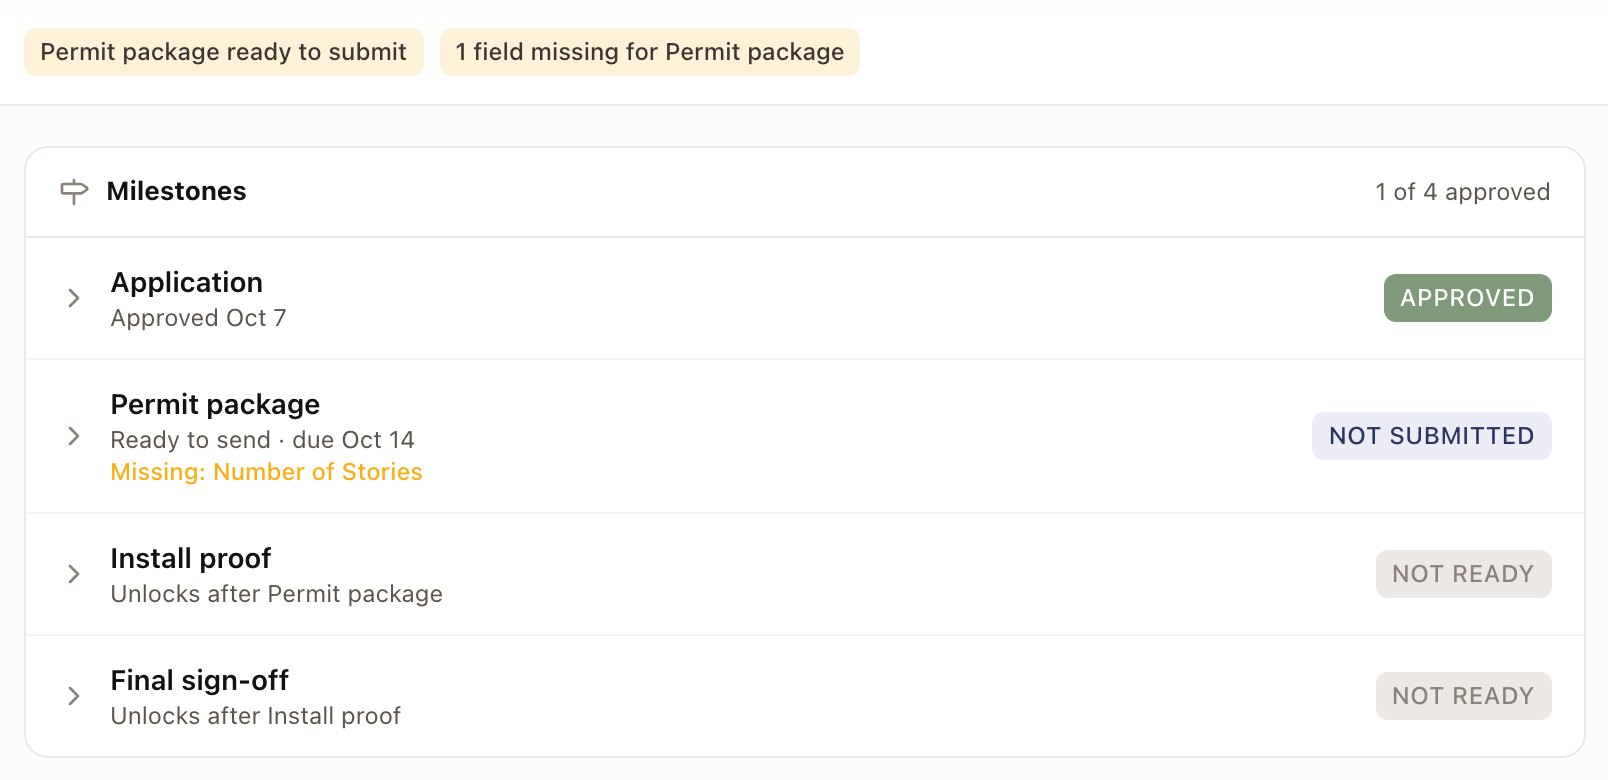
Neither shows once the application is approved, denied, expired, or cancelled. The Fields section keeps its count and its Missing labels.
The fields show on the application's drawer, its page, and its milestone in My Work. In My Work, the count is for the milestone you have open.
Read the type's instructions
If the application's type has instructions, they show last on the application, under Instructions: on its drawer, its page, and its milestone in My Work. Links in them open in a new tab. If you can edit application types, the Edit button there opens the type. To write them, see Write instructions.
End or reopen an application
Denied, Expired, and Cancelled end the whole application. Set them on the application's page: click Full detail in the drawer, then the ⋯ button.
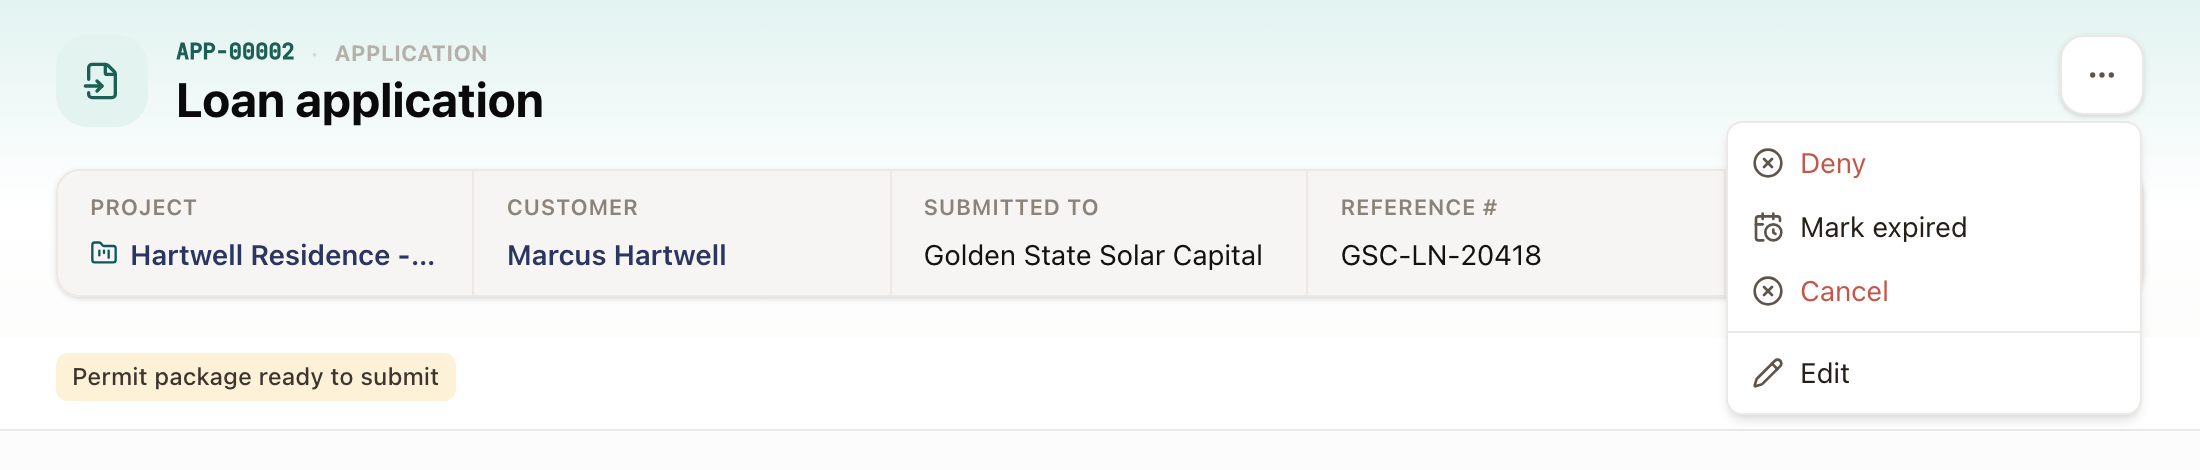
- Deny: the recipient turned it down. Steps for milestones that aren't approved are blocked until it's reopened.
- Mark expired: it lapsed before it was finished. Steps for milestones that aren't approved are blocked until it's reopened.
- Cancel: you're not going ahead with it. Steps for milestones that aren't approved are skipped.
Each one asks you to confirm. Steps that are already done stay done. If the move is unusual, such as denying an application that was never sent, the confirmation shows a warning, and you can still go ahead.
Once an application is denied, expired, or cancelled, the ⋯ menu shows Reopen instead. Reopening works the status out from the milestones again and returns the steps it blocked or skipped to where their milestones are.
Add a milestone to the plan
If an application was added to the project by hand, or the type gained a milestone after the project was built, a milestone can be missing from the plan. Its row in the application drawer reads Not in this project's plan and shows an Add to plan button. Click it to add the milestone as a step after the application.
See it on the timeline
Edit structure on the project, then Timeline, shows the application and its milestones as bars in the stage's color. Hover a milestone to see its status, who it's assigned to, and its due date. See Edit project structure and dependencies.
Choose or change an application's type
Click Edit on an application to change its Type. The list has your company's enabled application types and Other. Pick Other to type your own name, such as "HOA approval". A type from your list supplies the recipient, the milestones, the fields, and the instructions. An application with Other has one milestone of its own, named Application. Saving a different type replaces the application's milestones.
Common problems
- A milestone reads Not ready and has no Mark submitted. It unlocks after the steps named under it, for example Unlocks after Permit package. Finish or approve those steps first.
- The type you want isn't in the list. It may be turned off or not created yet. See Set up application types.
- The Type field is locked. The type can't change once a milestone has been submitted. Move its milestones back to Not submitted first, from each milestone's status menu.