
Add and manage project items
Add tasks, permits, applications, plan sets, and payment milestones to a project, and work each one through its statuses.
Work items are the things that actually get done on a project: tasks, permits, applications, plan sets, work orders, payments, and more. This guide covers adding them and working the ones that aren't covered elsewhere (work orders are covered in Service work; RMAs and material requests in their own guides).
Before you start
Adding or updating a work item needs the Edit Projects permission. Owner, Admin, Sales Manager, Operations Manager, and Operations User have it by default, and your organization can grant it to other roles.
Add work to a project
- On the project's Work tab, click Add work.
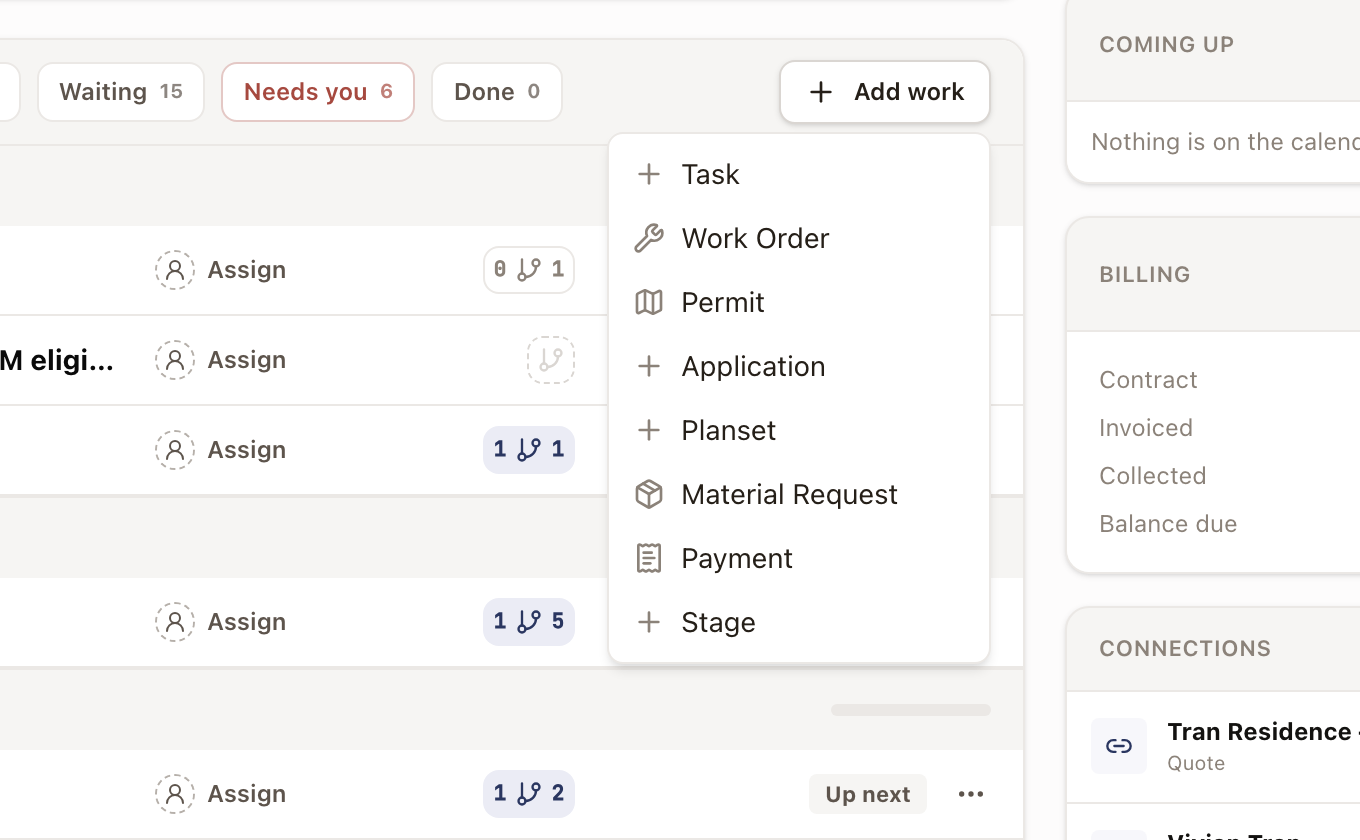
- Pick a type: Task, Work Order, Permit, Application, Planset, Material Request, or Payment. Choosing Stage instead adds a new stage.
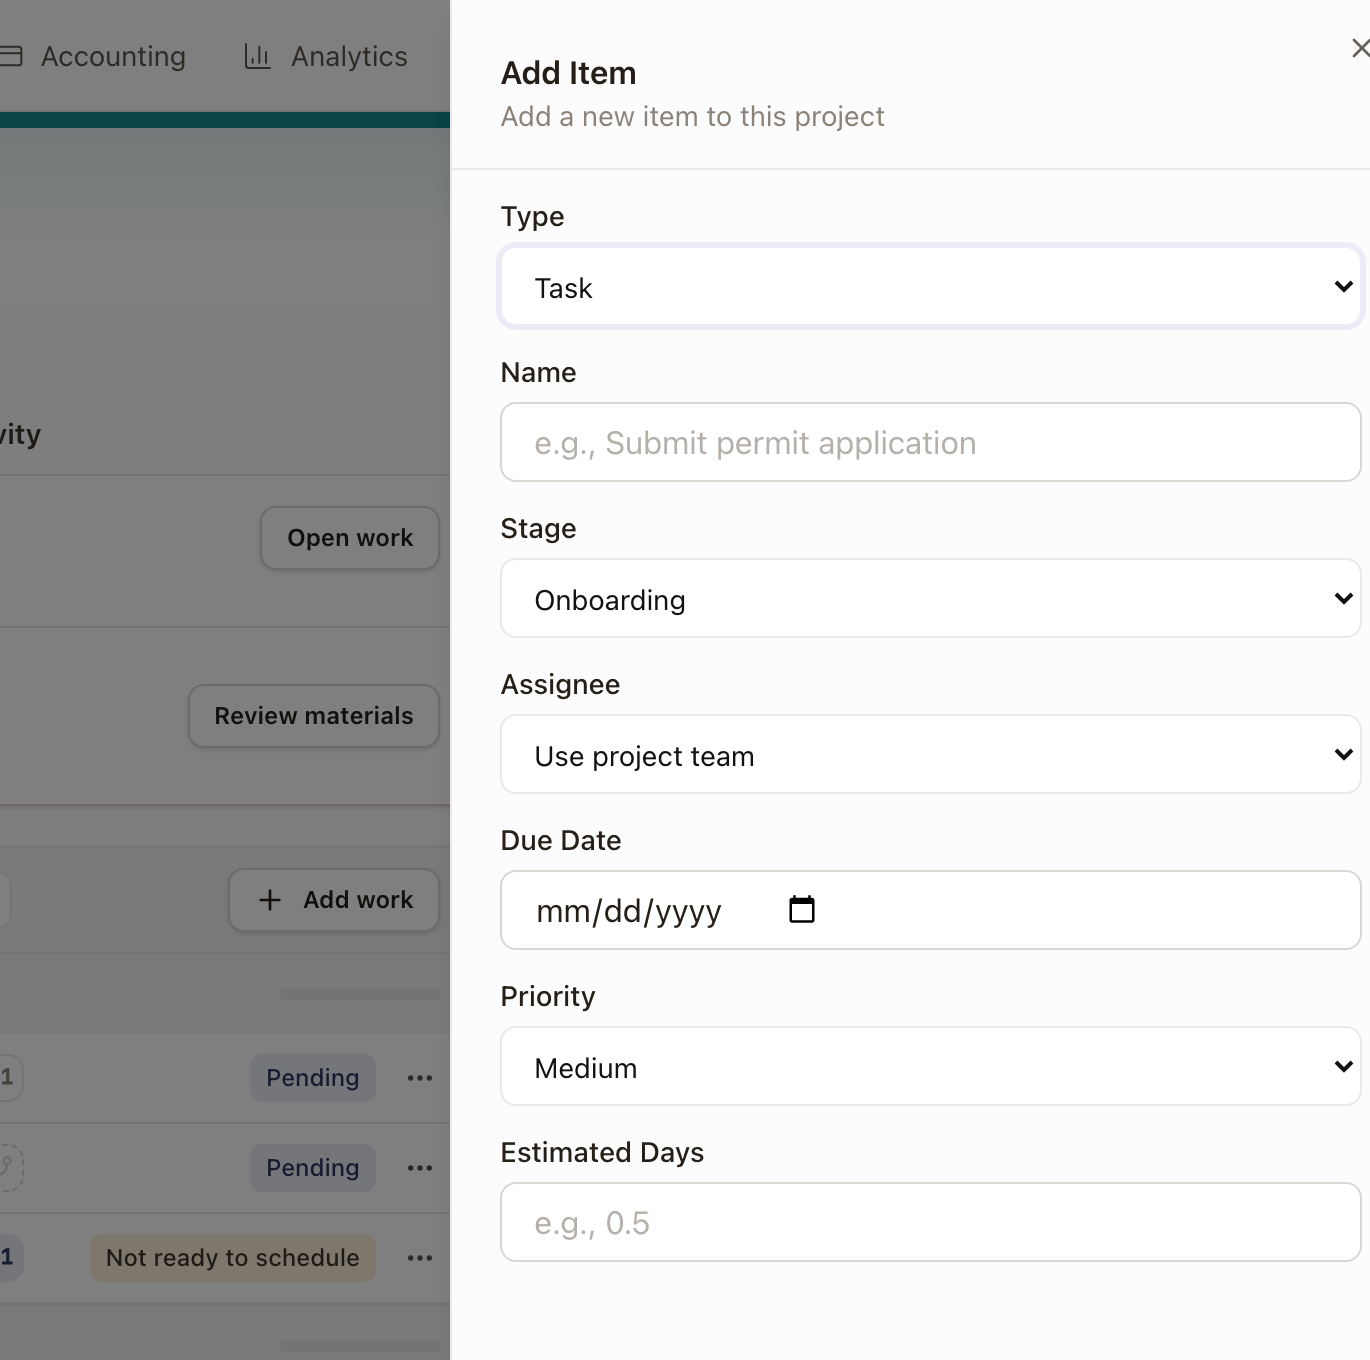
Every type shares the same core fields: Name, Stage (defaults to "No stage (ungrouped)"), Assignee (defaults to "Use project team"), Due Date, Priority, and Estimated Days.
For a Permit, Planset, Application, or Material Request, if another step on the project already creates that kind of record, the drawer also shows Record. Choose Creates a new permit (or the matching kind), or Uses the permit from one of the other steps. See Share a record between steps.
Adding work to a stage that was already Completed reopens the stage as In Progress, and a Completed project goes back to Active. The new item is ready right away unless it waits on unfinished dependencies, an open hold, or an open change order. Work added to a later stage waits for that stage.
Check it worked: the new item appears in its stage on the Work tab.
Work a task
Click a Task to open it. Its status moves Pending → In progress → Completed; change it from the dropdown on the item, or click Mark complete. Add checklist steps to break the task into smaller follow-ups, and fill in its description, due date, priority, and category from the Details section. A task starts with its step's due date and moves with the step when the plan moves it. A due date you set yourself stays where you put it.
Take a permit through approval
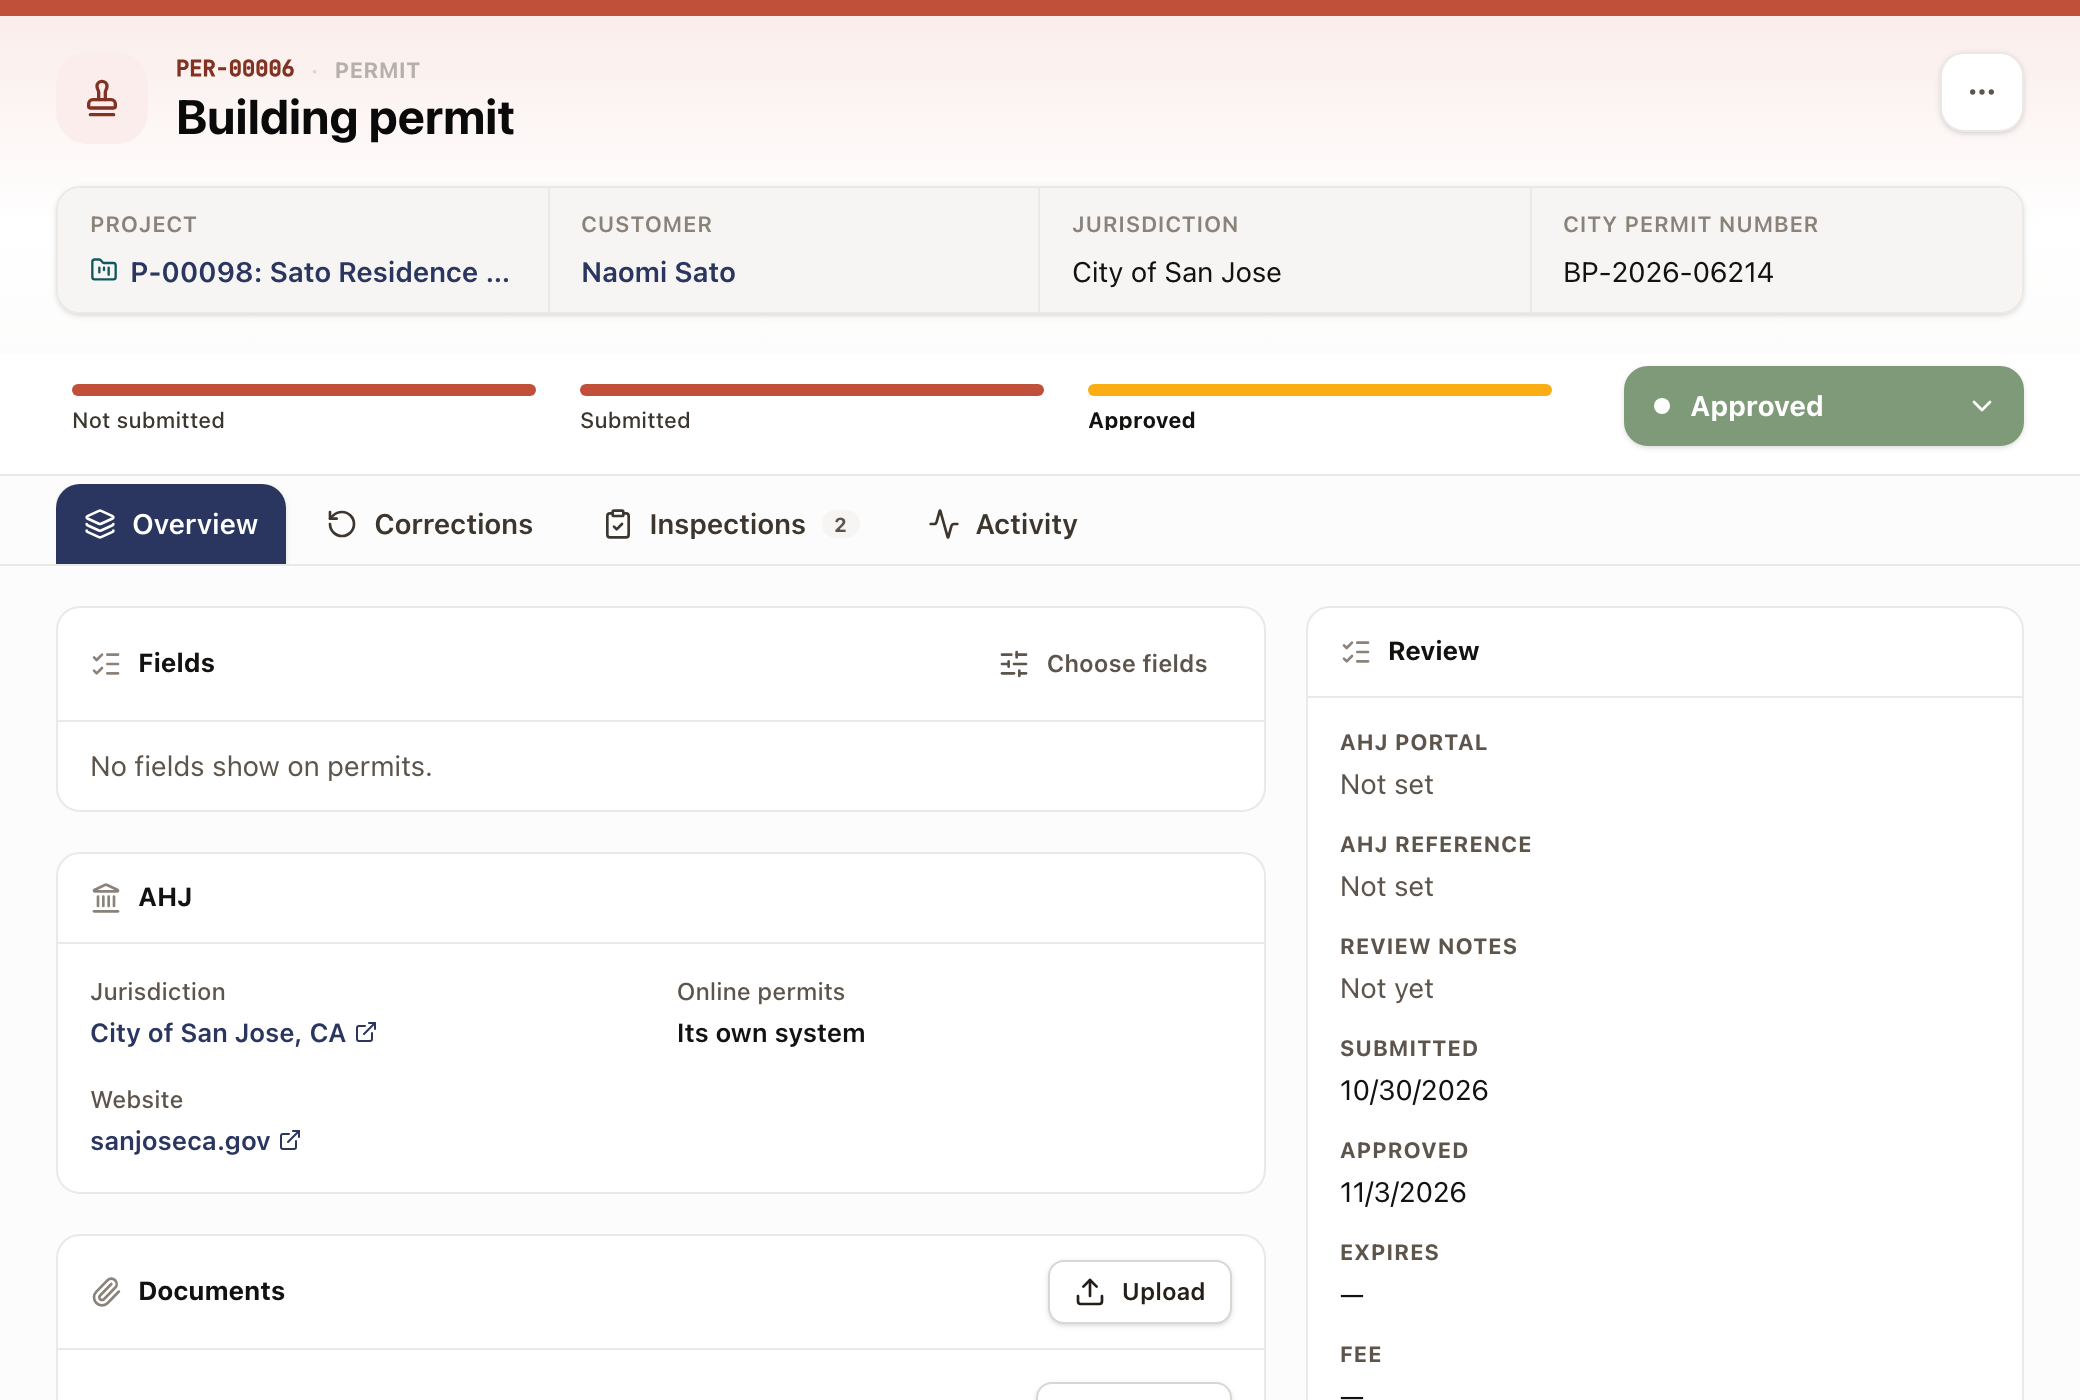
Click a Permit to open it. Under its status are three tabs: Overview, Corrections, and Inspections. The permit's full page adds an Activity tab, where you can add a note. A permit in Revision required opens on Corrections.
The Overview tab reads top to bottom:
- Fields shows the project's answers to the fields your company shows on permits, with a count such as 8 of 10 needed. A blank answer reads Missing. With the Edit Projects permission, click an answer to fill it in on the permit. The answer saves to the project. People who manage fields also see Choose fields. See Set up the field library. While answers are missing, a pill such as 2 fields missing sits beside the status. It goes away once the permit is approved, expired, or cancelled. Submit to AHJ names the blank fields, for example 2 needed fields are blank: Battery Model, Main Panel Upgrade Required. It doesn't stop you from submitting.
- AHJ shows the permit's jurisdiction: any warnings first, then the jurisdiction, Forms (the files your company uploaded for it, see Set up jurisdictions for permitting), Online permits, Usual approval time, Portal, Website, Phone, Email, and Address, then Fees, Requirements, Contacts, and Notes. Point at a value and click the copy button to copy it. Open portal opens the jurisdiction's portal in a new tab. A permit with no jurisdiction reads No AHJ set, and Set AHJ opens the permit's details so you can choose one.
- Documents holds the permit's files. Click Upload to add one.
- Details holds the permit's own fields. Click Edit to fill in its Type, City permit number, Jurisdiction, dates (Application Date, Submitted Date, Approved Date, Expiration Date), Permit Fee, Fee Paid Date, AHJ Portal URL, External Reference, and Review Notes as you learn them.
The permit's Jurisdiction is copied from the project and follows it until the permit is submitted. After that it stays as it was.
To send the permit, click Submit to AHJ. Check the City permit number and the Submitted date. Under Expected, type how many days you expect the permit to take, or leave it blank to use the usual time. A clock beside the status bar then shows how long the permit has been Submitted. See Read and reset the clock on waiting work.
Its status moves Not submitted → Submitted → Approved, with Revision Required, Rejected, Expired, or Cancelled as branches you can select from the status control.
The Corrections tab holds what the jurisdiction sent back on the permit itself, before any inspection. It lists each round in a table with Round, Status, Received, Respond by, Closed, and Work. When the permit is Submitted and the jurisdiction asks for changes, click Corrections received. Enter what they asked for under What did they ask for?, set Respond by, and list each correction under Correction work with an assignee and due date. To include the city's marked-up plans, click Attach files under Related files. The files are saved to the permit's Documents and shown on the round. Then click Record corrections. The permit moves to Revision required, and the tab shows how many corrections are open.
If the plans have to change, and the permit has a planset, turn on Plans will need to be revised. This adds one Revise plans step beside the permit and moves the planset to Revision required. Choose who revises the plans. The designer sees your notes and files on that step. If the planset is already being revised, the corrections join that revision.
When the work is done, click Mark resubmitted on the open round. If any correction work is still open, a Mark resubmitted? box lists it. The permit moves to Submitted and the work stays open with its assignees. A planset stays in Revision required until Revise plans is finished. To end a round without resubmitting, open the menu beside Mark resubmitted and click Close without resubmitting. The round ends, its open work is cancelled, and the permit goes back to where it was.
Inspections tied to the permit are on the Inspections tab, which shows how many there are. Each row shows the inspection's Result, Schedule, and Technician. Click a row to see its visits and corrections. Inspections normally come from the project template. To add one the template didn't plan, open the ⋯ menu on the Inspections tab and click Add inspection. On a project's permit, choose the Inspection type, Work type, Report, and Stage. For how a permit inspection step is scheduled, passed, or failed, see Work permit inspections on a project.
Take an application through approval
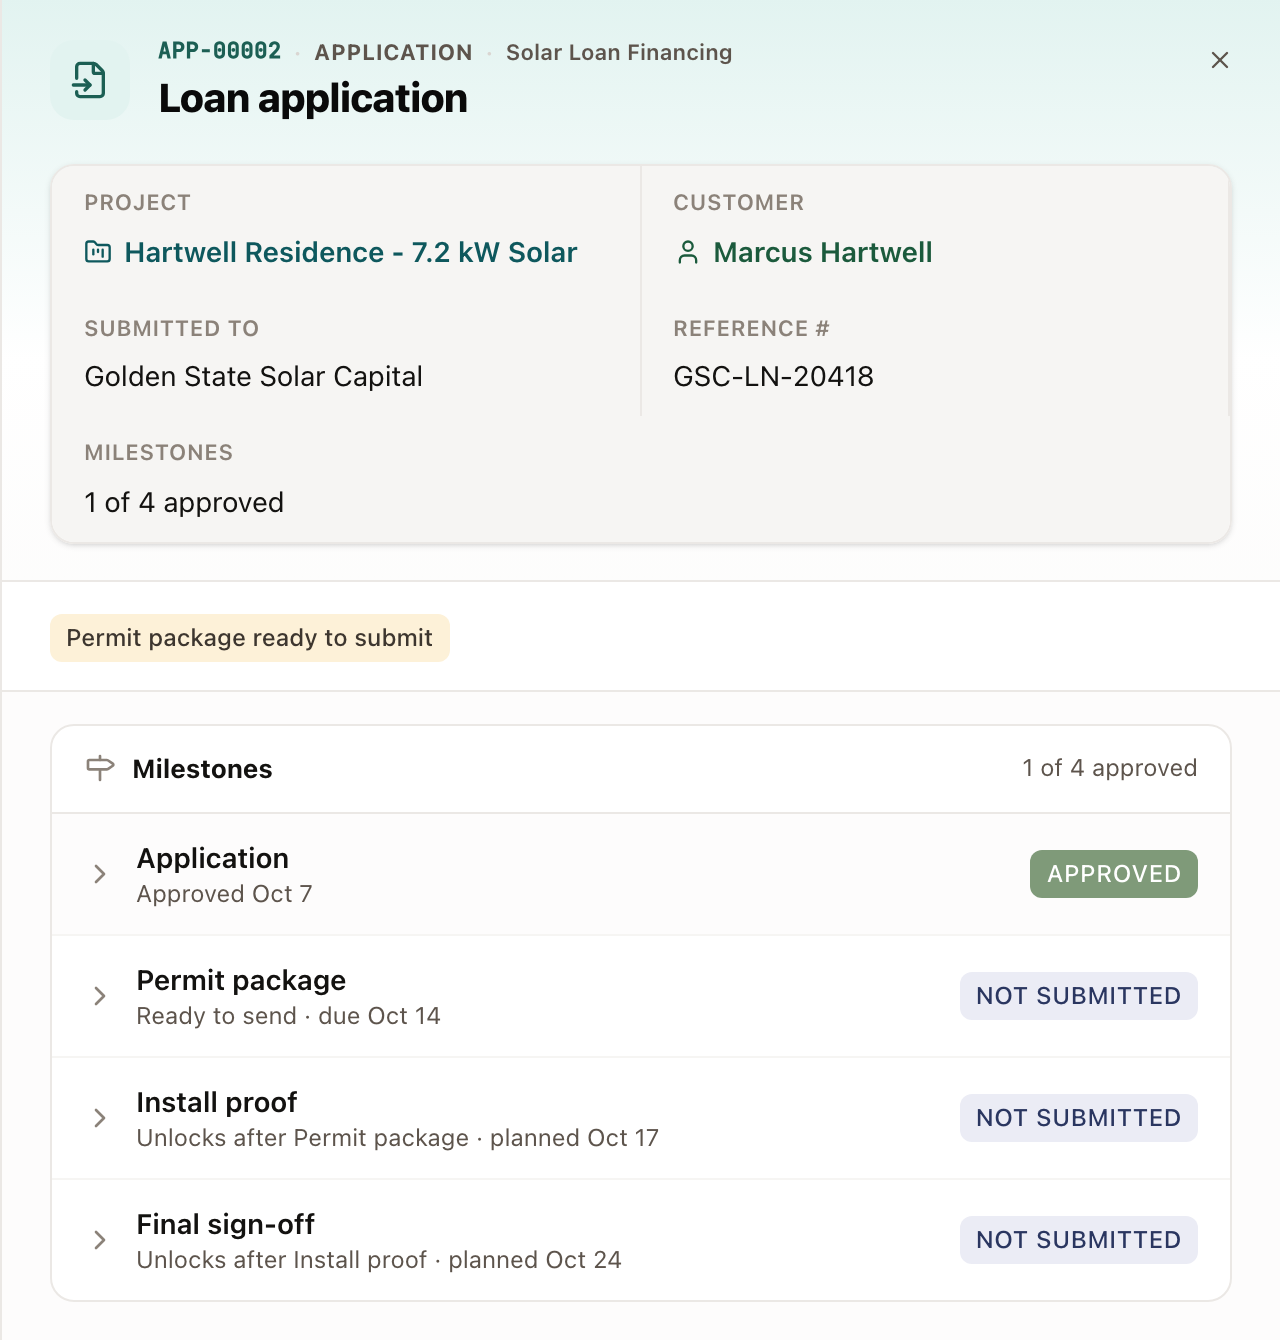
Click an Application to open it. Its Type is one of your company's application types (set up in Settings → Application types), or Other with a name you type, such as an HOA approval.
Click Edit to fill in Submitted To and Reference Number as you learn them.
An application moves forward through its Milestones, and every application has at least one. Each milestone has its own What to send checklist and moves Not submitted → Submitted → Approved, with Needs more when the recipient asks for more. The application's status is worked out from its milestones: Not submitted, In progress, Needs more, or Approved once every milestone is approved. Denied, Expired, and Cancelled end the whole application and are set on its full page. A milestone that has no step in this project shows an Add to plan button. See Work an application and its milestones.
Move a plan set through review
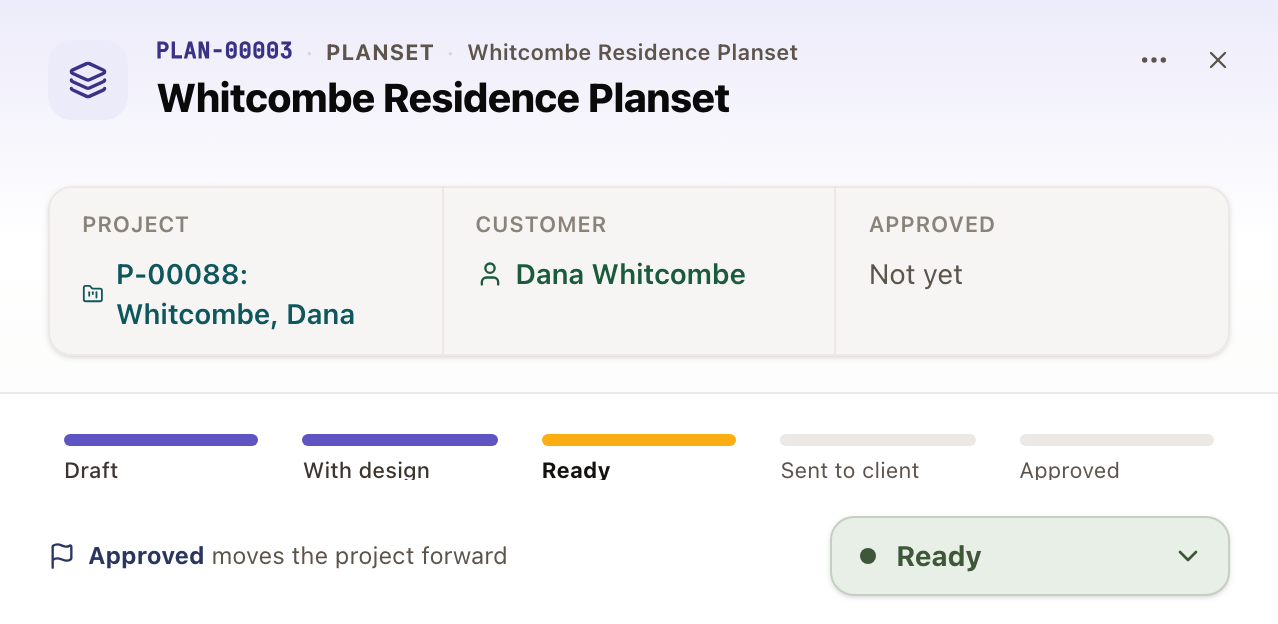
Click a Planset to open it. If no plan set has been created yet, the item shows Not created with Create Planset and Link an existing planset buttons.
Once created, it moves through Draft → With design → Ready → Sent to client → Approved, one step at a time from the buttons on the item. Revision required is the branch when the client asks for changes. Changing the status alone doesn't email the customer; only Send to client does that. The Send Planset dialog lists the plan set's documents under Attachments. All are ticked; untick any you don't want to send. See Create, check, and review a planset.
Set up and collect payment milestones
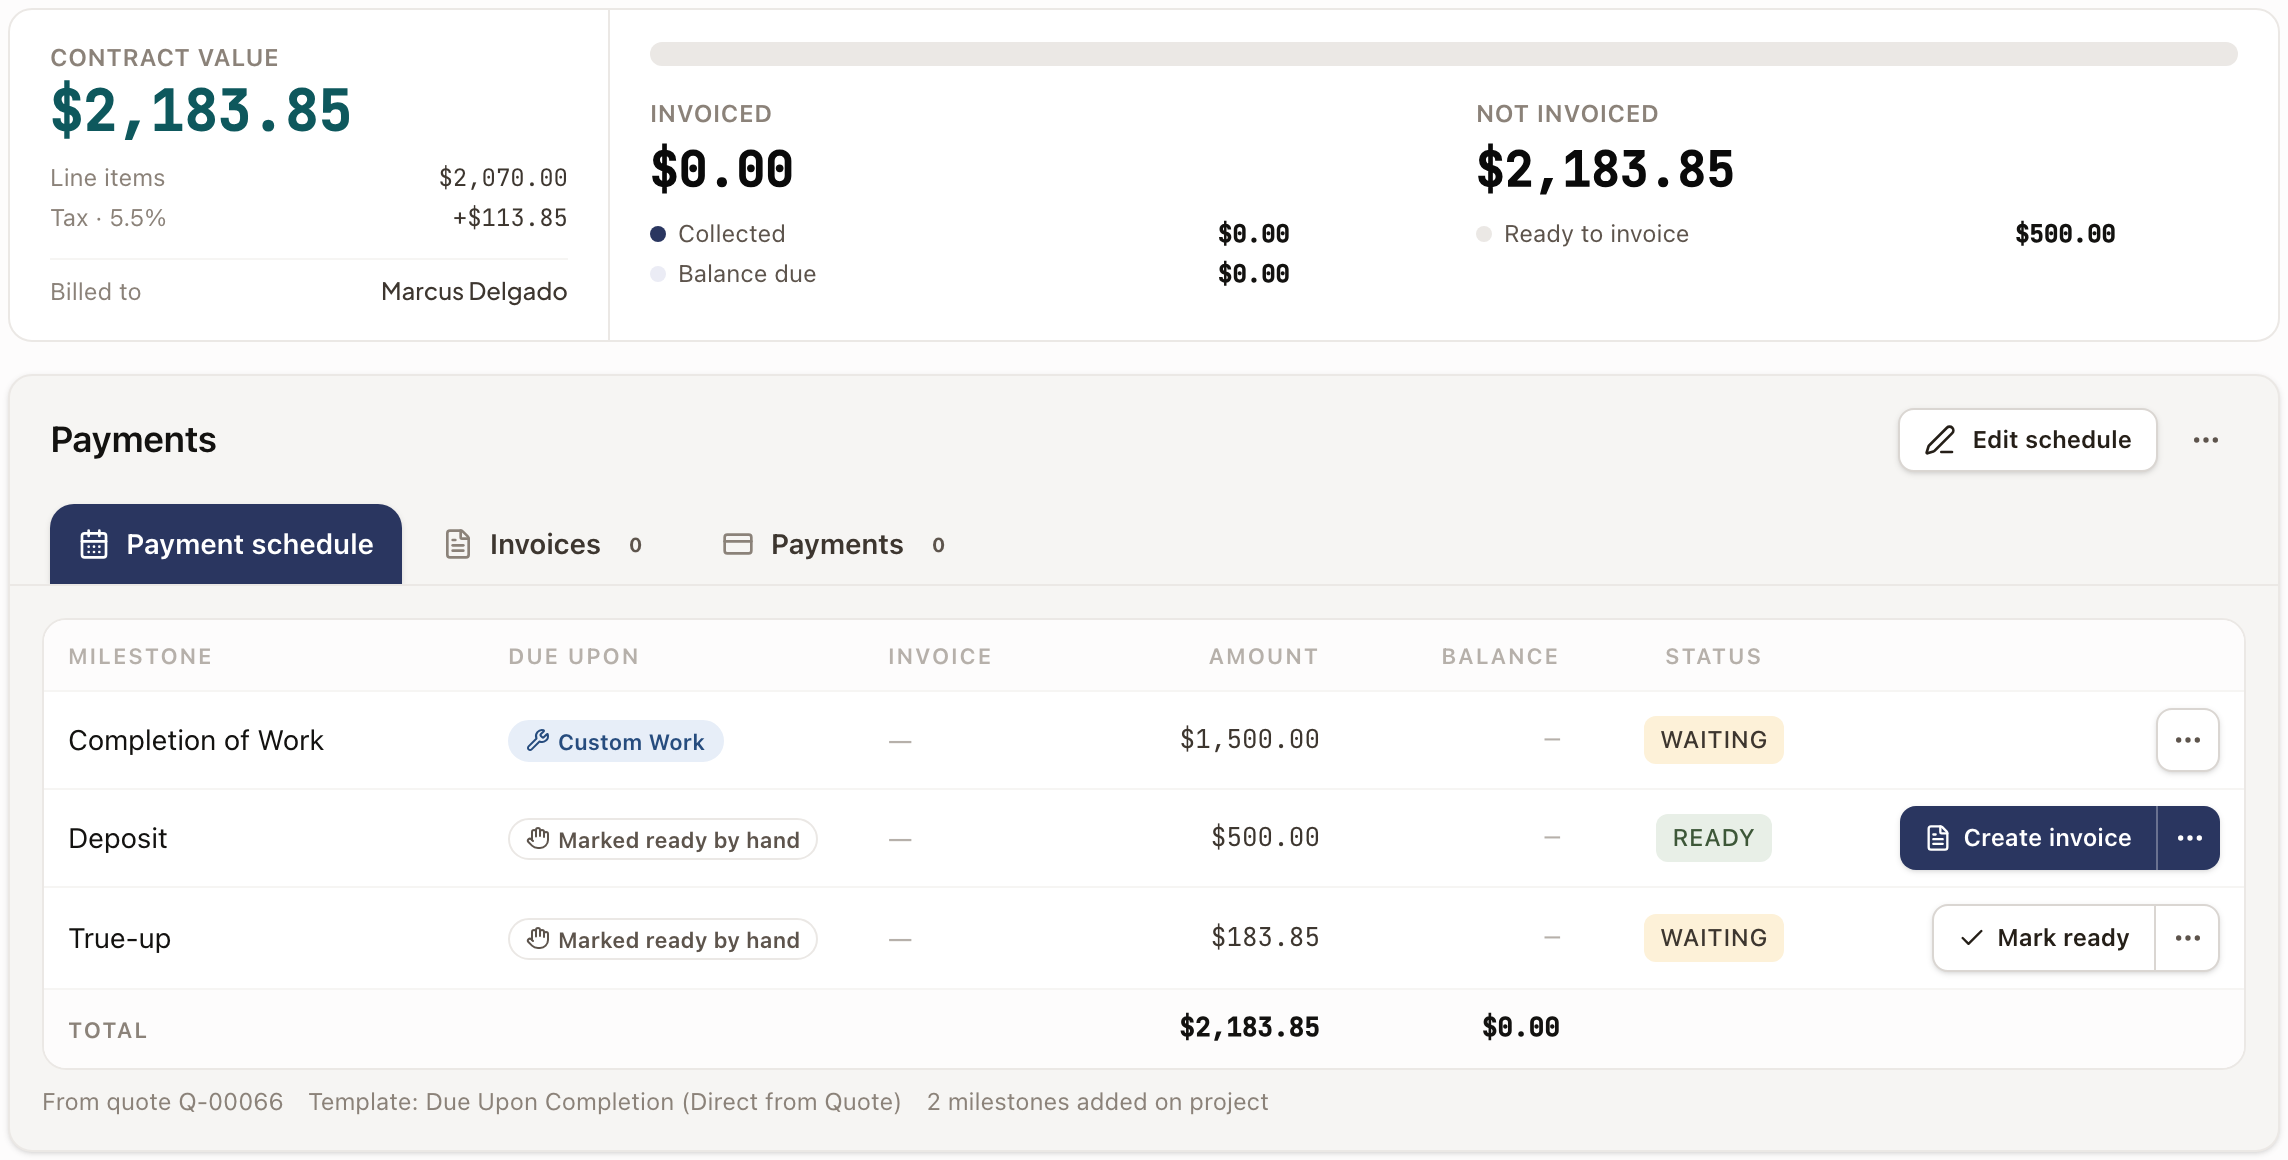
A project's payment schedule lives on the Billing tab, on the Payment schedule tab of the Payments card. The Billing tab explains the whole page.
- On the Billing tab, click ⋯ next to Edit schedule, then Add milestone.
- Set its Name and Amount: Fixed amount ($), % of contract value, or Remainder.
- Under Ready to invoice when..., choose Work completes (link a stage or a work order) or Manually.
- Click Save.
On an hourly project, the payment that bills hours takes its amount from the recorded hours. You can't switch it to a set amount.
The schedule always adds up to the contract value. If a change leaves a difference, a dialog asks Where should $X go? You can add it to the last unbilled milestone, add a True-up milestone at the end, spread it across unbilled milestones, or make a milestone absorb differences automatically. Cancel change undoes the edit. Milestones that are already invoiced or paid never change.
Each milestone shows a status: Waiting, Ready, Draft, Not sent, Sent, Partly paid, Overdue, Paid, or Waived. Not sent means the invoice exists but hasn't been sent. Its last cell holds the one next action, such as Create invoice or Mark ready; the ⋯ menu next to it holds the rest. A Payment step on the Work tab stands for the payments due at one event, or for one payment you pick. See Work a Payment step.
An approved change order can add to the unbilled payments, spread across them, or add a True-up milestone. It never touches invoiced or paid ones. While a draft or sent change order would change a payment, the row shows "CO-003 would change this payment", and a payment it would add shows as a dashed row marked "Not scheduled yet". The Pricing card lists change orders with their Lands on payment. See Change orders.
Work a Payment step
A Payment step stands for money you're waiting on. It waits for every payment due at one event, such as Install complete, or for one payment you pick. Those payments show once, on the step, and not again as their own rows on the Work tab. Payments that no Payment step waits for still show as Payment rows. When every payment the step waits for is paid, the step finishes by itself. If every one is waived, the step is skipped.
Click the step on the Work tab to open the payment drawer. In My Work, the same details show in the middle of the screen, and Full page opens the project's Billing tab with the payment highlighted.
What the drawer shows
- The top. The payment's status, such as Waiting, Ready, Draft, Not sent, Sent, Overdue, or Paid. Under it are the Customer with email and phone, the Amount with its balance, the Invoice with when it was sent and viewed, and Due with how many days are left or overdue. When the step covers more than one payment, the top shows the first one that isn't paid.
- Payment schedule. The Billing tab's table, read-only. A line above it shows what the step is Tied to and what it's Due upon. The payments the step waits for are highlighted, and the payments after them are grayed.
- The invoice. When the payment has an invoice, a card shows its number and status, its Issued, Due, Sent, and Viewed dates, its lines, Total, Paid, and Balance due, and a History of sends, views, reminders, and payments.
- Activity. Add a note, for example after you call the customer.
What you can do
The main button at the bottom is the payment's next action, the same one the Billing tab shows, such as Mark ready, Create invoice, Send invoice, or Record payment. It opens the same drawer or dialog as on the Billing tab. The payment drawer stays open and updates. When no unpaid payment is tied to the step, the main button is Mark received. Click it when the money arrives.
When the payment has an invoice, its card has its own buttons:
- Send invoice, until the invoice is sent.
- Send reminder, once it's sent and money is still owed.
- Record payment, while money is owed.
- Open invoice, to open the invoice itself.
Open in billing closes the drawer and opens the project's Billing tab with the payment highlighted.
Click ⋯ for more. It lists the payment's other Billing actions, such as Edit milestone, Download PDF, Copy pay link, Waive, and Void invoice, and Project step details. While the step is open, it can also have:
- Wait for one payment only. The step then waits for the payment you pick, and not for every payment due at the event. Choose a payment from the list, then click Wait for this payment. This shows only for a step that waits for an event.
- Mark done without payment. Finishes the step while payments are still unpaid. It asks you to confirm first.
These buttons follow the same permissions as the Billing tab. See The Billing tab.
Common problems
- A plan set's status says "Sent to client" but the customer says they never got it. Changing the status from the menu doesn't send the email; use Send to client.
- A permit or application is stuck and you can't tell why. Check whether it's waiting on a dependency, not just on the jurisdiction. See Edit project structure and dependencies.
Edit planset sheets and place equipment
Place equipment on the site plan, change a value on a sheet, edit the electrical diagram, and regenerate the sheets that are out of date.
Price and bill work by the hour
Quote labor by the hour, record each technician's hours at completion, and invoice from the hours worked.