
Create, check, and review a planset
Set up a permit planset from a project's quote design, generate the drawing sheets, acknowledge warnings with a reason, and move the planset through review.
A planset is the permit drawing package for a solar job. Every company can add plansets to projects, find them in the Plansets list, and move them through review. Planset Studio builds the drawing package: cover sheet, site plan, roof plan, string layout, electrical diagram, calculations, notes, signage, and placards. It takes the roof and equipment from the project's solar quote, runs code checks, and produces a PDF. Planset Studio is in beta. Contact solarOS support to turn it on for your company.
Before you start
- The project has an accepted solar quote with a drawn roof and equipment. See Build a solar quote.
- You can edit projects. Owner, Admin, Sales Manager, Operations Manager, and Operations User can.
- The solar equipment you use is active in the catalog, with complete product specifications. See Set up solar quoting.
Add a planset to a project
- Open the project and go to the Work tab.
- Click Add work, then Planset.
- Enter a Name, pick the Stage, and click Add Item.
The planset appears in the work list. Click it to open its drawer, which shows its status, documents, revisions, and notes. Click Full detail for the full page, which has Overview, Revisions, and Activity tabs. A planset with an open revision opens on Revisions. Each planset has a number such as PLAN-00005, shown beside the title.
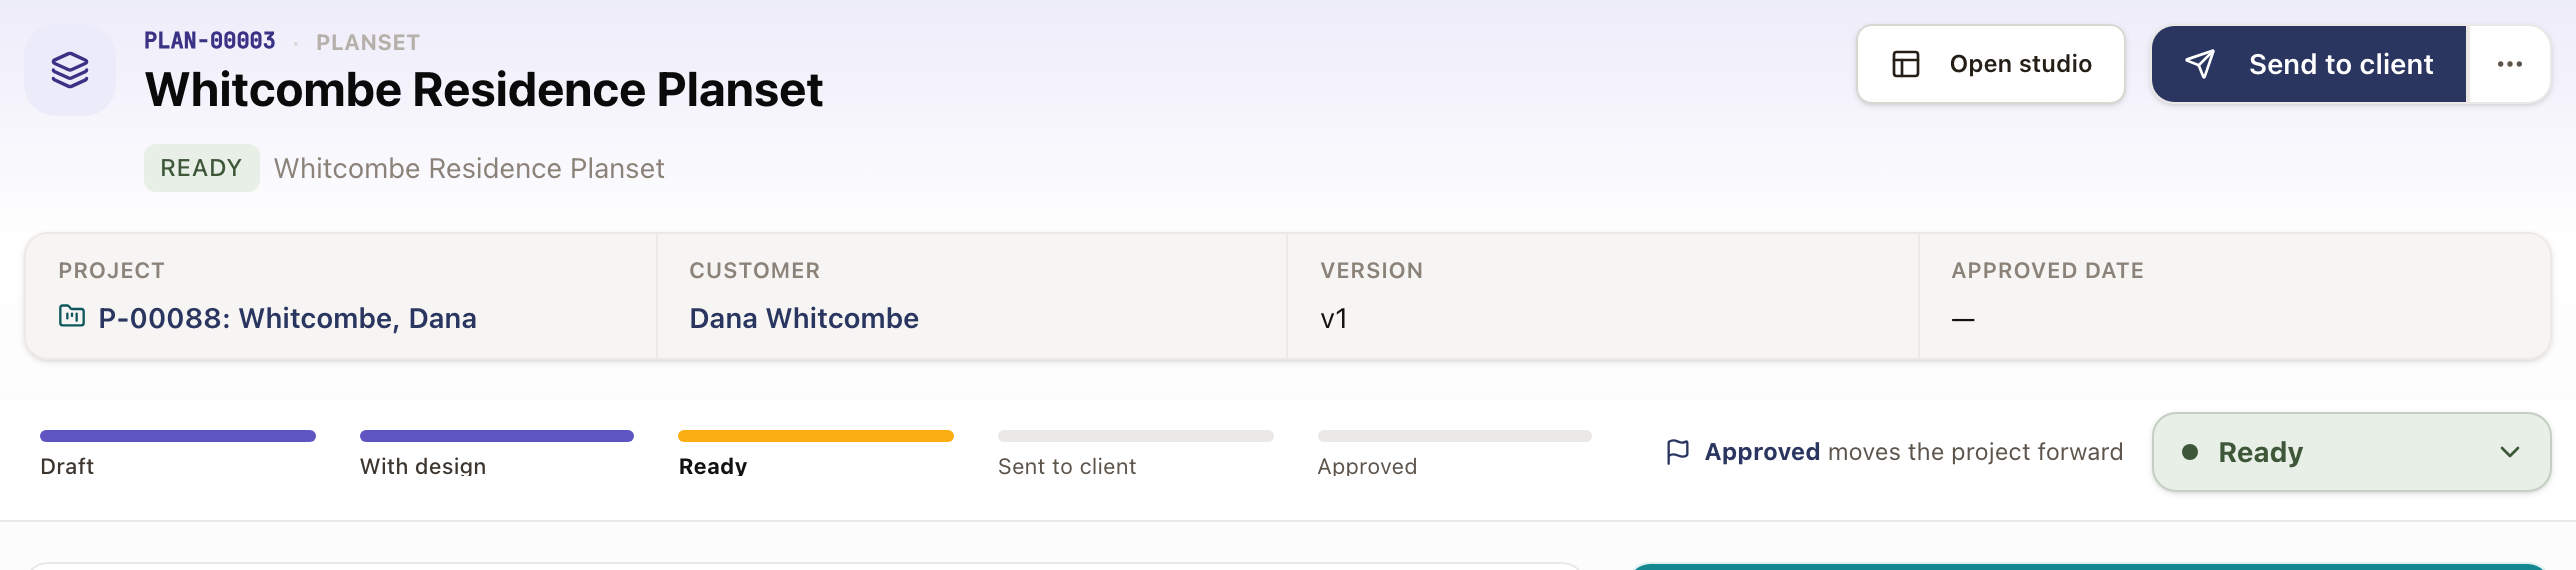
The page and the drawer also show the project's Project snapshot: the project's answers to the fields your company shows on plansets. See Read the project snapshot.
With Planset Studio on, you can also start a planset without a project: go to Operations → Projects → Plansets and click New planset. Enter the Site address, click Find the roof, check the satellite image, then click Yes, this is the roof. Enter the Property owner or pick a Customer, then click Create planset.
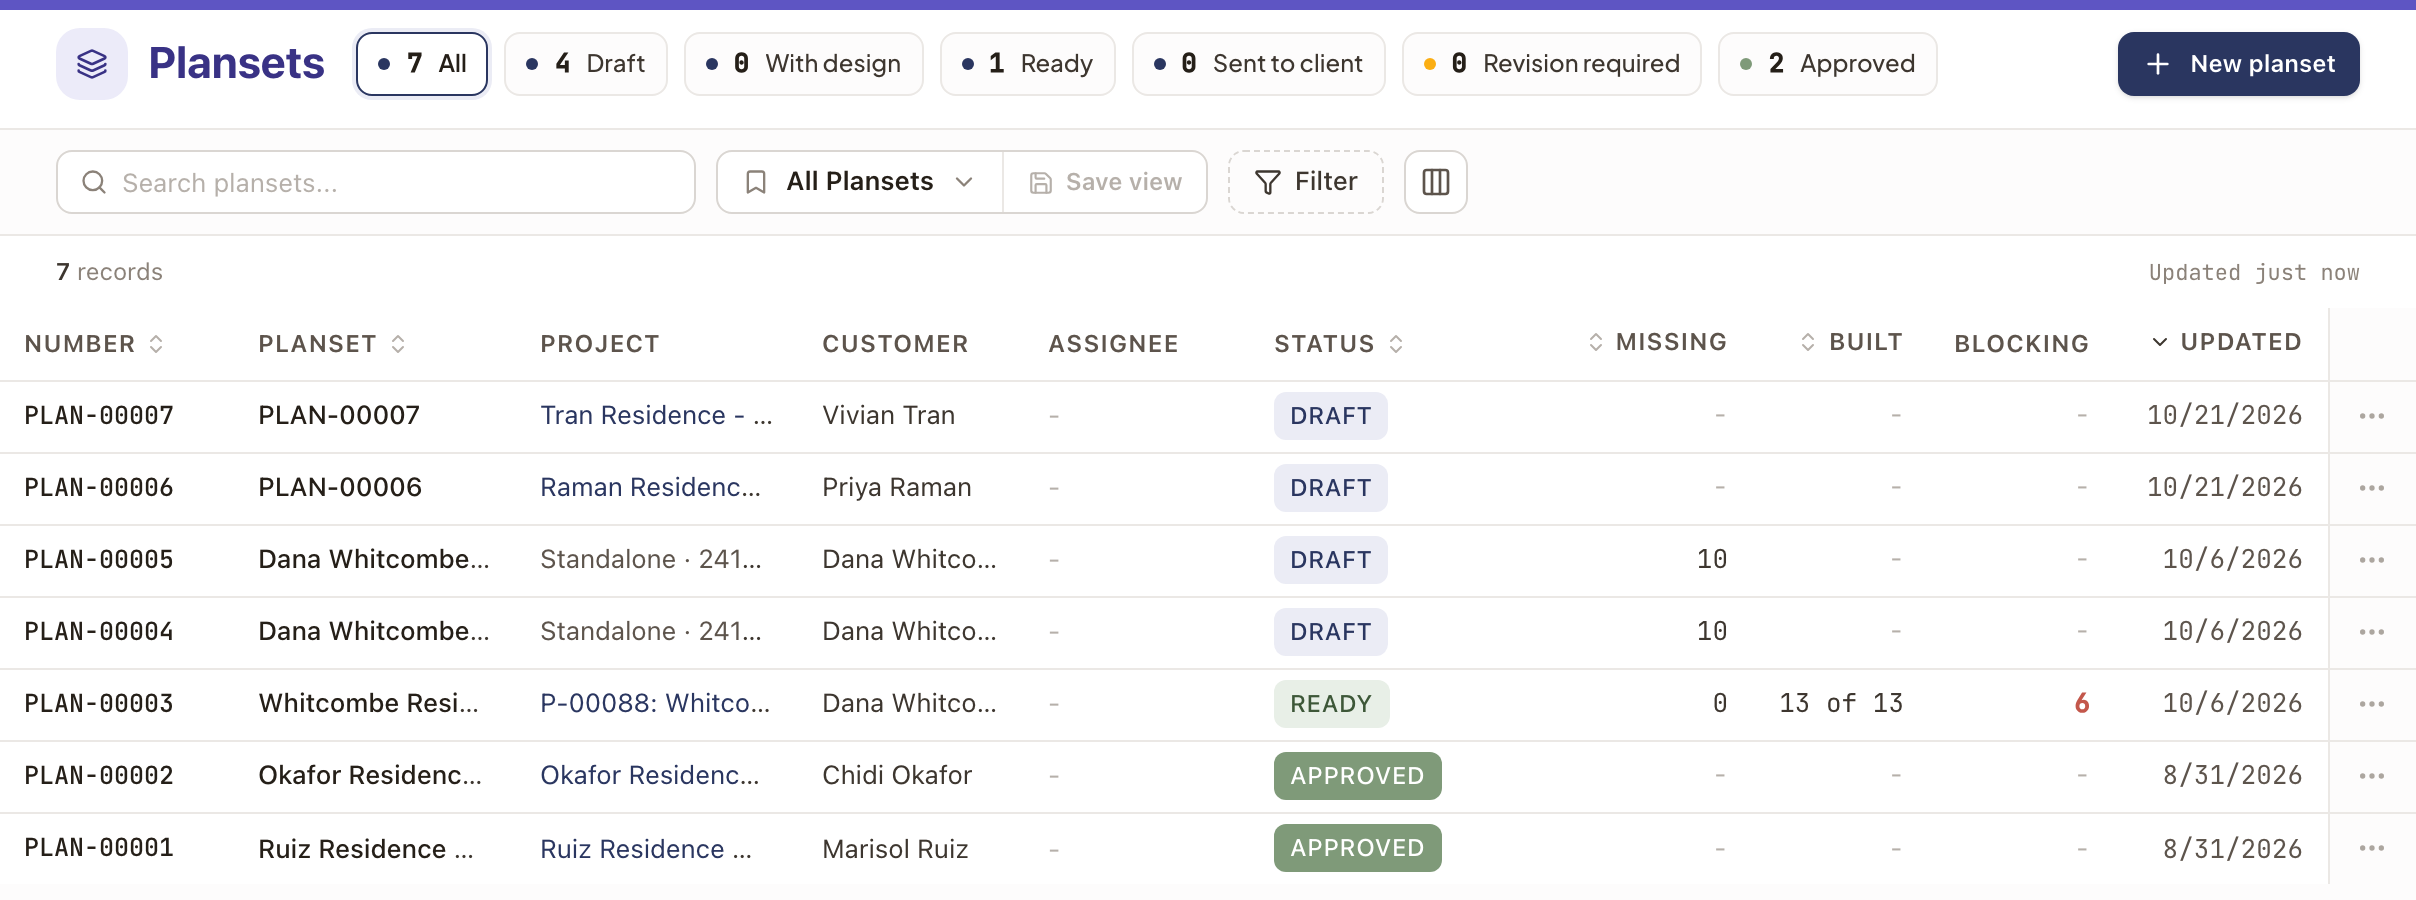
The Plansets list shows each planset's Number, Planset, Project, Customer, Assignee, Status, and Updated. Assignee is the person on the planset's step in the project plan. A planset with no project shows Standalone and its address under Project. Search finds a planset by its number, name, project, or customer. Chips beside the page title narrow the list to one status. Click Filter to narrow by Status, which takes several choices at once, Assignee, Project owner, Territory (if your company has territories), or the Approved, Updated, or Created date. Click a column heading to sort. Use Columns to show Version or Created. With Planset Studio on, the list also shows Missing, Built, and Blocking, which the Columns menu names Missing sheets, Sheets built, and Blocking checks, and Filter adds Drawing state.
Open the studio and set the inputsBeta
- On the planset page, click Open studio.
- Click Set up planset. After the first save, the same button reads Inputs or Edit inputs. The Planset inputs drawer opens. Its sections follow the order of the job, and all of them are open.
- Under Site and Jurisdiction, check the Site and Project. Click Permitting authority and type part of the name, for example City of Roseville, then pick it from the list. If it isn't listed, choose the Use line with what you typed. Leave Code cycle on Automatic, or pick the cycle the authority enforces. Add the Assessor parcel number (APN) and Owner phone if you have them. On a project, the APN starts from the property when one is on file, and saving the inputs saves it to the property for the next planset.
- Under Design and equipment, Design source says where the roof and arrays come from. This quote shows the project's quote with its number and status. Click Arrays to see them in a table. You can instead choose Aurora export, Draw the roof here, or Copy from a previous planset. The roof and arrays are a copy, so changing the planset doesn't change the quote. Click Change quote to use a different quote. If the quote has changed since the last save, it reads Quote changed since last save. Click Update from quote to bring in its design and hardware.
- Under Hardware, check the Modules, Inverter, Battery, and Expansion units from the quote. To use other products on this planset, click Change hardware. Click a list and type part of a name to find a product, enter the Storage capacity, Battery units, and Expansion units, then click Done. A changed row reads Changed. To put them back, click the ⋯ beside Change hardware, then Use the quote’s hardware. A planset with no quote shows these fields directly. If solarOS can't tell the kind of system from the sale, or there's no quote, pick the System type.
- Under Not on the quote (Other equipment on a planset with no quote), enter the PCS export limit if there is one, and pick the Rapid shutdown device, Combiner, and Gateway if the job has them. If the roof is drawn in Studio (Design source is Draw the roof here) and you later pick a Module of a different size, saving the inputs re-lays each array for the new panel size. Each array keeps its rows and columns.
- If a note starts Missing datasheet, click Upload PDF under each product it names. The PDF stays on the product for later plansets. If you skip it, no datasheet sheet is attached. Manufacturer datasheets lists the products that already have a PDF, so you can replace it.
- Under Electrical devices, click Add a device and pick E-stop, Disconnect, Production meter, Remote meter, Meter collar, or Outlet. Add as many as the job has. Enter the amps and volts each device asks for, and tick Fused on a disconnect. If your catalog has a matching Disconnect, Meter, Part, or Other product, pick it in the device's part list. The list shows only when your catalog has a matching product. The part's model then prints on the plan notes, the equipment schedule, and the cover's bill of materials, and its datasheet is added to the package if it has one. Leave No part to print the device by kind and rating. Click the X to remove a device. It comes off the site plan too.
- Under Existing equipment, answer Is there existing solar or battery? A new planset on a property that already has a system on file opens on Yes, with its arrays, inverters, and batteries listed as rows. If the answer is No and the property has a system on file, the drawer says so. Choose Yes to list it. Each row has a make and a model, plus panels and watts for an array, or units and Micro for an inverter. Click Add existing equipment to add a row. Removing a row removes it from this planset only. Enter the Existing PV breaker, then choose Remains untouched, Battery only, or Rewire arrays for How does the new work treat it?
- To write your rows to the home's system on the property, click Save to the property. The button shows when the planset is on a project with a property, and you need Edit Customers. Saving the planset never changes the property.
- Under Service and tie-in, enter the Main panel bus, Main breaker, and PV / ESS breaker amps, and choose whether the Panel is Existing or New (upgrade in scope). A new planset on a project starts with the property's saved main panel bus and main breaker. When the Panel is Existing, saving the inputs saves both to the property. Tick Split-bus panel for a split-bus panel. The main breaker field then reads Lower bus feed breaker. Choose One main breaker or Two main breakers (400 A service). Click Add a sub panel for each sub panel in the chain, starting at the main panel, and enter its bus rating and feeder breaker. Remove takes off the last one.
- Pick the Tie-in method. The method that fits the job best comes first, marked Suggested. Methods that don't fit come last, greyed, with the reason under them. If you pick one anyway, Use this tie-in anyway? shows the reason. Click Use it anyway or Keep the current tie-in. Choosing Line-side tap or Feeder tap adds a Disconnect with Fused ticked to Electrical devices, rated at the PV / ESS breaker. It stays if you change the tie-in later. Remove it from the list if you don't need it.
- Under Roofs and mounting, each roof has its own card. Pick the Roof type, the Attachment, and the Framing: 2×4 at 24″ on center, 2×6 at 24″ on center, 2×8 at 24″ on center, or Custom. Tilt angle shows when the attachment tilts. A flat roof also asks Ballasted mounting: Unverified, Yes, or No. One answer covers the planset. The first roof starts with the roof type from the quote and an attachment that fits it. Click Add another roof for a second roof type. Enter Stories and Total roof area. The pitch comes from the roof planes you draw.
- Under Structural review, answer the roof and attachment questions, and attach the roof audit and any engineering documents.
- Under Sheets and title block, pick the Sheet set and Sheet size. Designed by starts as the person who set up the planset. Change it, and fill in Checked by and Date. Tick Designer signature on every sheet to print the Designed by name in script lettering, on a DESIGNED BY line, in each sheet's title block. Tick Battery spacing dimension on the elevation to show it.
- Click Save inputs, or Save and regenerate to save and build at once.
The first time you set up a planset on a project, the kind of system, tie-in, Module, Inverter, Battery, battery units, and Storage capacity start from the system the project was sold with, as it stood when the quote became the project. Later changes to the quote don't change them until you click Update from quote. A tie-in someone chose stays unless the kind of system changes. A product the sale didn't name stays empty, and the banner asks you to choose it. See Read the System tab. A project with no saved sale starts from the quote's current equipment.
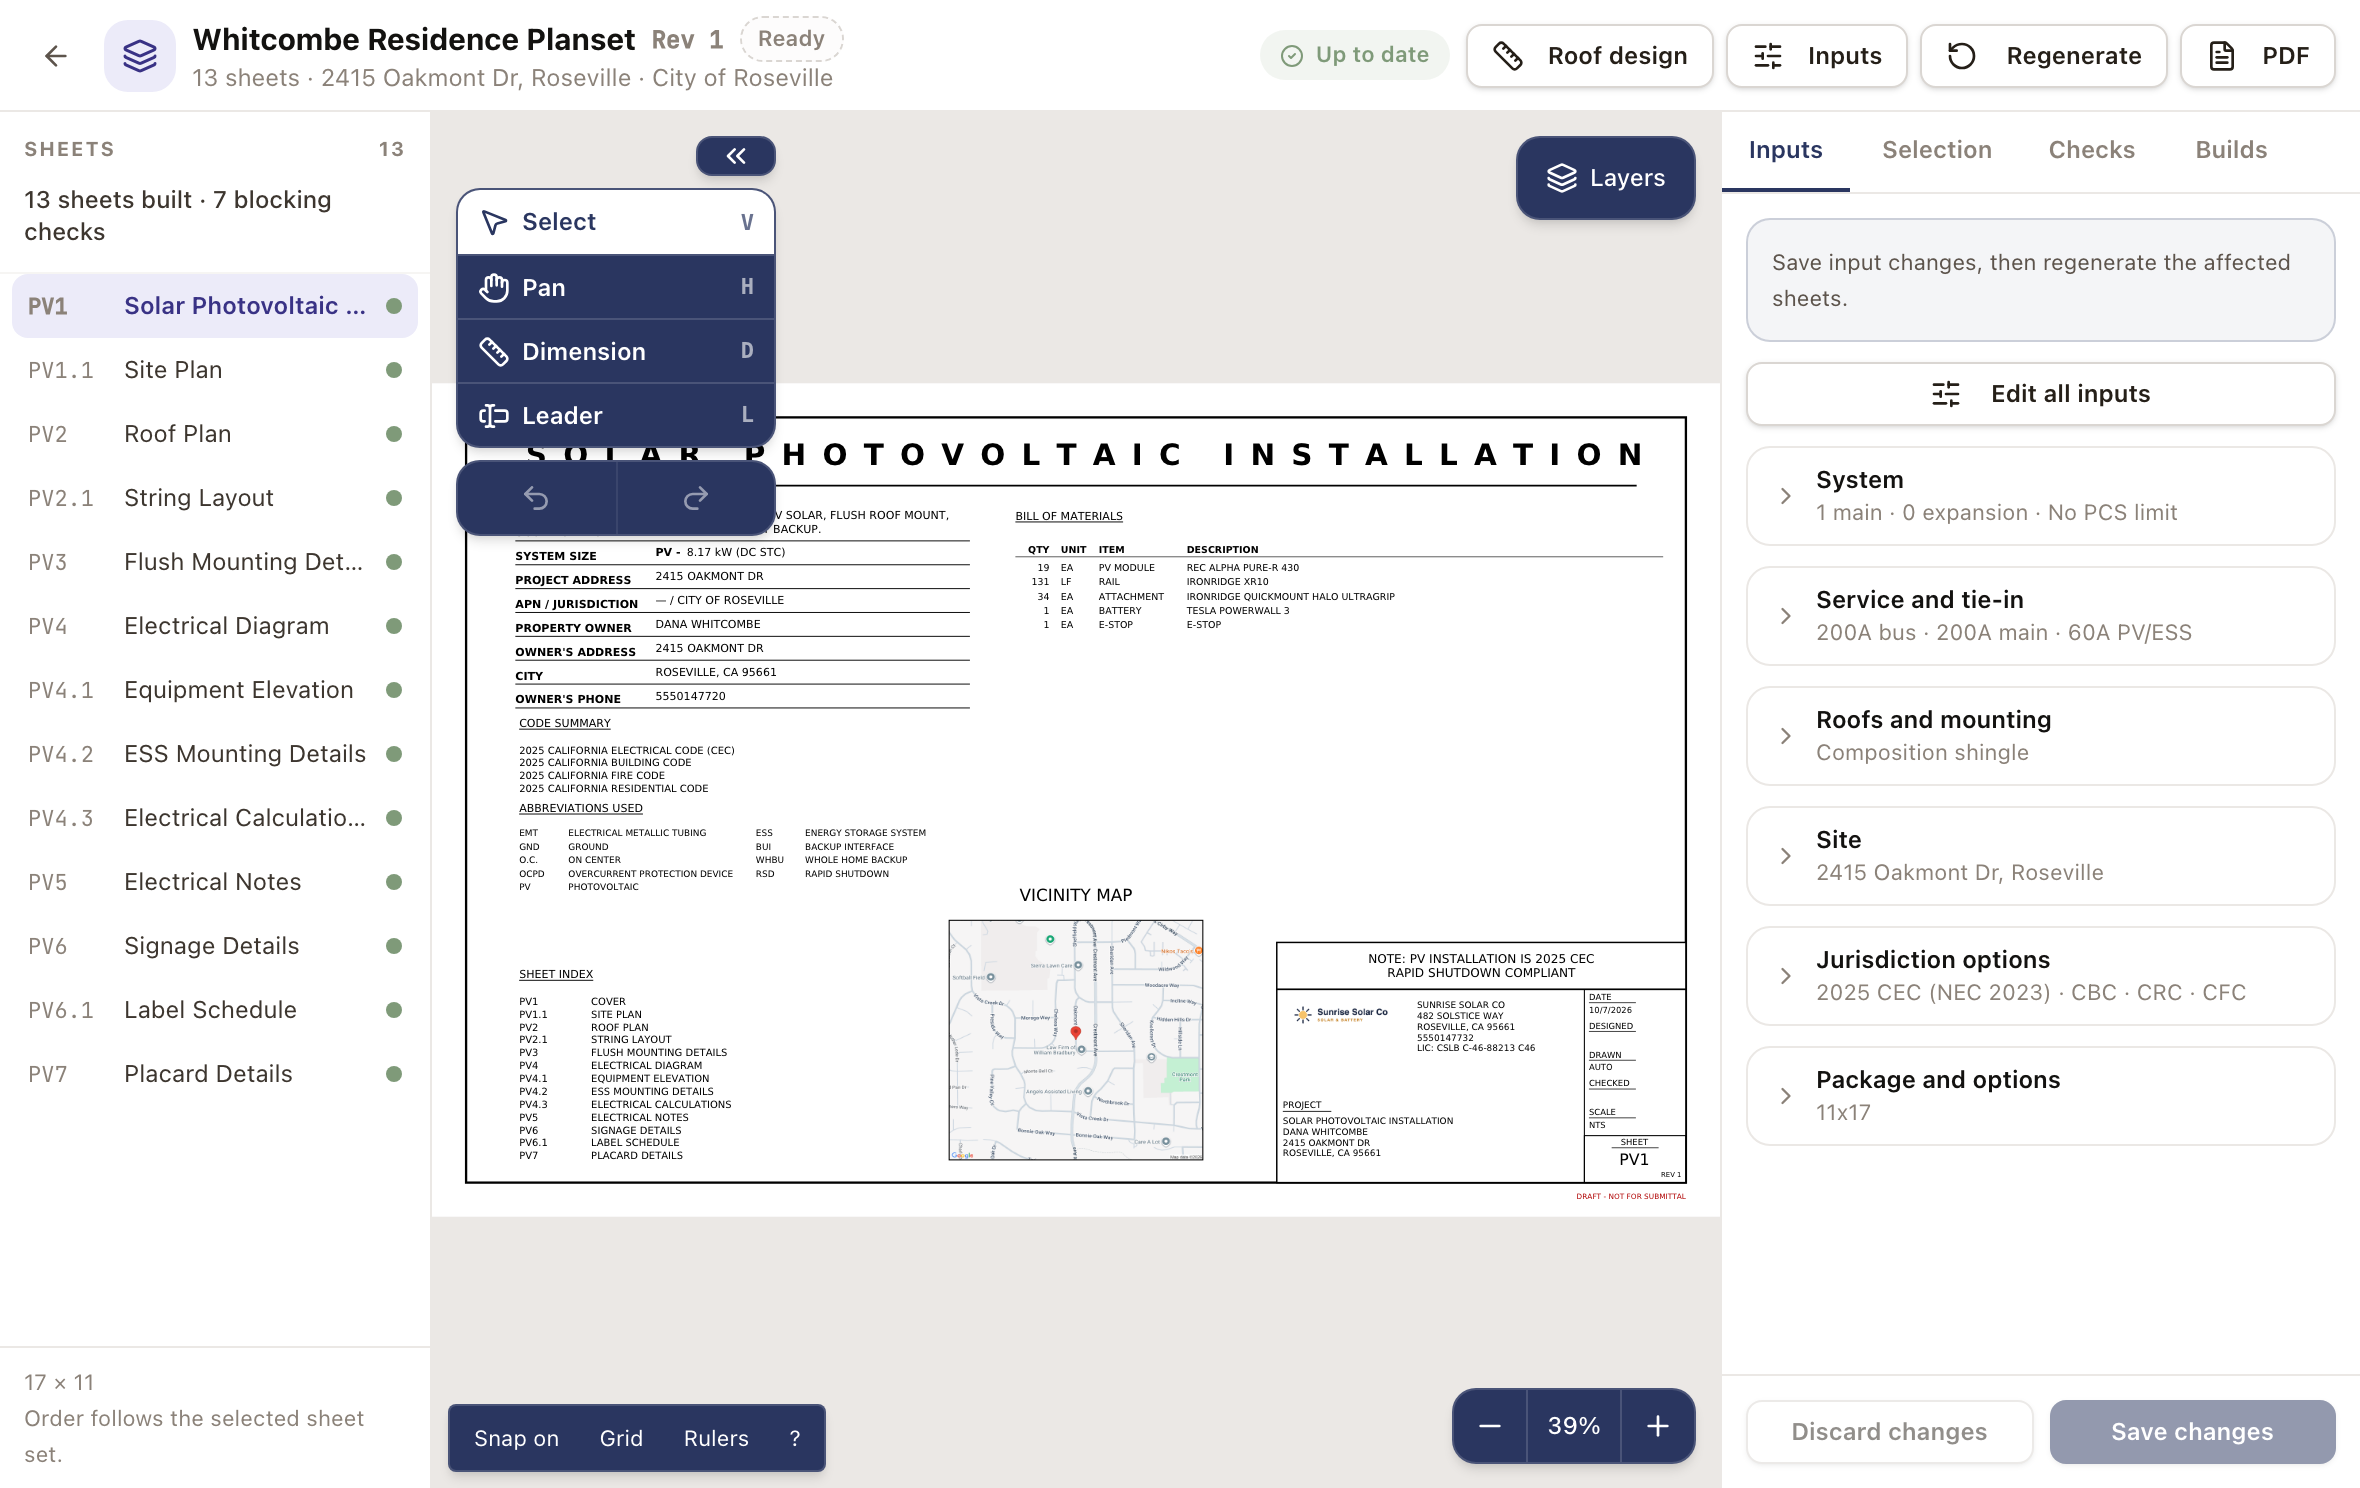
The Inputs tab on the right of the studio holds the main inputs in a short form: System, Service and tie-in, Roofs and mounting, Site, Jurisdiction options, and Package and options. Click Edit all inputs for the full drawer. Click Save changes when you finish, then regenerate the sheets that change.
If something required is missing, a banner at the top reads, for example, 1 of 12 sheets ready to generate and lists what to fix, such as Choose the roof’s attachment in Inputs. Click an item to jump to its field. Settings for tie-in methods, codes, and jurisdictions are under Settings → Planset studio.
To draw or edit the roof, click Roof design in the studio header. If the planset uses the roof from an accepted quote, this copies the roof into the planset and opens it. On a quote that isn't accepted yet, or an Aurora export, Take ownership of this roof? asks first: click Take ownership. Click Done when you finish.
If the planset has more than one roof, select a plane and pick its Roof in the plane's panel, for example Roof 1 · Composition shingle. The plane's panels, rails, and attachments then go on that roof's mounting sheet, with that roof's framing. A plane you leave unassigned goes on the roof that fits its slope: a nearly flat plane goes on the first flat roof, and any other plane on the first other roof.
Check the drawingBeta
When the build finishes, the studio shows the sheets down the left, each with a green dot, and the title shows Rev 1. Click a sheet to view it. A green dot means the sheet matches the inputs. An amber dot means it is out of date: the sheet shows the last build until you click Regenerate. While a build runs, the studio shows Building Rev 2 and the current step, and you can leave the page. Preview PDF opens the current build, which carries a draft mark. A detail the sheets don't have yet shows in red as FIELD VERIFY in the studio. It never prints on a PDF. Fill it in under Inputs and regenerate to print it. The Builds tab lists each build under Earlier versions, with Open PDF. The PDF is also saved under the planset's Documents.
Open the Checks tab. The top shows how many checks fail, warn, pass, and are N/A.
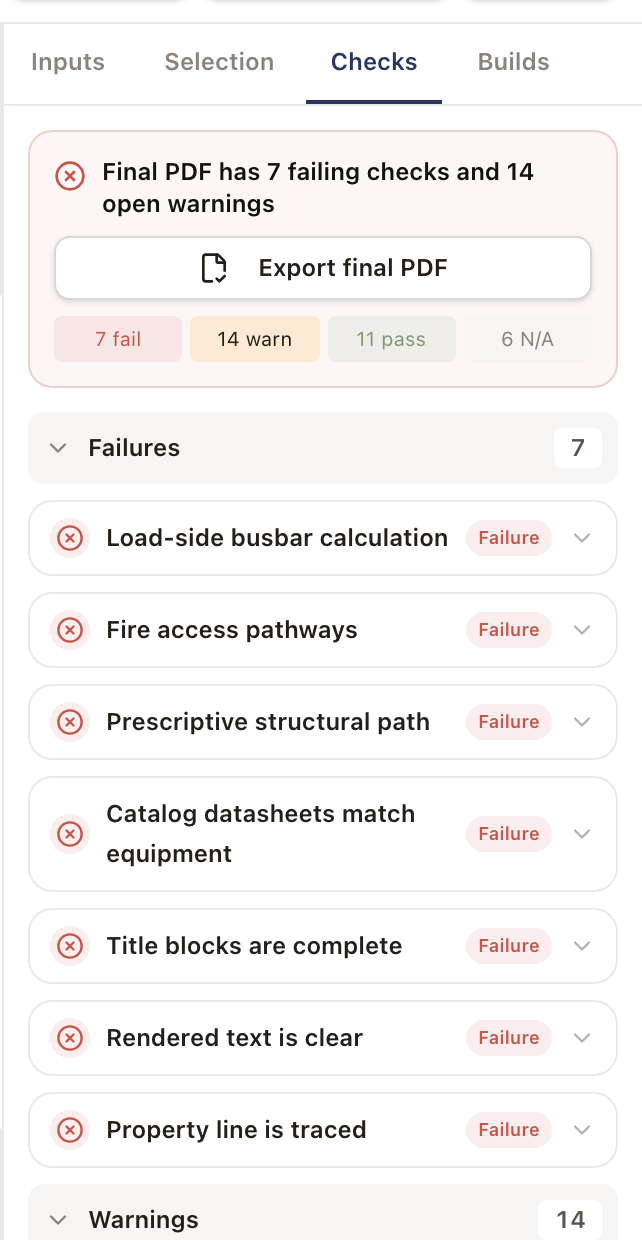
The banner at the top counts what's open, for example Final PDF has 3 failing checks and 2 open warnings. It reads Final PDF can be exported once every failure is clear and every warning has a reason. Click Failures, Warnings, Passed, or Not applicable to open or close that group.
- Failures are listed first. Open a failure to see the code reference, the sheets it affects, and the next step. Fix it in the inputs and click Regenerate.
- Warnings stay open until they have a reason. Open the warning, type why it is acceptable in the Why is this acceptable? box, and click Acknowledge with reason. The warning then shows who acknowledged it and why.
- If the authority isn't matched, a note links to Review site inputs and Manage jurisdiction profiles.
To finish, click Export final PDF in the banner. Failing checks and open warnings don't stop the export, so read the banner first. If the sheets are missing details, Export without these details? lists them by sheet. Click Export anyway, or Cancel to fill them in and regenerate. The export prints the sheets again without the draft mark and saves the PDF under the planset's Documents. The button then reads Open final PDF.
The button stays off when the banner reads Final PDF needs a new build: there's no build yet, one is running, or the design has changed since the last one. If the banner reads These checks are out of date, click Regenerate to run the current checks. Only the current build can be exported, so export again after you regenerate.
To change what a sheet shows, see Edit planset sheets and place equipment.
Move it through review
The status strip on the planset page runs Draft, With design, Ready, Sent to client, and Approved. The main button in the page header moves the planset to the next status.
- Click Start design. The status changes to With design.
- When the plans are finished, click Plans ready. The status changes to Ready.
- Click Send to client. The Send Planset dialog opens. Check the recipient and the Attachments you want to send. In Expected, type how many days you expect the client to take, or leave it blank to use your company's usual time. Then click Send Email. The status changes to Sent to client. To move it without emailing the customer, click Mark as sent without emailing.
- If changes are needed, open Revisions and click Request changes. In What needs to change?, describe the changes. Set Needed by, and pick Who revises the plans?, which starts with the person on the planset's step in the project plan. To include the redlines or a comments letter, click Attach files under Related files. They are saved to the planset's Documents, and the person on the Revise plans step sees them with the round. Related files shows only if you can upload files. Under Revisions, click Add revision for each change you want as a task, then click Request changes. The planset moves to Revision required. A line under the status strip shows the Round, the date Requested, and who is Revising. The project plan gets a Revise plans step under the planset's step, assigned to that person and due on the Needed by date. Steps after it that haven't started wait for it. When the revisions are done, click the button the header shows: Back to Ready, Send revised plans to the client, or Back to Approved. The button depends on where the revision started.
- When the customer accepts it, click Mark approved, then confirm Approve Planset?. The studio then opens read only: you can open the sheets, preview them, and export the final PDF, but not change them. To change an approved planset, click Request changes in the studio header, which goes to the planset page, and start a revision there.
To drop a revision you don't need, click Cancel revision in the planset page's ⋯ menu or the open revision's menu under Revisions, then confirm Cancel this revision?. The Revise plans step is skipped, its open revision tasks are cancelled, and the planset goes back to the status where the revision started. You need to be able to edit projects.
If your project template finishes the planset's step at Sent to client, Send to client is the main button at With design, and Plans ready moves to the ⋯ menu.
You can also change the status from the menu beside the status strip. Moving to Sent to client this way does not email the customer. Approving may make the steps that wait on the planset ready to start.
Once your company has set an Expected time for the planset's status, a clock sits beside the status strip, for example With design 6 days · 10 expected. Click it to reset the clock or change the Expected time. Clicking a status on the strip asks you to confirm the move and has an Expected box. See Read and reset the clock on waiting work.
A failed permit inspection can also send the planset to Revision required. The planset then lists the inspection's corrections under Inspection corrections, each with a link to the inspection. Before Back to Ready, Send revised plans to the client, or Back to Approved closes that revision, a box asks Does the permit need resubmitting? Click No to close the revision. Click Yes to add a Resubmit permit step for the person on the permit step. The re-inspection waits on it. See Work permit inspections on a project.
Check it worked
- The status strip shows the status you chose.
- The project's Work tab shows the planset row with its new status.
Common problems
- Generate stays disabled. The banner lists missing inputs. Fix each one, then save.
- A battery or inverter says to choose equipment with complete catalog specifications. Pick a product whose specifications are filled in, or ask an Owner or Admin to complete it in the catalog.
- Export final PDF is off. The banner reads Final PDF needs a new build and says why. Click Regenerate, or wait for the current build to finish.
- Export without these details? lists something you want on the plans. Click Cancel, fill it in under Inputs, click Regenerate, then export again.
- A tie-in method is greyed out. The reason shows under it. You can still choose it: click Use it anyway.
- The studio reads This quote has no roof drawing. Click Roof design, click Take ownership if it asks, and draw the roof and panels.
Write and approve a change order
Record a change to the price, payments, scope, or schedule of a project, send it to the customer, and see what it changes once it's approved.
Edit planset sheets and place equipment
Place equipment on the site plan, change a value on a sheet, edit the electrical diagram, and regenerate the sheets that are out of date.