
Build a solar quoteBeta
Size a solar system from the customer's usage, add storage, price it, choose how the customer pays, and send the quote.
A solar quote has its own builder. You enter the customer's usage and utility rate, draw the roof and place panels, add storage and pricing, and the builder shows production, savings, and payback as you go. Contact solarOS support to turn it on for your company.
Before you start
- Your company has finished Set up solar quoting: the Solar Installation template, active equipment, and a price per watt or a default price list.
- The customer exists, with a property address. See Add a customer.
Start the quote
- Go to Sales → Quotes and click New Quote.
- Pick the Customer, then the Property. Pick or create the Opportunity.
- For Quote Template, choose Solar Installation. The line under it reads Solar · Solar builder.
- Enter a Quote Name. Valid Until defaults to 30 days from today.
- Click Create Quote.
The builder opens. The bar across the top shows System, Storage (when the quote has a battery), Usage, Production, Offset, Price, $/W, Savings, and Payback, plus Payment once the plan has a monthly payment. With a battery, $/W reads $/W solar and counts the solar only. It fills in as you complete the tabs. The tabs run down the left side, each with a dot. A dot is green only when that section is complete for the homeowner's quote.
Property and Job Details
The builder opens on Property. The left side shows Site: the picture of the roof drawing once a design is drawn, and the satellite map until then, with the Lat and Lng of the pin. Under a design picture, Design picture · saved gives the date. Click the pencil System button beside the heading to change the design or the pin. Next come Site Notes about the job site and Internal notes for your team. The Quote Details card is always open. It shows Valid Until and the Roof, and holds Terms & Conditions. Click Set in Job Details or Set in System to change the date or the roof.
The right side shows two cards. When the quote sends an agreement, the Agreement card says whether everything the agreement prints is filled, or lists what is still blank. Click a name to go where you fill it in. If you can send agreements, click Check with this quote to see the agreement filled in with this quote's values. The System card sums up the design, usage and savings, and price. Each part has a small pencil button named for its step: System, Storage, Usage, or Pricing. Click one to change that part. A small document icon beside a figure means the agreement prints it. Hover over the icon to see the page.
Job Details is where you answer the agreement's questions. For the agreement comes first, with the same list of blanks. Validity follows, with Valid until. Your company's other fields come next under Parameters and After the sale. If there are no other fields, Job Details says No parameters configured for this quote type.
Usage
Tell the builder how much electricity the customer uses and what they pay for it.
- Open the Usage tab.
- Under Utility and rate, pick the Utility Company, then the Rate Schedule. Bills are priced on this rate, so pick it first. If your template or company sets a default rate, this section starts as a list. Click Edit to change it.
- Check Rate increase. It is how much rates go up each year. It starts at your company's default. Change it only for this quote.
- Once the rate is set, click Done. The rate now reads as three rows, Utility, Rate, and After solar, then one line of tags: Generation, Territory, and Interconnects (a year) when the rate uses them, and Rates with the yearly rise, such as +3%/yr. Click Edit to change anything.
- Under Bill and usage, type the Monthly Bill.
- If you have usage instead, type Annual Usage or Monthly Usage, or the Annual Bill. Typing one fills in the other three.
- To use a bill or usage file, click Upload.
After you change a bill or usage figure, a line reads Calculating offset and savings…. Offset, savings, and payback then update on their own.
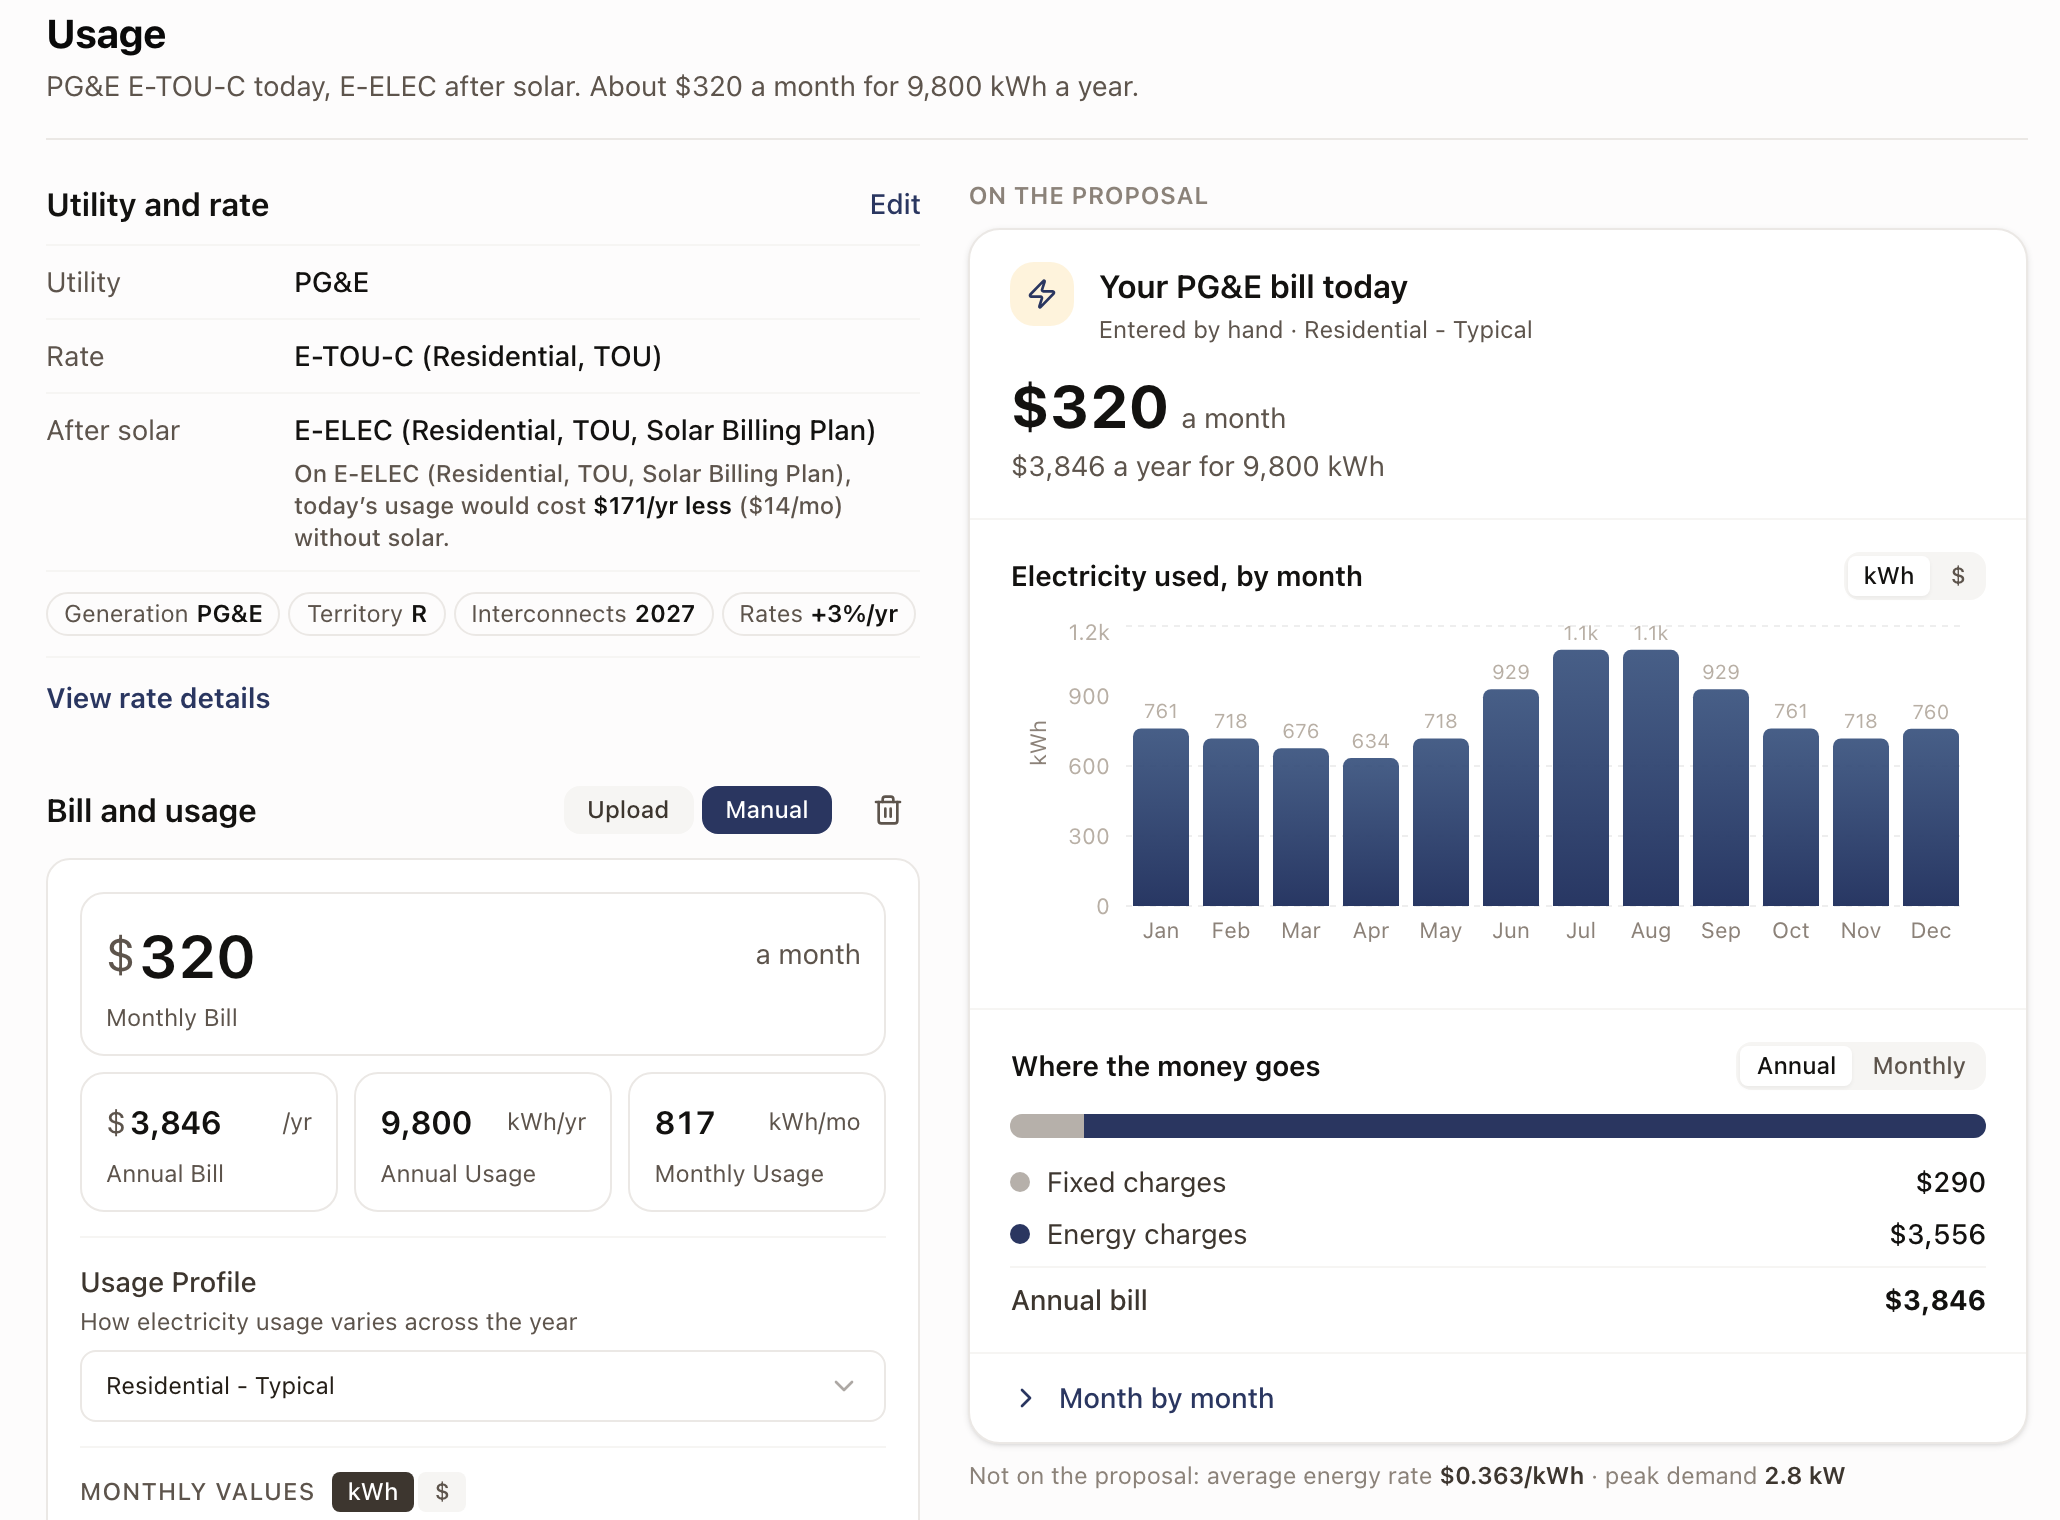
Under Manual, pick a Usage Profile to set how usage varies across the year. If you don't pick one, the template's default profile is used, or your company's if the template doesn't set one.
Monthly Values lists each month. Click $ to see the months as dollars; it is available once a rate schedule is picked. The chart on the right, Electricity used, by month, switches between kWh and $ with the grid. A month you type stays as typed and the other months stay estimates. Click Reset All to return every month to an estimate. The year's total stays the same.
When the usage isn't 12 months of the home's own bills or readings, for example when you enter one yearly figure or only some months, an agreement's Usage Basis Note prints a sentence saying how it was entered, such as that the usage was estimated from a typical usage profile.
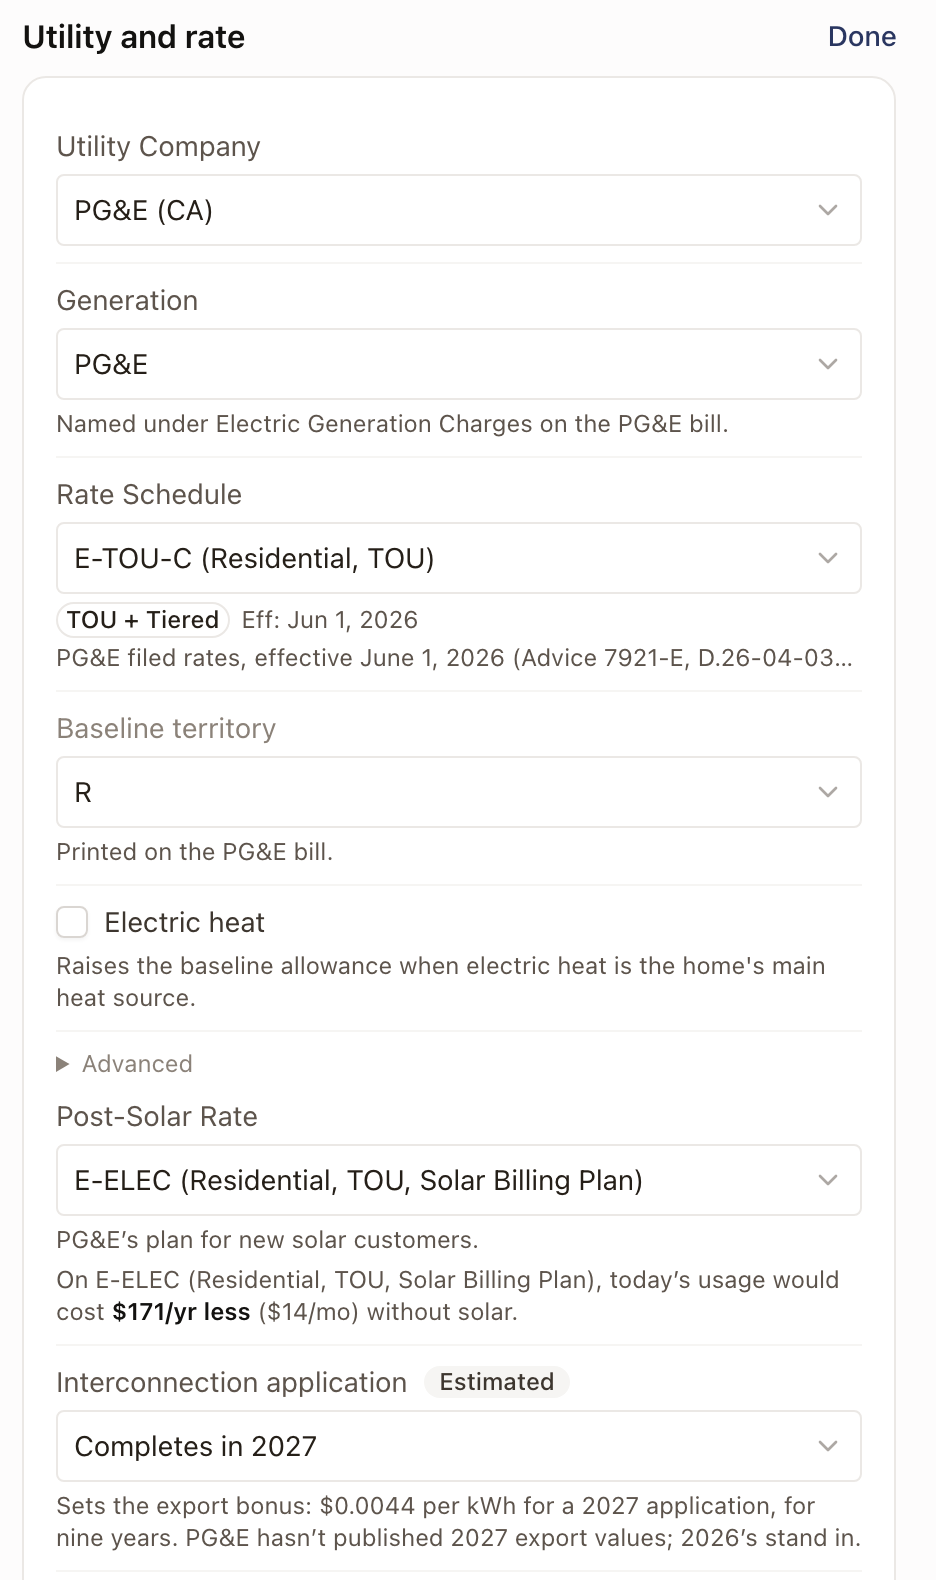
Click Edit to see more fields, depending on the rate:
- Generation. If the customer buys electricity from a community choice supplier, pick it here, then its service and the PCIA vintage. The vintage is printed on the customer's bill in small type under Total PG&E Electric Delivery Charges. It reads Assumed until you pick one.
- Post-Solar Rate. By default this is the utility's plan for new solar customers, shown with a note. Pick another schedule, or click the X to return to the default. Under After solar, a line says what today's usage would cost on that rate. It compares rates. It is not what solar saves.
- Interconnection application. Set the year the home's application completes. It sets the export bonus the quote uses. It reads Estimated until you pick a year.
- Baseline territory. For a rate with a baseline allowance, pick the territory printed on the customer's bill. It starts at the template's territory, or your company's. Check Electric heat if electric heat is the main heat source. Advanced holds a Baseline override in kWh per month.
Bills can't be priced until a baseline territory or allowance is set. The bill boxes show Calculating bills… while they price.
A rate schedule that shows a Starter rates chip, or a note about starter rates under the picker, has starting figures only. Check it against the customer's bill. Schedules that name where their rates come from are not starter rates. See Manage rate schedules.
System
Draw the roof and place panels on the System tab. See Design the roof and panels. The system size and yearly production appear in the top bar when the drawing is applied to the quote. Set the Roof Type and Roof Age in the row at the top of the tab. To change Panel output loss, click Configure and find it under Production.
Storage
Skip this tab for a solar-only quote. You set things on the left. The right side, under On the proposal, shows the results.
- Open the Storage tab. The Batteries card has Add battery at the top.
- Click Add battery and pick a battery from the list. It lists main units only, and the battery is added at once, one unit. For a battery that isn't in the catalog, pick Battery not in the catalog… and fill in Manufacturer, Model, and Capacity.
- The table lists Battery, Qty, Capacity, and Power, with expansions indented under their battery. Use − and + to change the count. To add an expansion, click Add expansion under the battery it attaches to. The line beside it reads, for example, 2 more fit or None more fit, and the list shows only expansions that fit. The ⋯ menu on a row has Change battery and Remove. Removing a main battery that has expansions asks whether to Keep them on a battery on site or Remove its expansions too.
- Under Operating mode, pick Self-Consumption, TOU Arbitrage, Backup Only, or Custom Schedule. Each button leads with what the battery adds over solar alone, such as +$X a year, with the mode's whole first-year savings under it. Backup Only shows what solar saves. For every mode except Backup Only, drag Backup reserve to set how much charge stays saved for outages.
- Under Backup, pick how the battery backs up the home: a whole-home option (meter adapter or gateway), an essential-loads backup panel, no backup, or existing backup equipment. An agreement that asks for it prints your choice. Then enter Essential loads in watts, or pick from Add a load to build a list of loads with their watts and a total.
- Under Battery details, switch Charges from the grid on or off and set Capacity loss in %/yr. Warranty, Warranty cycles, and At end of warranty come from the battery's product and can't be changed here.
For a sale that only adds expansions to a battery already at the home, click Expand a battery on site, pick the battery from Existing Equipment, and click Use this battery. It counts toward power and backup, but isn't priced or on the proposal.
On the right, In an outage shows how many hours the battery runs on your reserve and on a Full battery, for essential loads and for the whole home. Below it are What the batteries save, Totals, and the Daily Dispatch Profile.
A main battery takes a set number of expansions. If the quote has more, a red note says so and the quote can't be sent. Remove an expansion or add a main unit. The limit is set in Expansions per main unit on the main battery's product in Settings → Sales → Products & services. Left empty, there is no limit.
If your template or company sets a default battery, adding that battery also adds its inverter. Removing the battery removes a built-in inverter with it.
Pricing
- Open the Pricing tab.
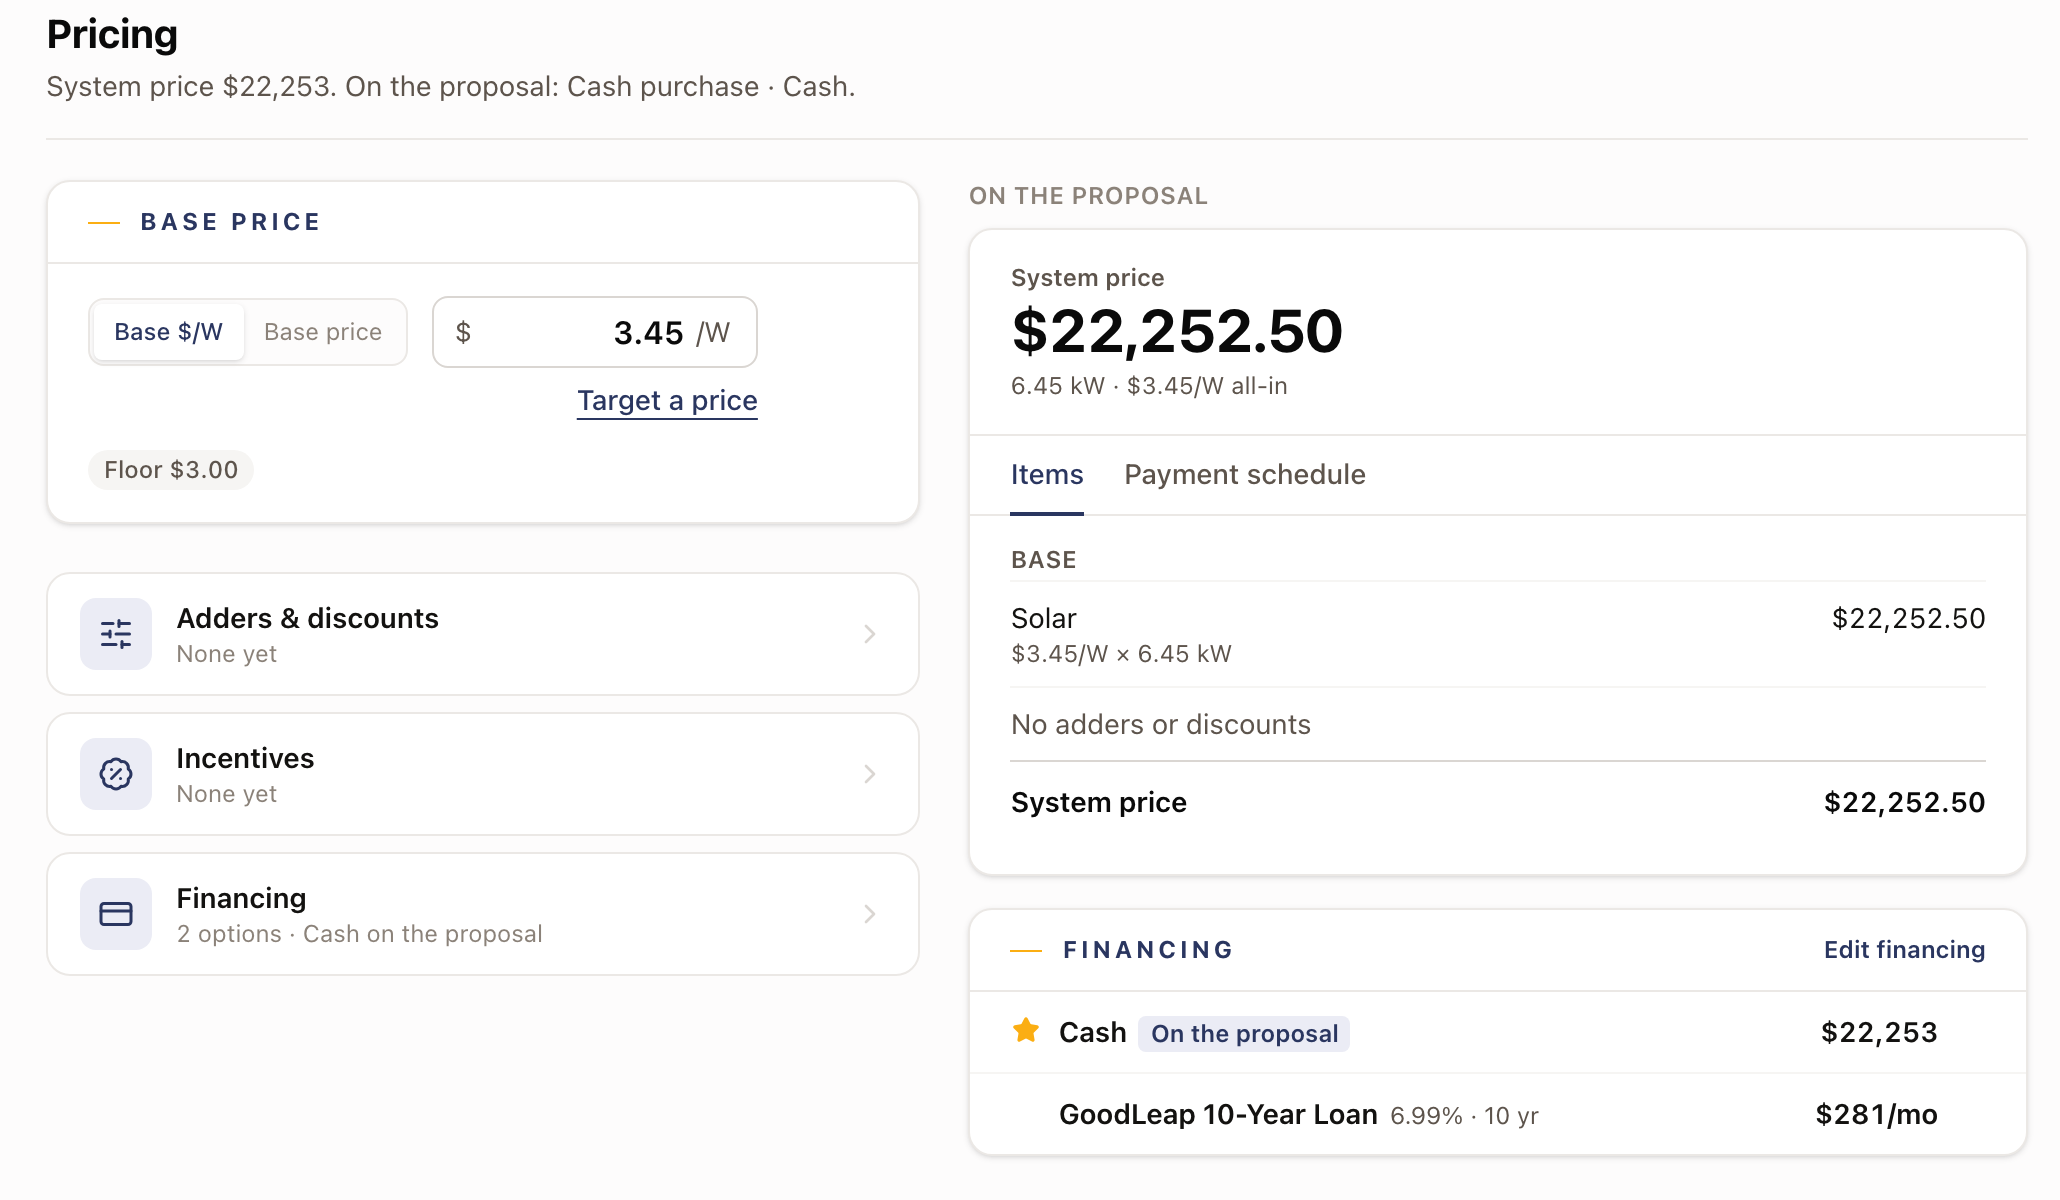
- Enter the Base $/W, or switch to Base price to type a total. A new quote starts on your company's default price list when there is one. The field shows your Floor. Target a price works backward from the price you want to reach.
- If the rate is under the floor, a prompt asks you to use the floor or save below it. A rate saved below the floor shows Below the $X/W floor, not confirmed until you click Confirm price, and the quote can't be sent until then.
- Click Adders & discounts. The band at the top shows Base price + Adders − Discounts = System price as you work. Use the Adders and Discounts buttons, the search box, and the Solar, Storage, and Whole system filters to find a row. Turn a row on with its switch. Each row shows its Unit price, Qty, and Price. The line under the name shows its category and why the row is on: Auto with what matched, Required, Custom, or From the design. You can't turn off a Required row. If your company locked a quantity, it shows as text. For a one-off, click Custom adder or Custom discount, fill in Name, Category, Priced as, and the amount, then click Add. This needs the Write In Quote Adjustments permission. Owner, Admin, and Sales Manager have it by default.
- Click Incentives. Under Library, search for the credits that apply and click Add beside each. The list starts with the home's state. Click All states to see the rest. Click Custom incentive for one that isn't in the library. The federal residential credit ended for systems placed in service after Dec 31, 2025, so it is not in the library. A leftover federal line shows a warning on cash and loan plans. On a lease, a power purchase agreement, or a prepaid plan, the provider claims the tax credits, and a note says so.
The Price card shows the System price large, with the kW and $/W under it. On a prepaid plan, a Customer pays band follows with the amount after the provider's share. Two tabs sit under it. Items lists Base, then every adder and discount, Incentives, and Net cost. Payment schedule holds the payments.
Choose how the customer pays
The Financing card lists one line per option. Click Edit financing to open the Financing drawer.
To add a plan, find an option under Add from your saved options and click Add. Then click Use on proposal on the plan the homeowner should see first. That plan is tagged On the proposal. The proposal, the PDF, and the email all follow it. The payment schedule follows that plan too. If it no longer matches, the note under the schedule offers Update the schedule. See What the homeowner sees on a solar proposal.
- A saved loan's terms come from your company. In the drawer, click View terms to read them. Anyone with the Manage Pricing permission can change a saved loan's APR, Term, and Paid in cash on the quote with Edit terms. Owner and Admin have it by default.
- A lease needs its monthly payment. Click Enter payment on the lease card and fill in Monthly payment, Escalator, and Term (years).
- A power purchase agreement needs a rate. Click Choose rate.
- If your company allows it, click Custom financing option in the drawer to add your own loan or cash terms, then click Add to quote. The option is marked Custom, and the send review asks you to check it. You can change a custom loan's terms yourself.
- On a prepaid plan, Passed to the customer is how much of the provider's funding comes off the customer's price. Leave it empty to pass the most your company allows. You can pass less, never more; the line under the box shows the limit.
- If your company lets reps see them, a prepaid plan also shows Contractor proceeds: the customer's payments plus the provider's funding in full. Proceeds never show on the proposal.
The Payment schedule tab is one table with Payment, When, Paid by, and Amount, and a count and total underneath. A payment tied to a project step shows the step in a tag under When. A lender's or provider's payments carry their name under Paid by. Click Edit schedule to change it. Inside, Reset to financing defaults replaces the payments with the plan's own.
Financial
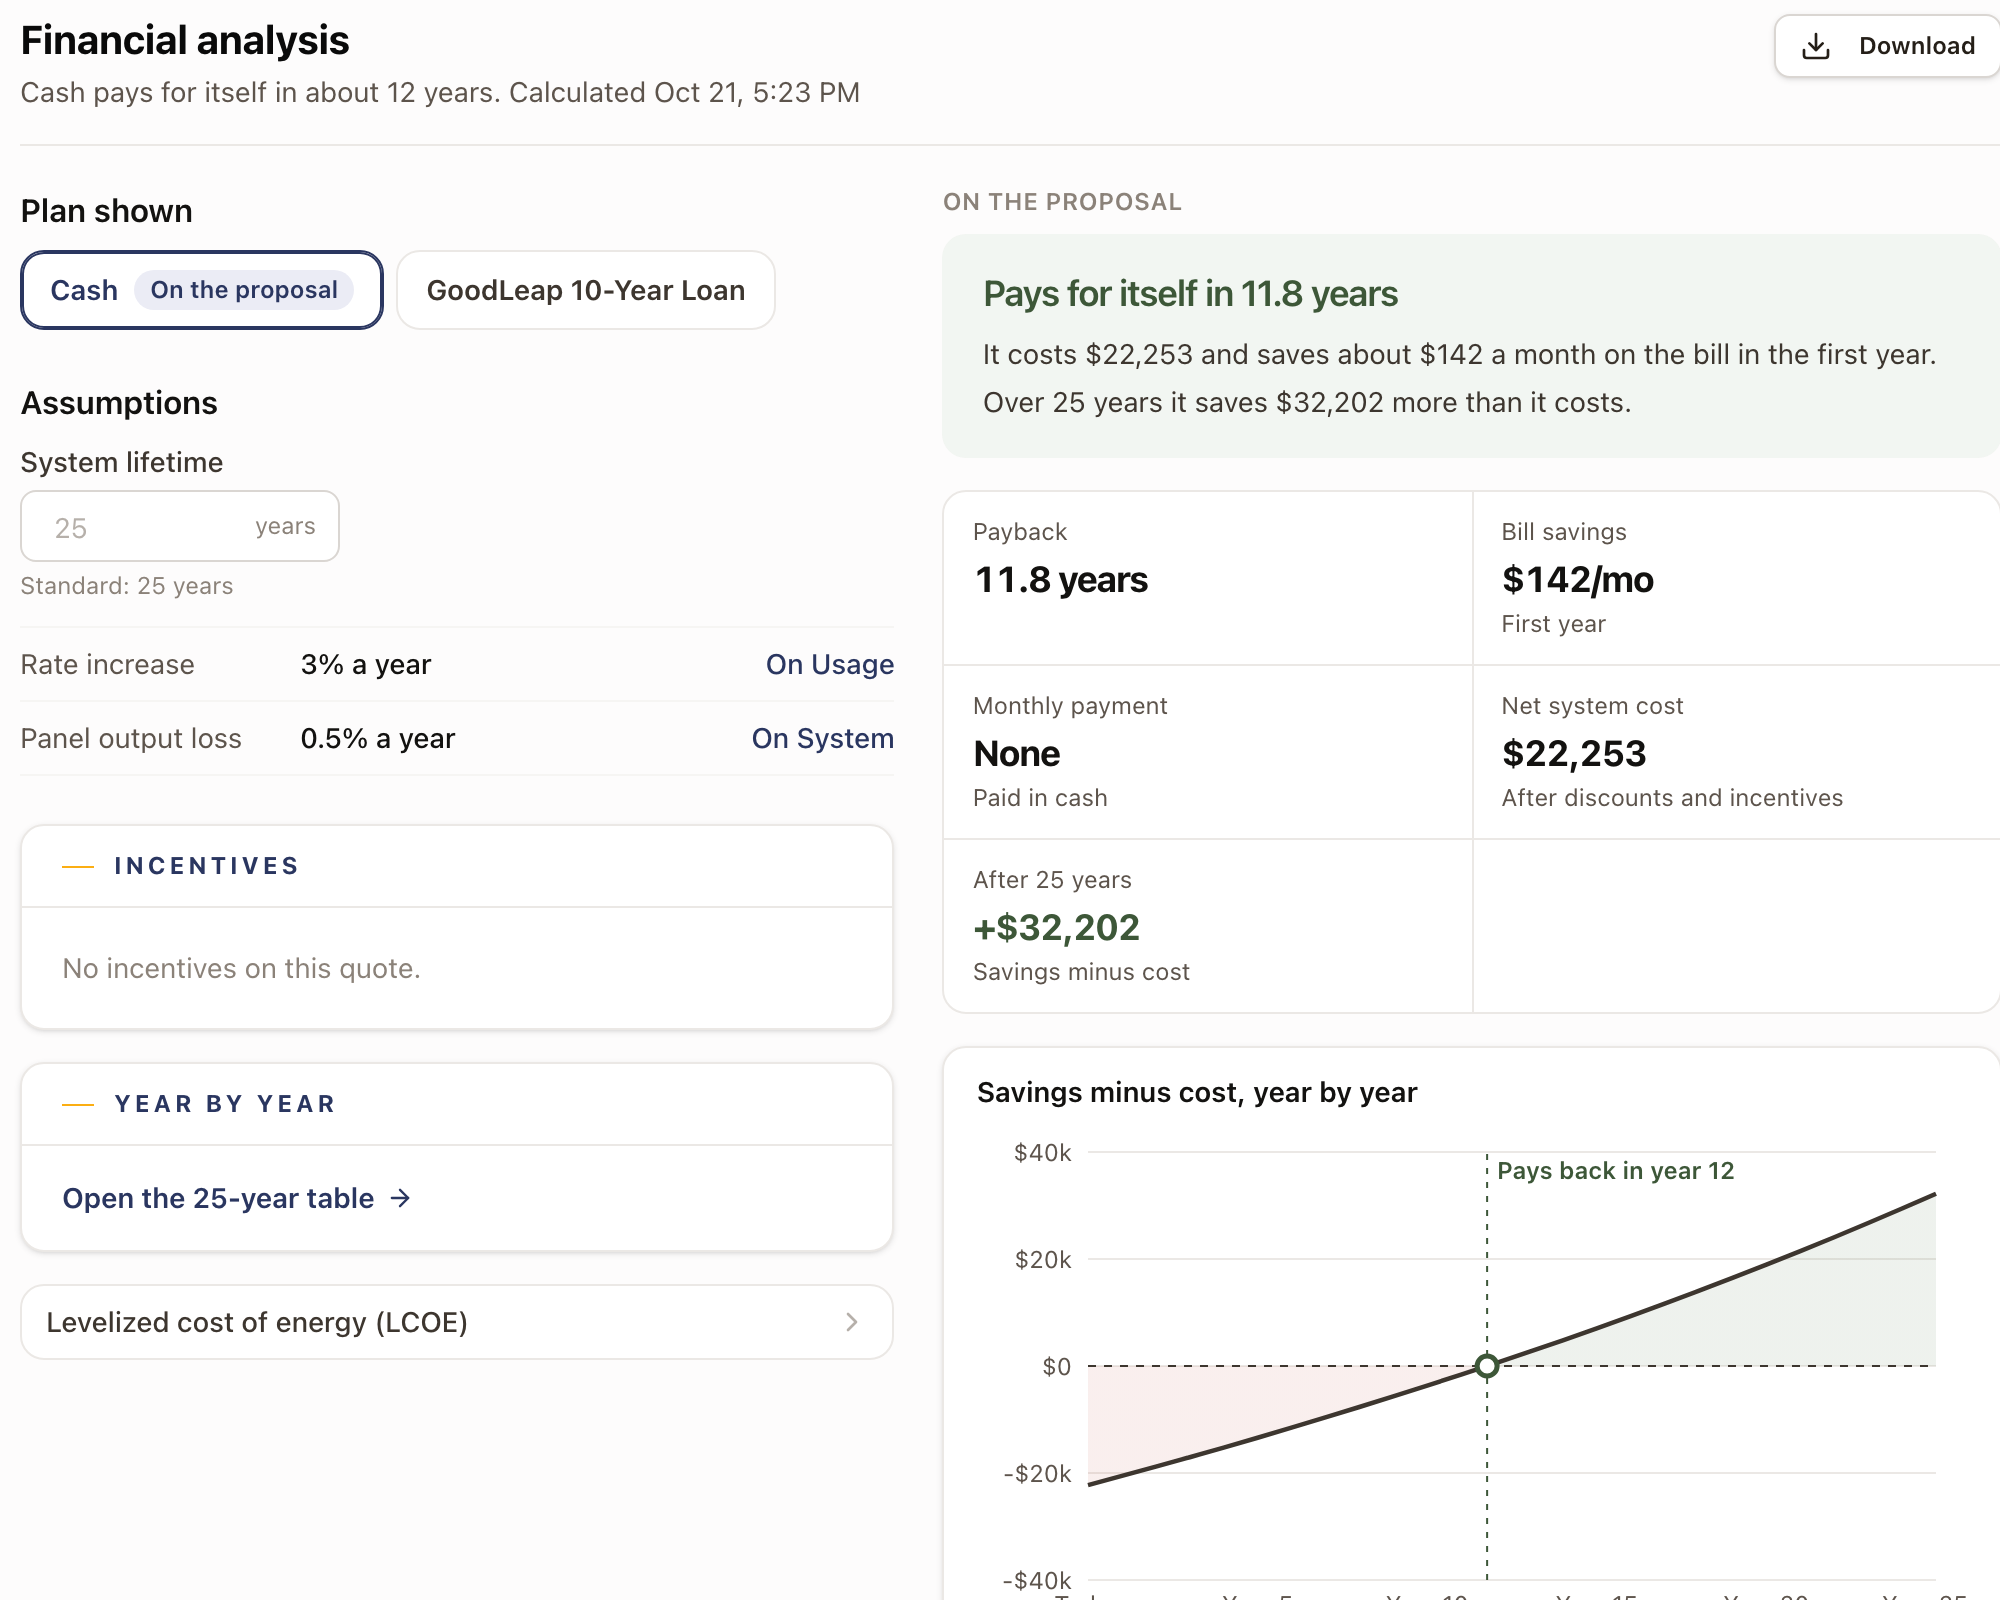
The Financial tab compares the plans. Under Plan shown, pick a plan to see its figures. Under Assumptions, set the System lifetime in years. It starts at 25. The result after that many years, the chart, and the year-by-year table follow it. Rate increase and Panel output loss show below it; click On Usage or On System to change them. The tab shows payback in years, bill savings, the monthly payment, the net system cost, and the result after the lifetime. A plan that never pays back has no payback figure. Open the table from Year by year. Click Download to save the figures as a CSV file.
If a number looks stale, click Refresh at the top of the builder. The status next to it reads Up to date when the figures match your inputs.
Proposal
Proposal shows a Proposal preview of what the homeowner will open, with Open full page to see it on its own. If the quote still carries starter wording, a notice offers Remove placeholder text. Rate increase is on Usage, Panel output loss is under Configure on System, and System lifetime is on Financial. Change them only when you have a reason.
Send the quote
- Look at the button next to Send Quote. It reads Ready to send when nothing is left to fix, or N to fix or N to check. Click it to see the list.
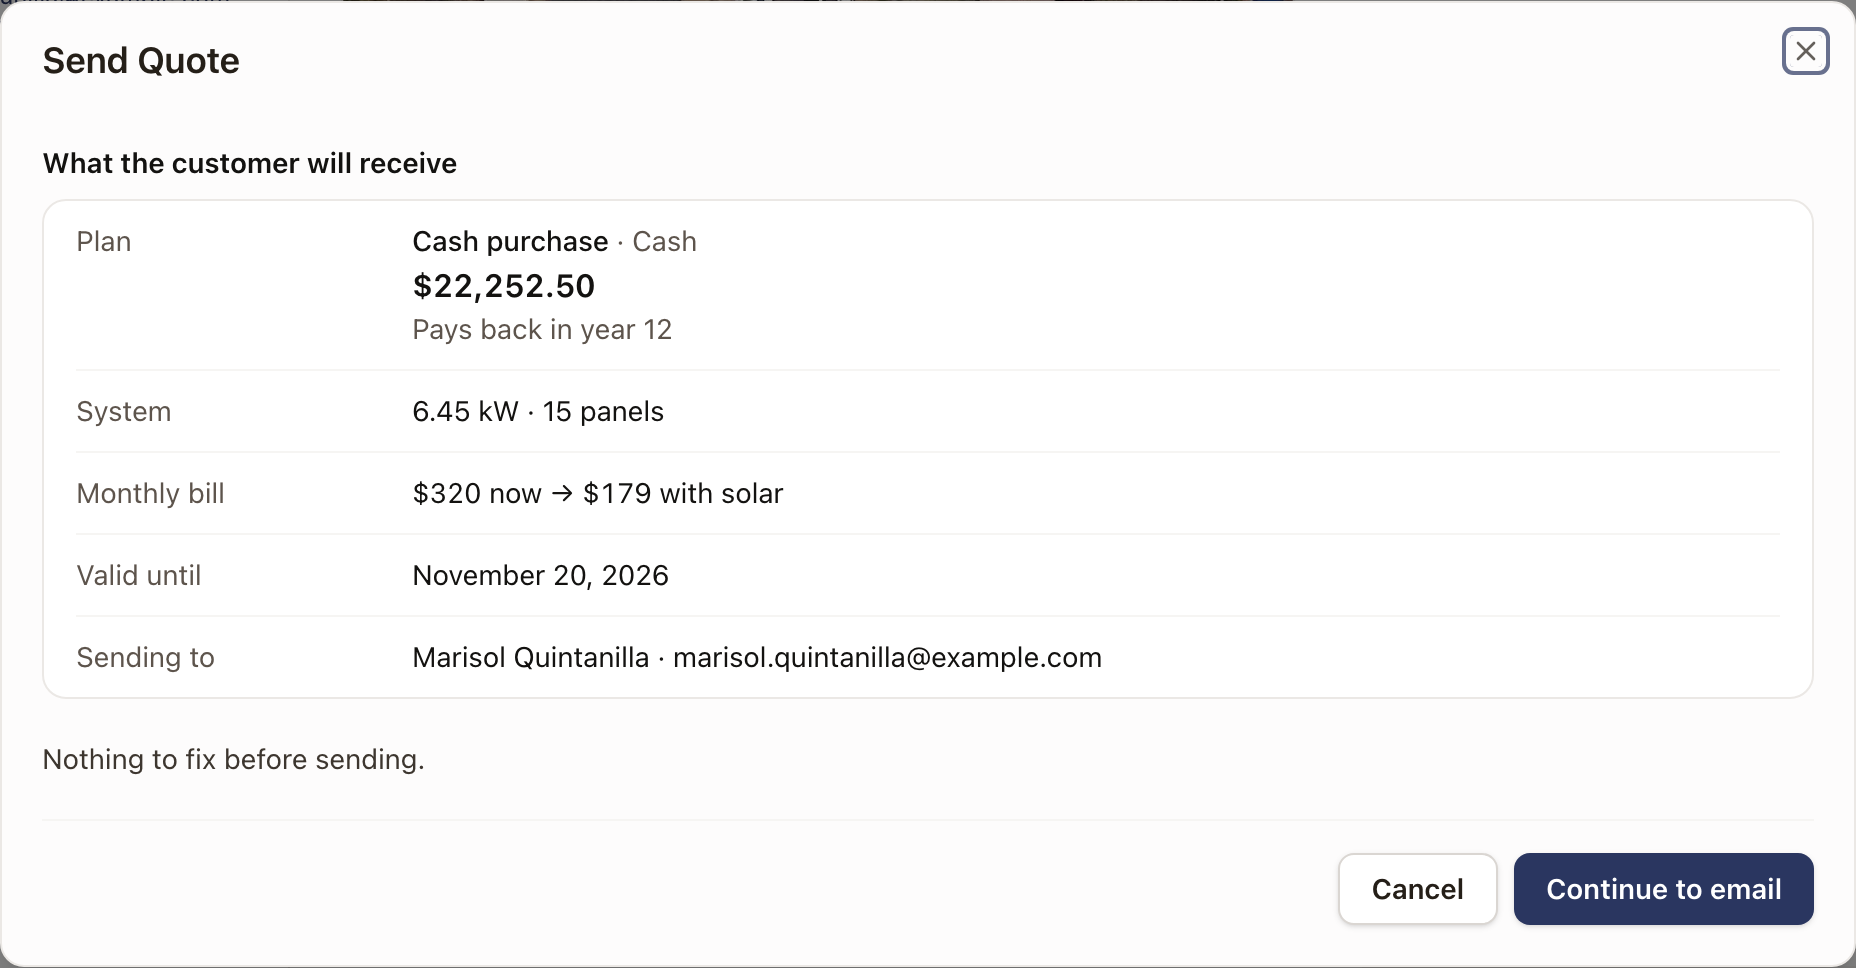
- Click Send Quote. The review shows What the customer will receive: the Plan, the system, the Monthly bill, Valid until, and Sending to.
- Fix anything listed under Fix before sending. Most rows have a button that takes you to the fix. Continue to email stays grayed out until nothing is left there. Rows under Check before sending don't hold the quote.
- Click Continue to email. Check the To address, the reply-to address, and the email preview. Add an Additional message if you want.
- Click Send Email. If you already told the customer some other way, click Mark Quote as Sent instead. It moves the quote to Sent status without emailing anyone.
The review can also hold the quote for:
- Blank on the agreement. The agreement would print a value blank, and accepting the quote sends the agreement for signature by itself. Each value has a Set in button that opens the step where you answer it, such as Set in Storage, or Fix field for a question on Job Details. A calculated field whose formula can't be worked out is listed with no button. Ask an admin to fix the formula in Settings → Sales → Field library. When your company sends the agreement later by hand, these values appear under Check before sending instead.
- Production is a regional estimate. This holds the quote when the agreement prints yearly production. Click Refresh production, which opens System. Click Production, then Refresh.
- Too many expansion batteries for the main units. Click Fix the batteries.
A custom financing option shows under Check before sending with Review financing. It doesn't hold the quote.
The review may also ask you to check the PCIA vintage on Usage, or to click Refresh when the interconnection year has passed. On a quote that was already sent, the dialog is titled Resend Quote.
The quote's status changes to Sent. The button at the top becomes Mark Accepted, and Resend appears under the ... menu. When the customer accepts, or you click Mark Accepted, the quote is locked. The builder shows it read-only, with a banner that reads This quote was accepted, so it can't be changed. Every tab still opens, but none can be changed. Open Project takes you to the project solarOS created from the Solar Installation project template. See Quote acceptance.
Check it worked
- The top bar shows system size, production, price, and payback.
- The header button reads Ready to send, and every section you used has a green dot.
- After sending, the quote shows Sent in the builder and in Sales → Quotes.
Common problems
- Send Quote lists things to fix. Open the list from the header button. Rows under Fix before sending hold the quote: for example no system price, a price under the floor that isn't confirmed, a $0 total, or calculations that are out of date. Click Refresh for out-of-date calculations. Placeholder text is a Check before sending row and doesn't hold the quote. Use Remove placeholder text on the Proposal tab to clear it from the scope, warranty, and line items.
- The price shows $0. Enter a Base $/W on the Pricing tab, or ask an Owner or Admin to set a price per watt or a default price list. A quote can't be sent while its system price is $0.
- A value is listed under Blank on the agreement. Click the button on its row to fill it in.
- Production is a regional estimate. Click Refresh production, then click Production and Refresh on System.
- Too many expansion batteries. Remove an expansion battery or add a main battery on Storage.
- A calculated field can't be worked out. It is listed under Blank on the agreement with no button. Ask an admin to fix its formula in Settings → Sales → Field library.
- You see View terms instead of Edit terms on a loan. Your company sets saved loan terms. Ask an admin to change them on the quote.
- The status next to Refresh says Inputs changed. Click Refresh to recalculate.
- Bills show a note about the baseline territory. Pick the territory printed on the customer's bill, or enter the baseline allowance.
- The system tab says the quote is still priced from the previous design. Click Apply design to quote to update the quote, or Keep quote arrays to leave it.
- A panel or battery is missing from the list. An Owner or Admin has to activate it in the product catalog.