
Edit a customer and their contacts
Change a customer's details, give them a role, add a second email and phone, link the people who act for them, merge duplicates, and delete a record.
Use this to correct a customer's details, record who they are to the job, and give your team a second way to reach them. It covers customers, companies, and contacts, which share one Edit screen.
Before you start
You need the Sales User, Sales Manager, Owner, or Admin role.
Edit a customer
- Open the customer from Sales → Customers.
- Click Edit at the top right of the customer page.
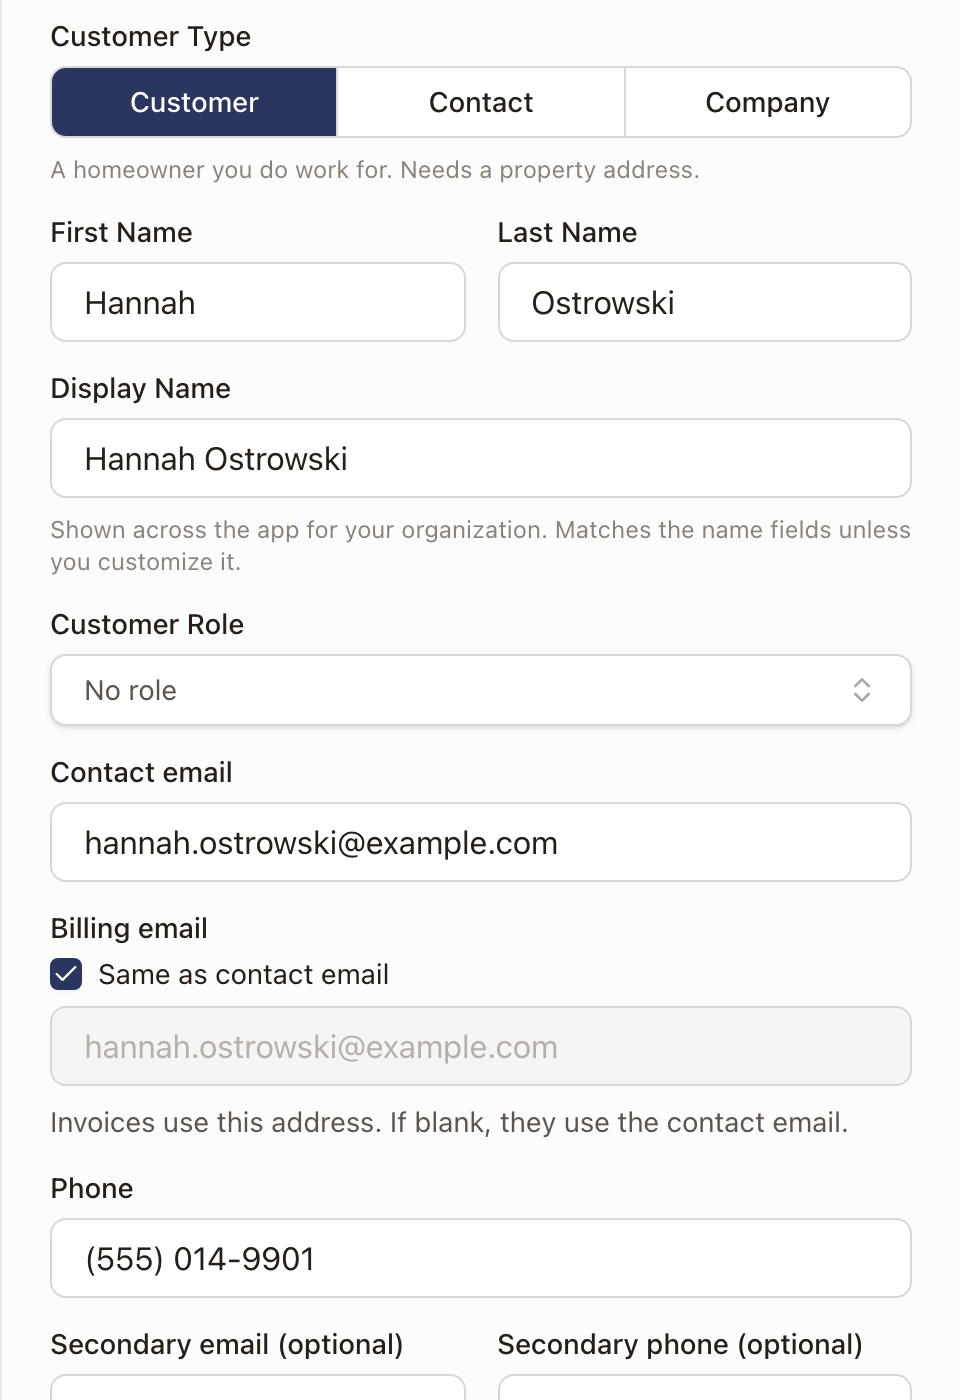
- Change what you need. The drawer has these fields, top to bottom:
- Customer Type: Customer, Contact, or Company.
- First Name and Last Name, or Company Name for a Company.
- Display Name: how the name shows across solarOS. It follows the name fields unless you type your own.
- Customer Role.
- Contact email, Billing email, and Phone.
- Secondary email and Secondary phone.
- Campaign Source.
- Parent Customer and Billing Contact.
- Internal Notes, which only your team sees.
- Click Save Changes.
A few fields do more than store a value:
- Customer Type. Changing a customer to a Contact doesn't affect their work or properties. The drawer says so before you save. To go the other way, use Promote a contact, which also asks for a property address.
- Contact email. Your company's emails to this customer, such as quotes and appointment confirmations, start from this address.
- Billing email. Invoices go to this address. Clear Same as contact email to enter a different one.
- Billing Contact. Invoices for this customer are billed to the contact you choose. Once one is chosen, Default quotes to billing contact appears. Turn it on to have quote emails address the billing contact too. Choosing a Parent Customer also offers to set that customer as the billing contact.
- Campaign Source. If the customer already has opportunities and you change the source, an Update existing opportunities switch appears. Turn it on to apply the new source to all of them.
Give someone a role
A Customer Role says what the person is to the job, such as a property manager or a spouse. It helps when one company has several contacts.
- In the Edit drawer, open Customer Role.
- Pick one from the list: Property Manager, General Contractor, Subcontractor, Account Representative, Employee, Tenant, Co-owner, Spouse, or Family Member. Or type your own and choose the Use line that shows your text.
- To remove a role, open the field again and choose Clear role.
The role shows above the customer's name, next to the record type, and as a badge beside the name in a company's Related Contacts list. Customer Role is also on the Add Customer drawer, so you can set it when you create the record.
Add a secondary email and phone
Use these when someone can be reached another way, such as a spouse's email or a second phone number.
- In the Edit drawer, enter the Secondary email and Secondary phone.
- Click Save Changes.
Both numbers and both emails show under Contact on the customer page. Each has a copy button beside it.
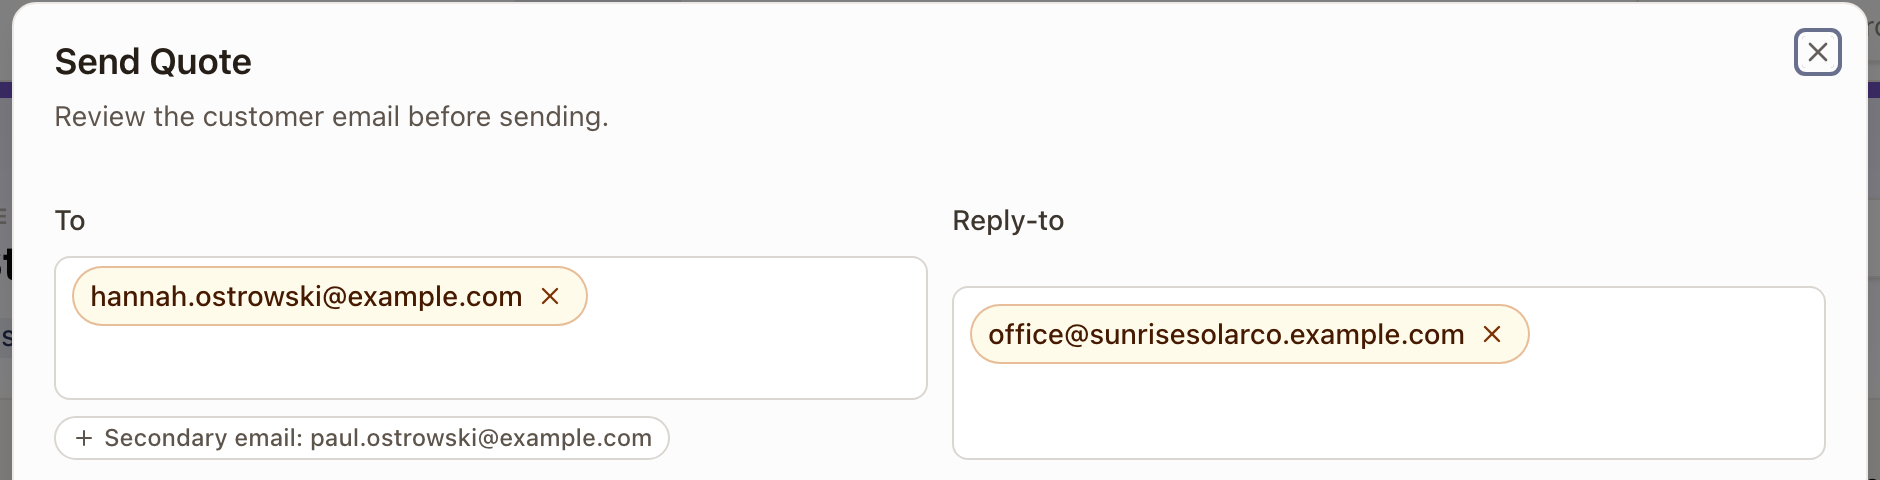
On the screens that email the customer, such as Send Quote, a chip under To reads Secondary email and the address. Click it to add that address to the message. The chip goes away once the address is in the To field.
Add and review related contacts
The people who act for a company, or who share a household, are their own records linked to the main customer.
- Open the main customer.
- Click the ⋯ button, then Add Related Contact. The Related Contacts card has the same button.
- Fill in the contact and click Add Related Contact.
The Related Contacts card lists each person with their role, email, and phone numbers. Each address and number has a copy button, and clicking a name opens that contact. The steps are in Add a contact or company, and promote a contact.
Merge two records for the same customer
If you entered the same customer twice, merge the records so the work and history stay on one record. You merge one duplicate at a time.
- Open one of the two records.
- Click the ⋯ button, then Merge duplicates….
- Under Likely duplicates, pick the duplicate to merge into this customer. If the other record isn't suggested, search for it under Find another customer. Then click Review duplicate. A record that can't be merged is greyed out, with the reason under it.
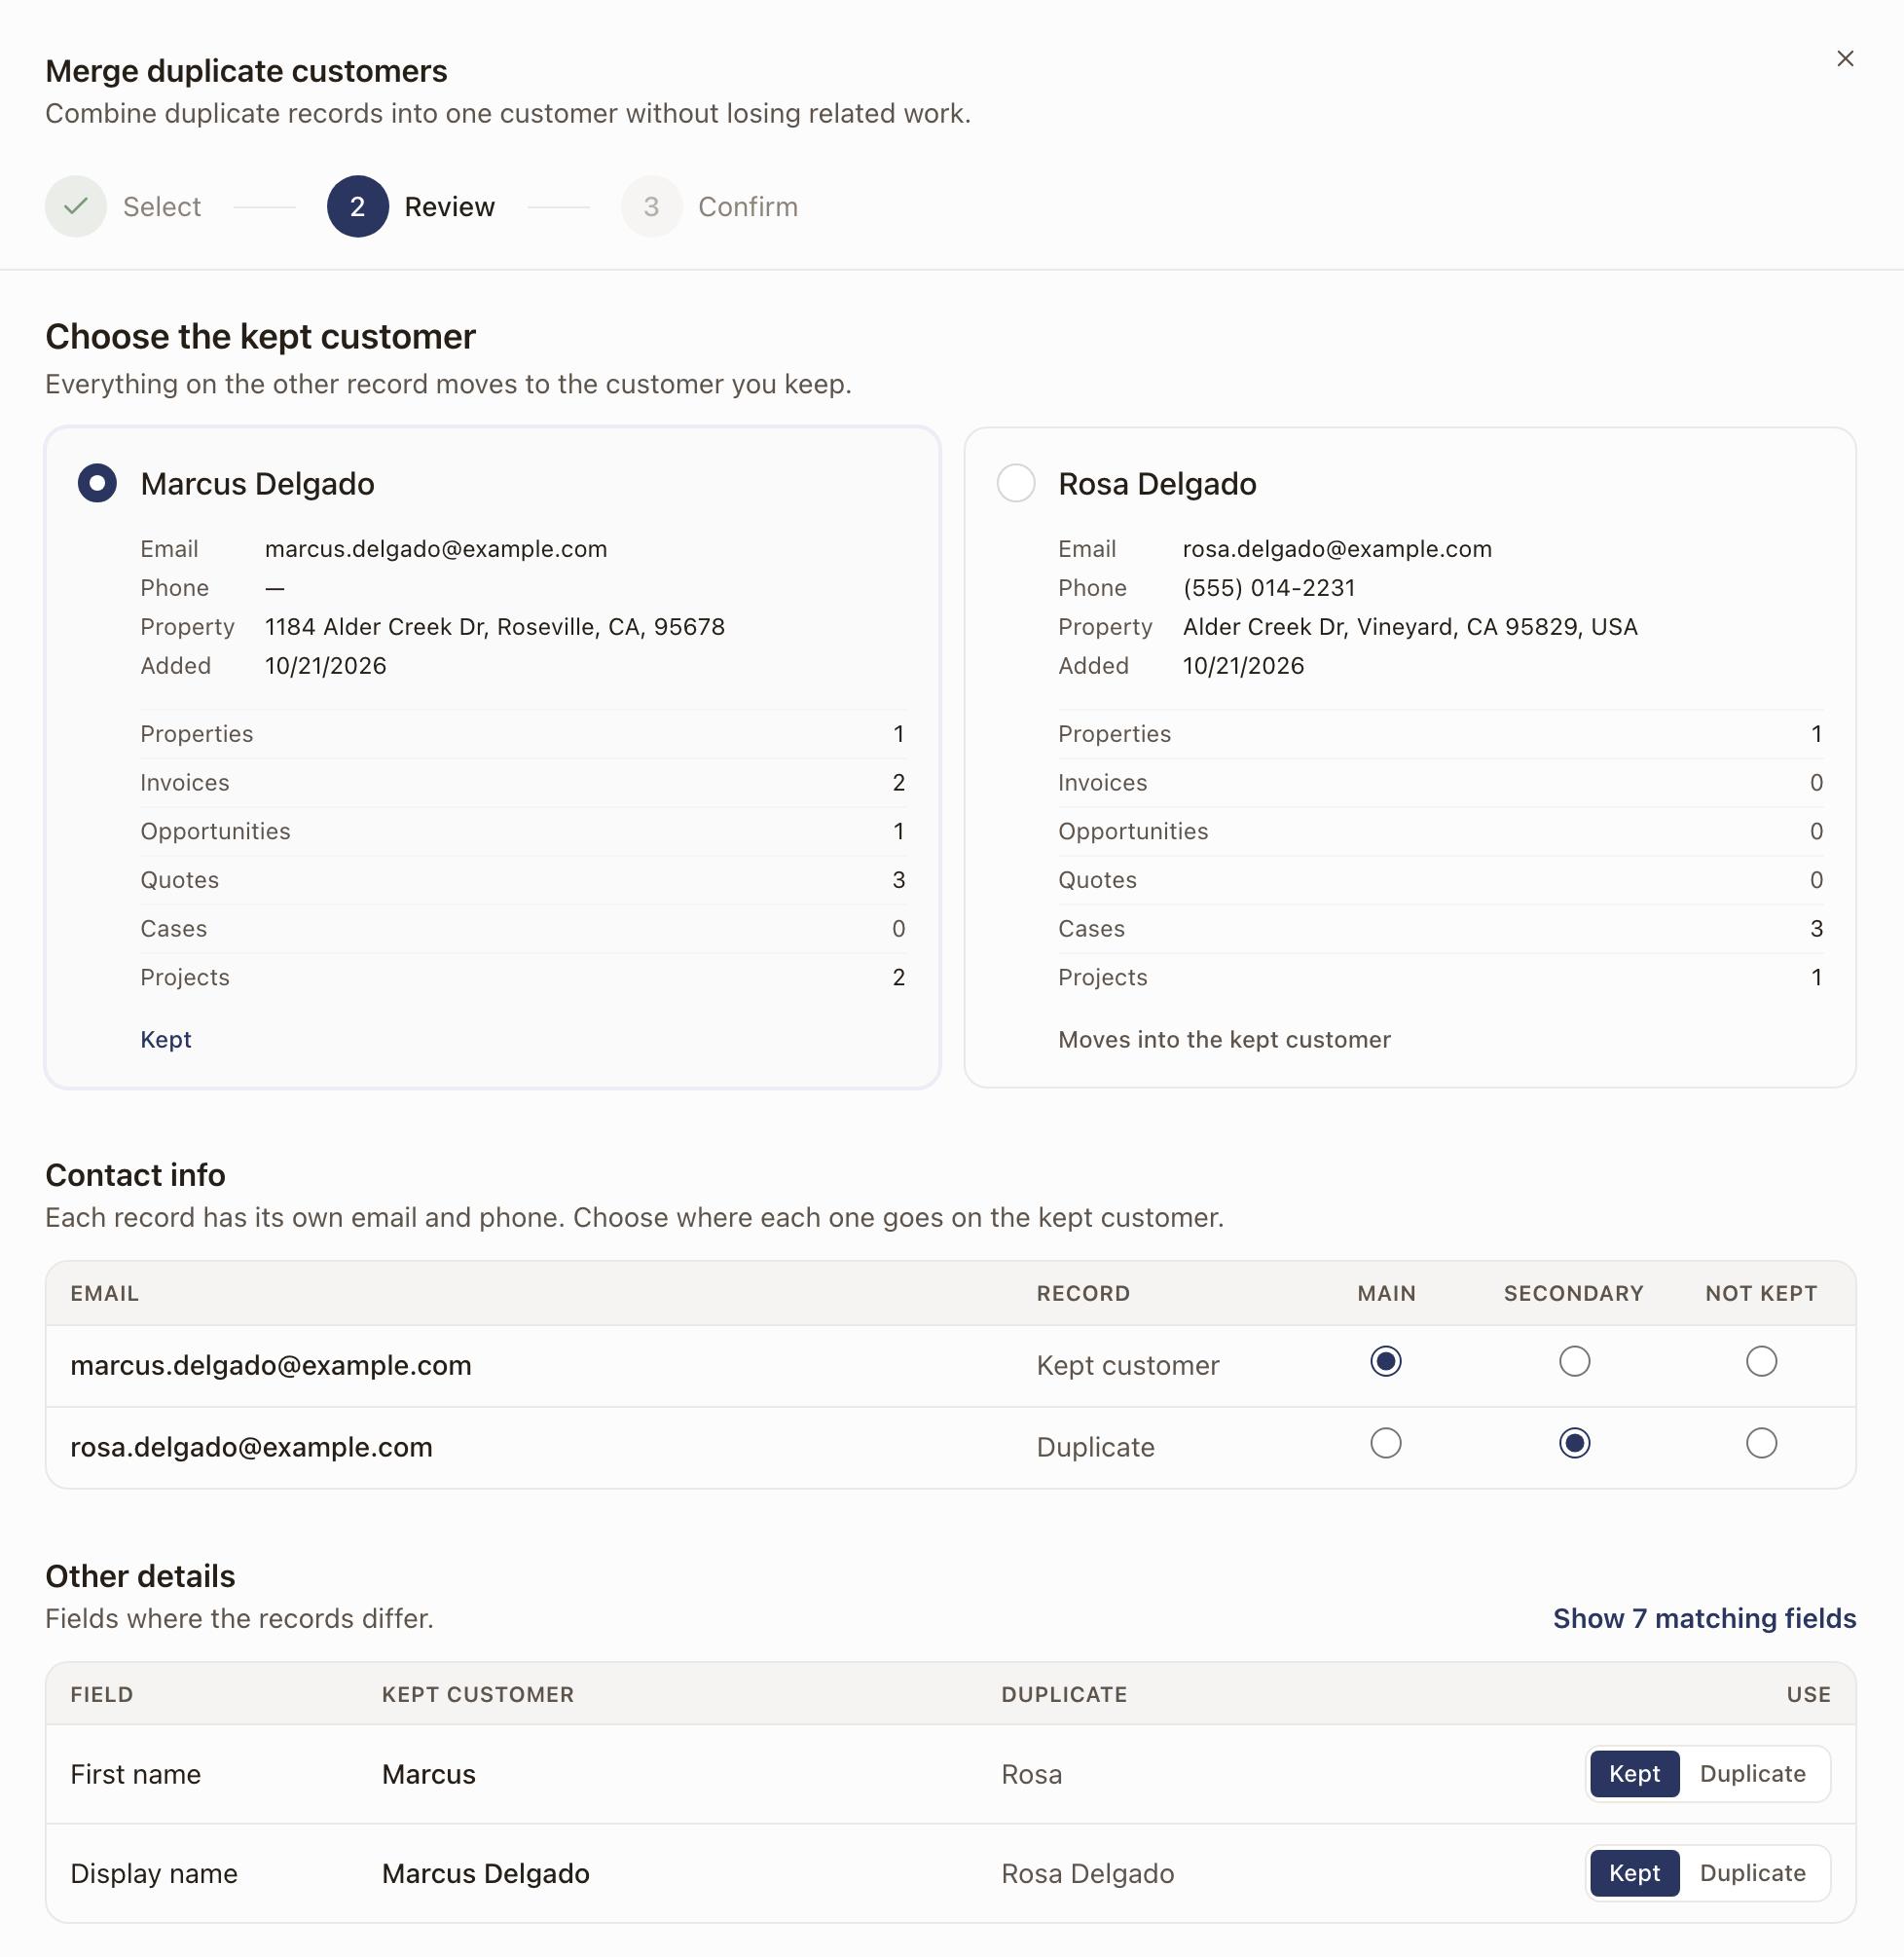
- On Choose the kept customer, compare the two records and the count of related items on each. Click the card of the one to keep. It reads Kept. The other reads Moves into the kept customer.
- If the two records have more than one email, or more than one phone, between them, Contact info lists each one. For every row, pick Main, Secondary, or Not kept. At the start, the kept customer's main value is Main, the next value is Secondary, and any others are Not kept.
- Under Other details, each field where the records differ has a Kept and a Duplicate choice. Pick the value the kept customer should have. Click Show N matching fields to see the fields that already match. If the kept customer also works with another company or has a portal account, a name you choose becomes your display name and shows only at your company. Only the name fields are offered, and the step says so.
- Click Continue to confirm. If the duplicate has a property at one of the kept customer's addresses, the button reads Continue to properties and a Properties step comes first.
- On Confirm, check the Customers table and the Contact info you chose. Click Merge customer. The merge can't be undone from this screen.
If a Properties step comes up, each matching address has a Merge into one and a Keep both choice. Merge into one is picked for you. Click a property to choose the one to keep. The button on Confirm then reads Merge customer and property. If you pick Keep both, both properties stay on the kept customer, and you can merge them later. A pair that can't merge, for example because both are monitored, shows why and stays on Keep both.
When the merge finishes, the heading reads Merge complete. Click Done. The duplicate disappears from lists and search, and its work moves to the kept customer. If a pair of properties could not merge, the last step says why and shows Review duplicate properties, which opens the property merge. See Merge duplicate properties.
Delete a customer, company, or contact
Deleting ends your company's relationship with this person or company and takes their records out of your company's search and lists. Other companies that serve the same customer aren't affected.
You need the Delete Customers permission. By default, the Owner, Admin, Sales Manager, and Operations Manager roles have it. If invoices or payments would go too, you also need Manage Payments, which the Sales Manager role doesn't have by default.
- Open the record from Sales → Customers.
- Click the ⋯ button, then Delete customer, Delete company, or Delete contact. A contact can also be deleted from the menu on its row in Related Contacts.
- Read the dialog. Also deleted counts the records that go with it, such as projects, cases, quotes, and invoices. Scheduled visits on those projects are canceled.
- If Clear these first appears, the delete can't go ahead until you deal with what it lists, such as a subscription that isn't canceled, an agreement out for signature, or a payment still going through. Then open the dialog again.
- If records go with it, type the name to confirm. Click the delete button.
The dialog says what's left behind. Invoices and payments leave your reports and totals, including past periods. An invoice already in QuickBooks stays there, and an invoice billed to another customer stays with them. Related contacts stay as their own records, no longer linked.
Adding the same email again brings the customer back. The records that went with them stay deleted.
Check it worked
After Save Changes, the drawer closes and the page shows the new values. The Contact section lists the main and secondary email and phone, and the role shows above the name.