
Manage rate schedulesBeta
Choose which utility rates solar quotes bill on, copy a platform schedule, and edit your own copy.
A solar quote prices the customer's electric bill, before and after solar, on a rate schedule. The Rate schedules page holds those schedules. Use it to see where each schedule's rates come from, copy a schedule, and correct your own copy. Contact solarOS support to turn solar quoting on for your company.
Before you start
You need permission to manage pricing. Owners and Admins have it. Finish Set up solar quoting first.
Find a schedule
- Go to Settings → Sales → Rate schedules.
- Search by name or utility, or narrow the list with All States and All Sources.
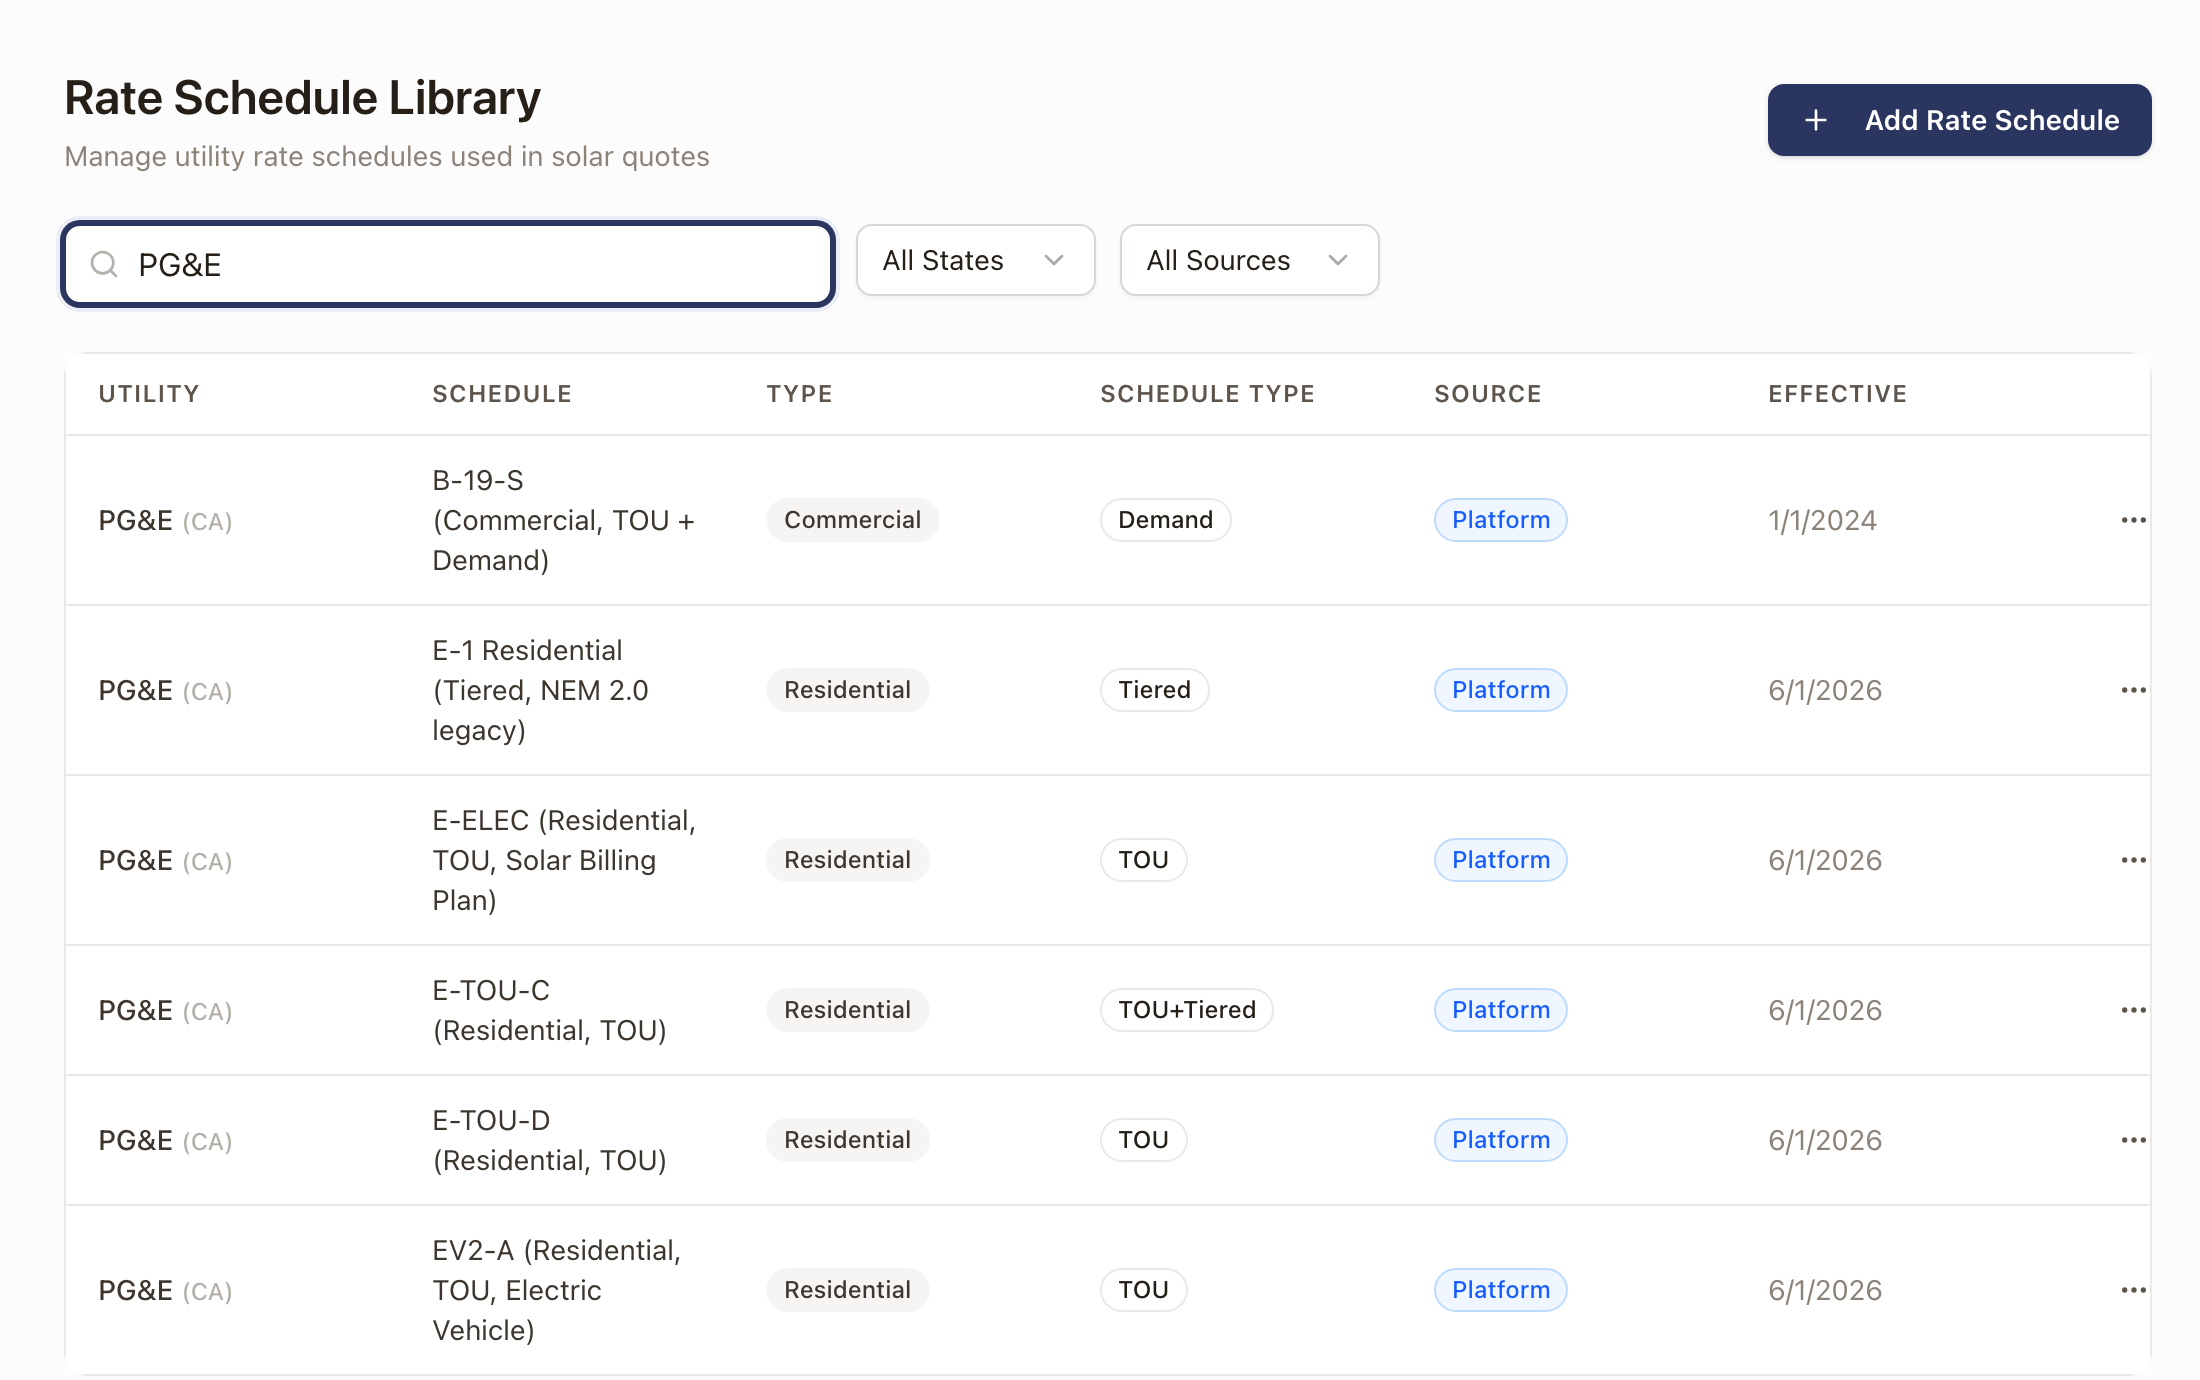
Each row shows the Utility, the Schedule, the Type (residential, commercial, or industrial), the Schedule Type, the Source, and the Effective date. Platform schedules are shared with every company and can't be edited. Org schedules are your company's own copies. Utilities include investor-owned utilities, city utilities such as Healdsburg and Ukiah, and community choice suppliers such as MCE and Sonoma Clean Power.
Filed rates and starter rates
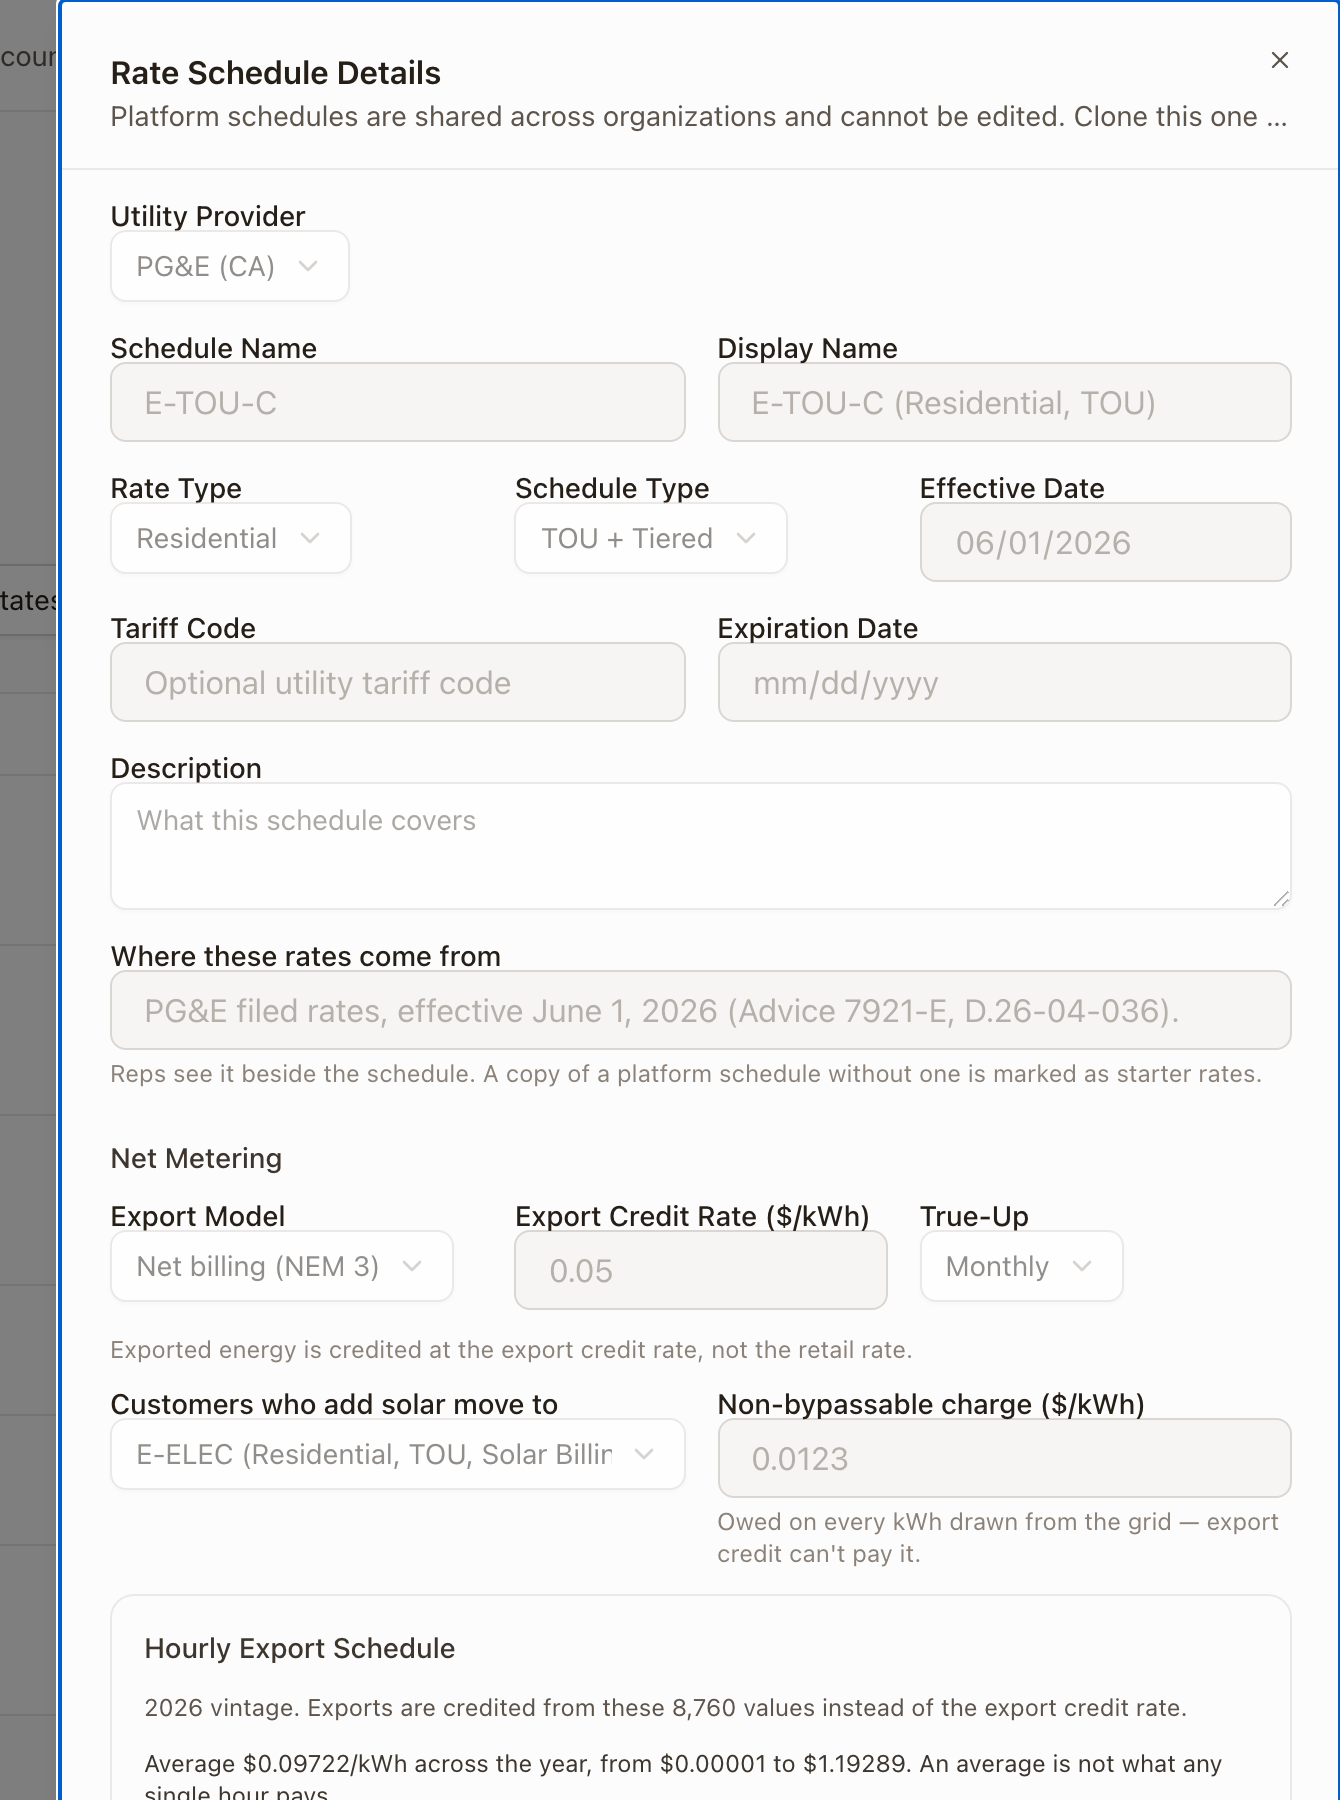
Open a schedule and read Where these rates come from. A schedule that names its source, for example the utility's filed rates and their effective date, bills on those rates. Reps see that line beside the schedule on the Usage tab.
A copy of a platform schedule that has no source is marked as starter rates. Reps see a Starter rates chip in the schedule list and a note under the picker. Starter rates are starting figures only. Check them against the customer's bill before you rely on them.
The checklist on Settings → Sales → Quote families counts both kinds, for example 5 with filed rates, 1 starter.
Copy a platform schedule
- Click a platform schedule, or open its ... menu and click View Details.
- Click Clone to My Organization, or use Clone to Org in the menu.
The copy appears in the list as an Org schedule, named with (Custom) after the original name. Rename it in the editor if you want.
Edit your own schedule
Click an Org schedule, or open its ... menu and click Edit. Click Save Changes when you finish. If you change the rates, Where these rates come from is cleared, because the old source no longer describes them. Write a new source line if you have one.
From the ... menu you can also click Deactivate or Delete. Delete asks you to confirm and can't be undone.
To make a schedule from nothing, click Add Rate Schedule.
The schedule
- Utility Provider, Schedule Name, and Display Name. Reps pick by display name.
- Rate Type and Schedule Type: Flat, Tiered, TOU, TOU + Tiered, or Demand.
- Effective Date, Expiration Date, Tariff Code, and Description.
Net metering
- Export Model says how the utility credits power the system sends to the grid: Full retail net metering (NEM 1/2), Net billing (NEM 3), Avoided cost, Feed-in tariff, or No export credit. A line under it explains the choice.
- Export Credit Rate ($/kWh) and True-Up appear when the model needs them.
- Customers who add solar move to sets the schedule a home is billed on once it has solar. Quotes use it as the default Post-Solar Rate. Pick Stay on this schedule if there is no change.
- Non-bypassable charge ($/kWh) is owed on every kWh the home takes from the grid. Export credit can't pay it.
Hourly export values
A net billing schedule can credit exports hour by hour. Click Import file and choose a CSV with one row per hour of the year (8,760 rows), or 12 rows of 24 hourly values. The editor then shows the average, lowest, and highest values for each season. Without a file, exports are credited at the export credit rate.
After you import a file, set the Vintage year, the Step-down by year, the Export bonus ($/kWh), and the Bonus years. The bonus belongs to the interconnection year. Later years are listed under Applications filed after with their own bonus terms. On a quote, the rep's Interconnection application year picks which terms apply.
Time-of-use periods, tiers, and fixed charges
- TOU Periods: for each period, a Period Name, a Type (On-Peak, Mid-Peak, Off-Peak, Super Off-Peak, or All Hours), a Season, the Days and Months it applies, and its Hour Ranges.
- Tiers inside a period: a rate for use up to the baseline and a rate above it, or a From kWh to kWh band.
- Fixed Charges: a Charge Name, a Charge Type (Fixed Monthly, Demand $/kW, Minimum Bill, Connection Fee, or Other), the amount, and the Months Billed.
Baseline territory
Some rates bill the first kWh at a lower baseline price. The baseline depends on the home's territory, printed on the customer's bill. Set your company's usual territory under Settings → Sales → Pricing & assumptions → Baseline territory. Reps can change it on each quote. See Build a solar quote.
Community choice suppliers
If a customer buys generation from a community choice supplier, the rep picks it under Generation on the Usage tab, then the supplier's service and the PCIA vintage. The supplier's own schedules are in this list, and you can copy and edit them like any other.
Check it worked
- Your copy shows as Org in the list.
- On a solar quote's Usage tab, the schedule appears in the Rate Schedule list with its source line under it.
Common problems
- A rep sees a Starter rates chip. The schedule has no source. Check its rates against the utility's, then add a Where these rates come from line to your copy.
- I can't edit a schedule. Platform schedules are read-only. Clone it, then edit the copy.
- Bills can't be priced. The rate has a baseline allowance. The rep needs to pick a baseline territory or enter the allowance on the quote's Usage tab.
Set up solar quoting
Turn on the Solar quote family and starter template, then add the equipment, utility rates, and pricing that solar quotes use.
Set up your product and service catalog
Activate or add the equipment, materials, and labor a quote template's line items can price from, and set who you bill for a manufacturer's RMAs.