
Find and work with reports
Find a report on the Reports list, then review it, email it, fix its outcome, and start an invoice from the report drawer.
A report is the technician's write-up of a visit. Operations → Reports lists every report. Click one to open it in a drawer, where you review it, email it to the customer, fix its outcome and work summary, and start the invoice for the work.
Before you start
You need the Owner, Admin, Operations Manager, or Operations User role to open and edit reports. Complete Review and Email need the Owner, Admin, or Operations Manager role. Create invoice needs permission to create invoices. Owner, Admin, Sales Manager, Operations Manager, and Operations User have it by default.
Find a report
- Go to Operations → Reports.
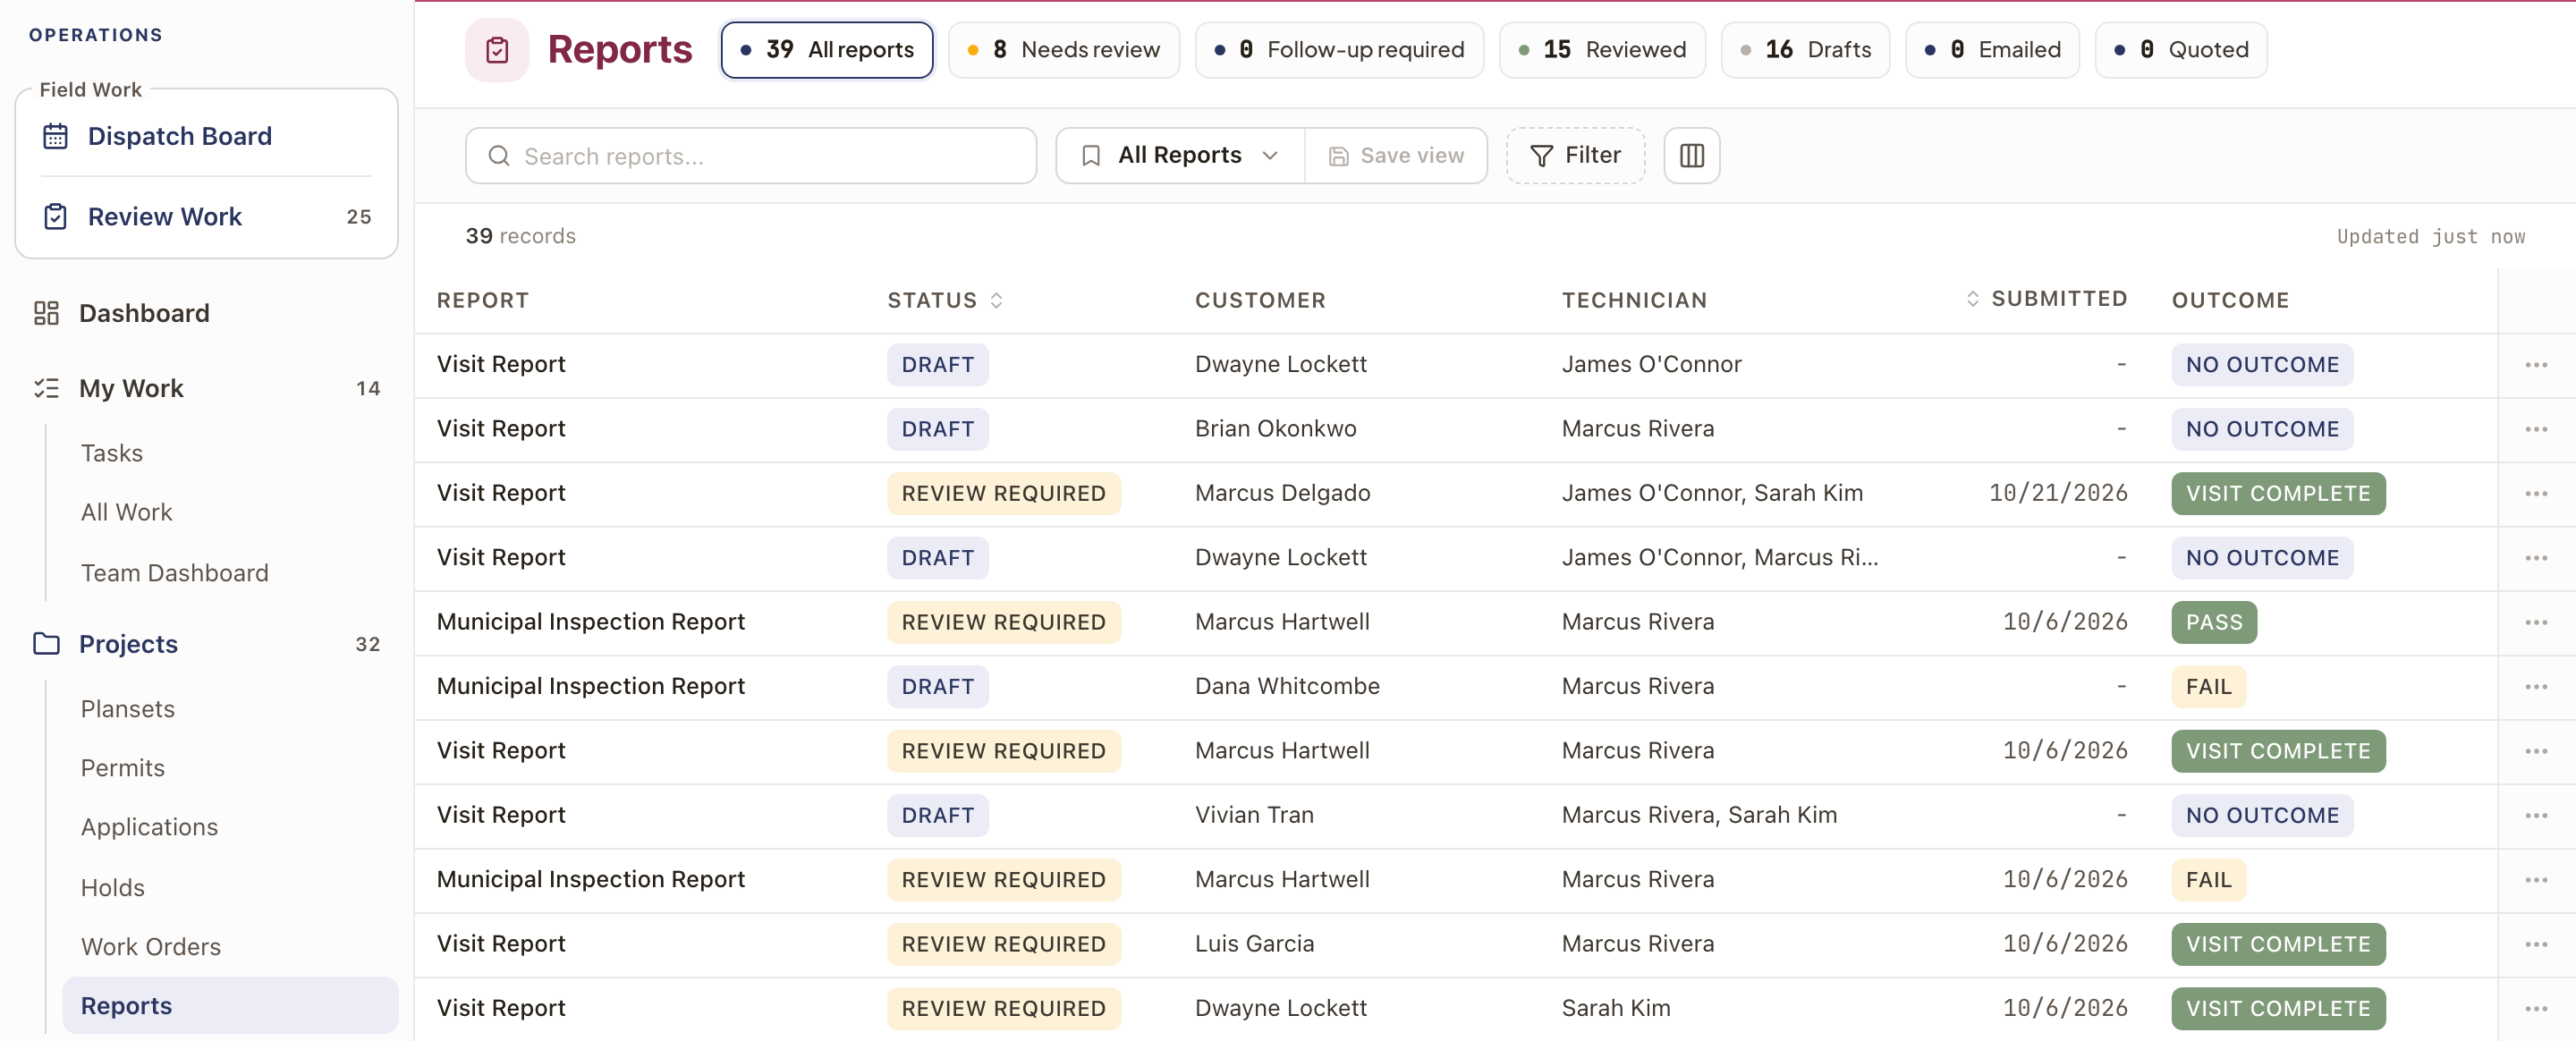
- Use the buttons across the top to narrow the list: All reports, Needs review, Follow-up required, Reviewed, Drafts, Emailed, and Quoted. Each shows how many reports match.
- Type in Search reports..., or open Filter to narrow by Owner, Submitted By, Technician, Status, Review view, Report type, or Outcome. Use Save view to keep a set of filters.
- Click the columns button to add or remove columns, such as Type, Site, Related Work, Reviewed, or Follow-up.
Each row shows the report, its status (Draft, Review Required, Follow-up Required, or Reviewed), the customer, the technician, the date submitted, and the outcome.
Open a report
Click a row, or open its ⋯ menu and click Review. The report opens in a drawer on the right. The same drawer opens from a work order's Reports tab and from a project. To read a report on its own page, use Full report in Review Work.
The top of the drawer shows the report's name and status, who submitted it and when, and these buttons:
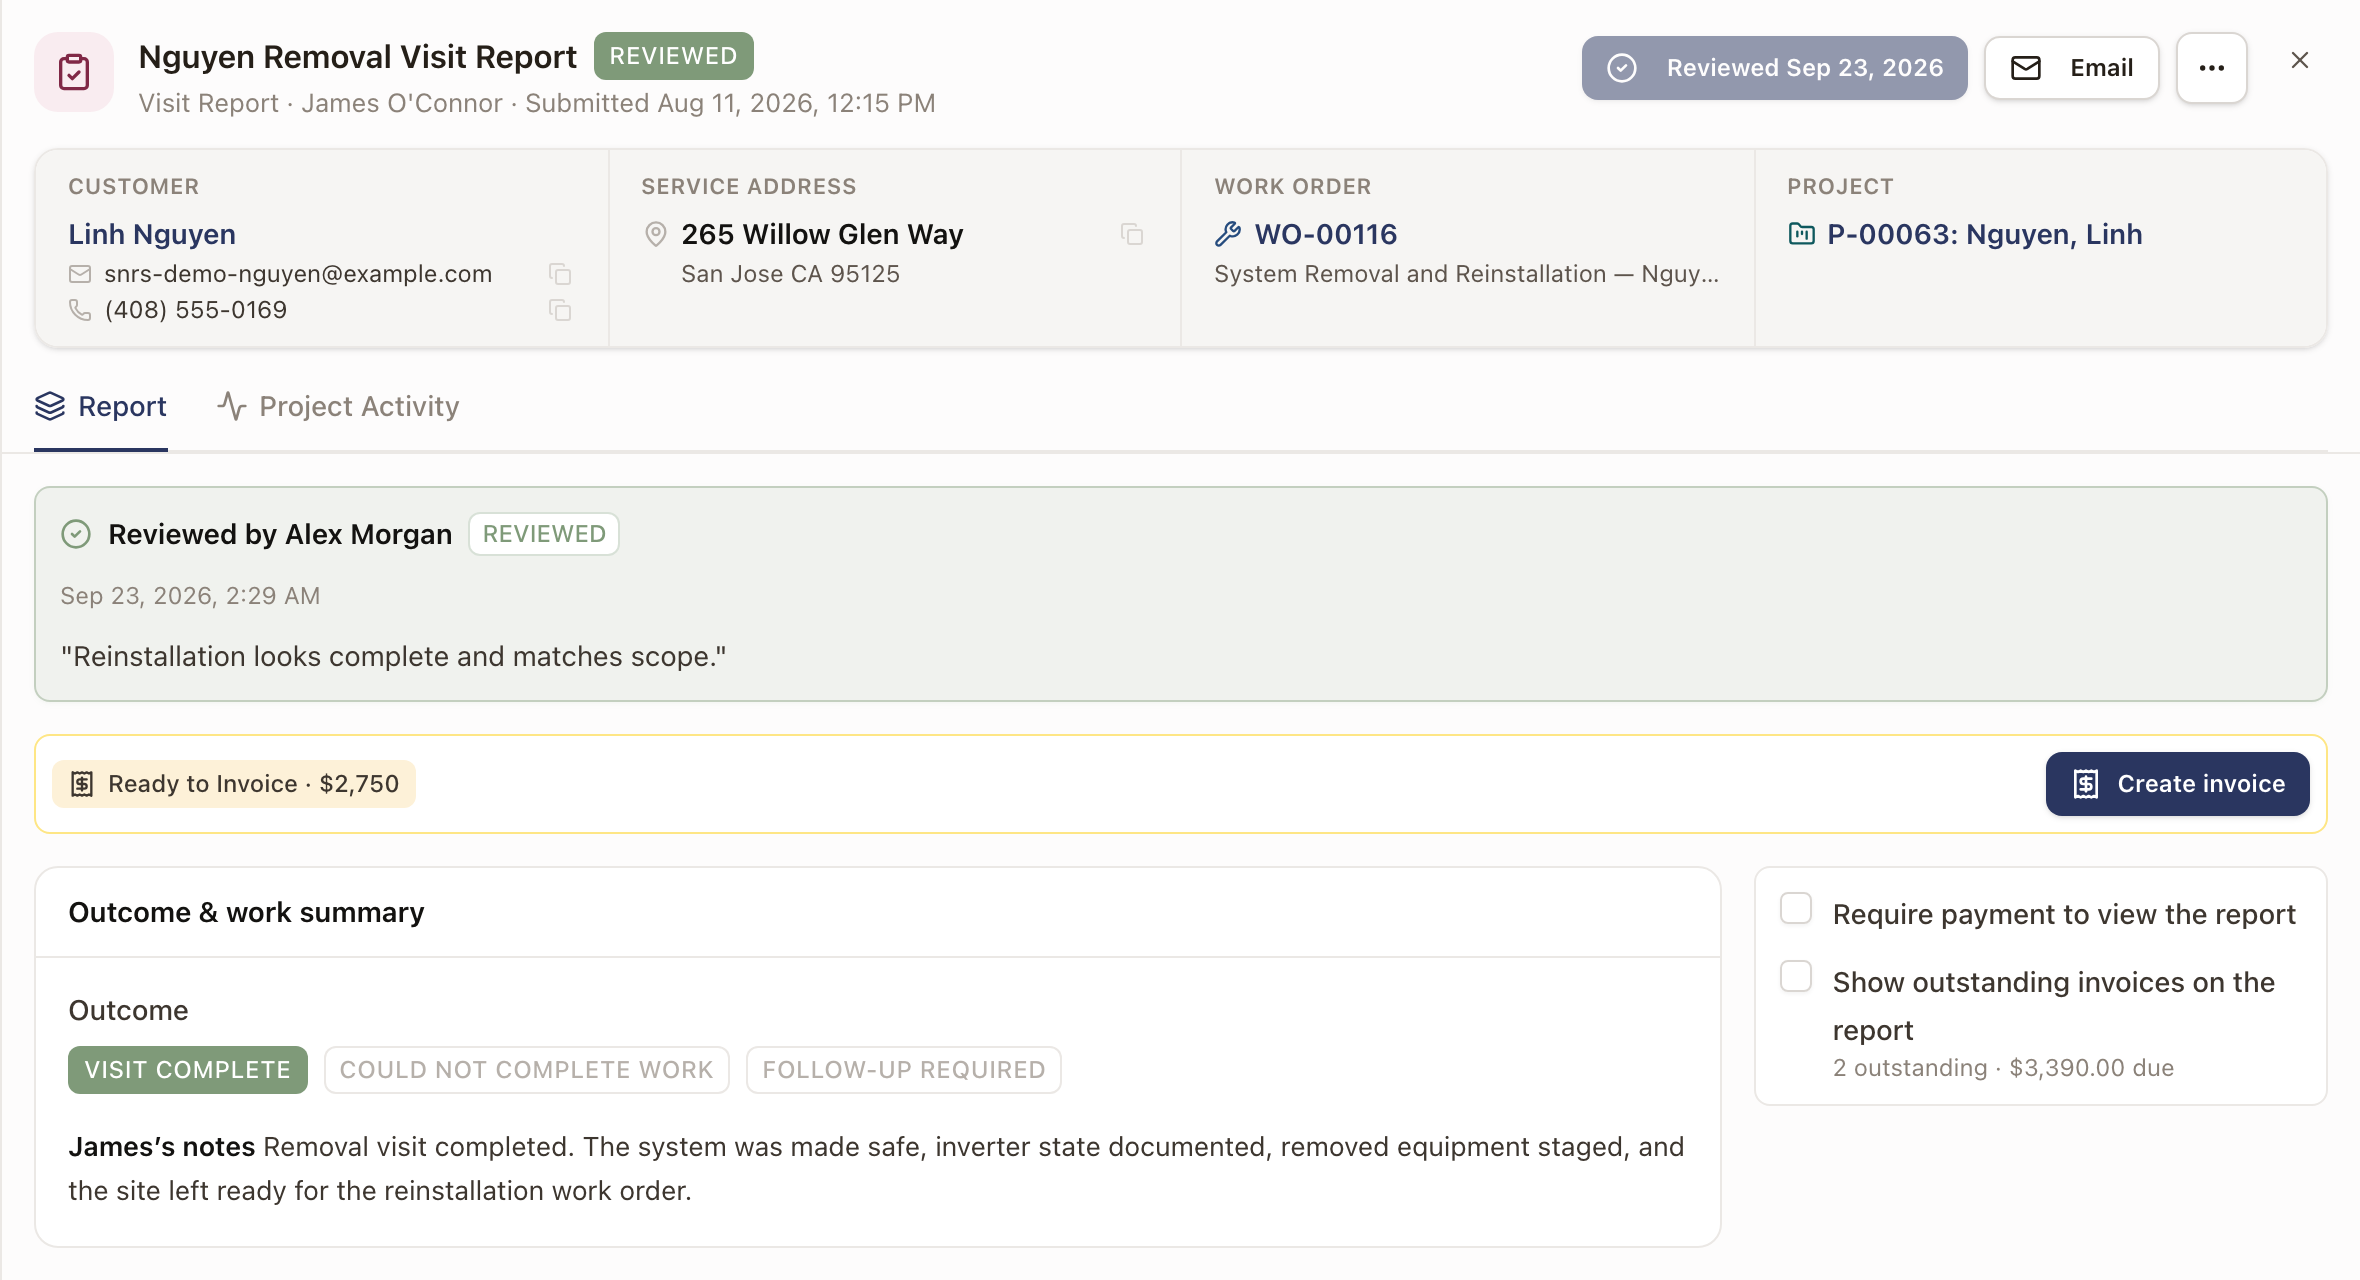
- Complete Review: records your review. Once the report is reviewed, the button turns gray and shows the date, for example Reviewed Oct 6, 2026.
- Email: sends the customer a link to the report. It's available once the report is submitted.
- ⋯: Print, Close out all reports (marks every report on the work order reviewed, when some aren't), Schedule go-back (sends the work order back for another visit and takes you to it), and Delete.
Under the buttons, the customer, service address, work order, and project link to their records. The Report tab holds the report. Project Activity shows the project's activity feed.
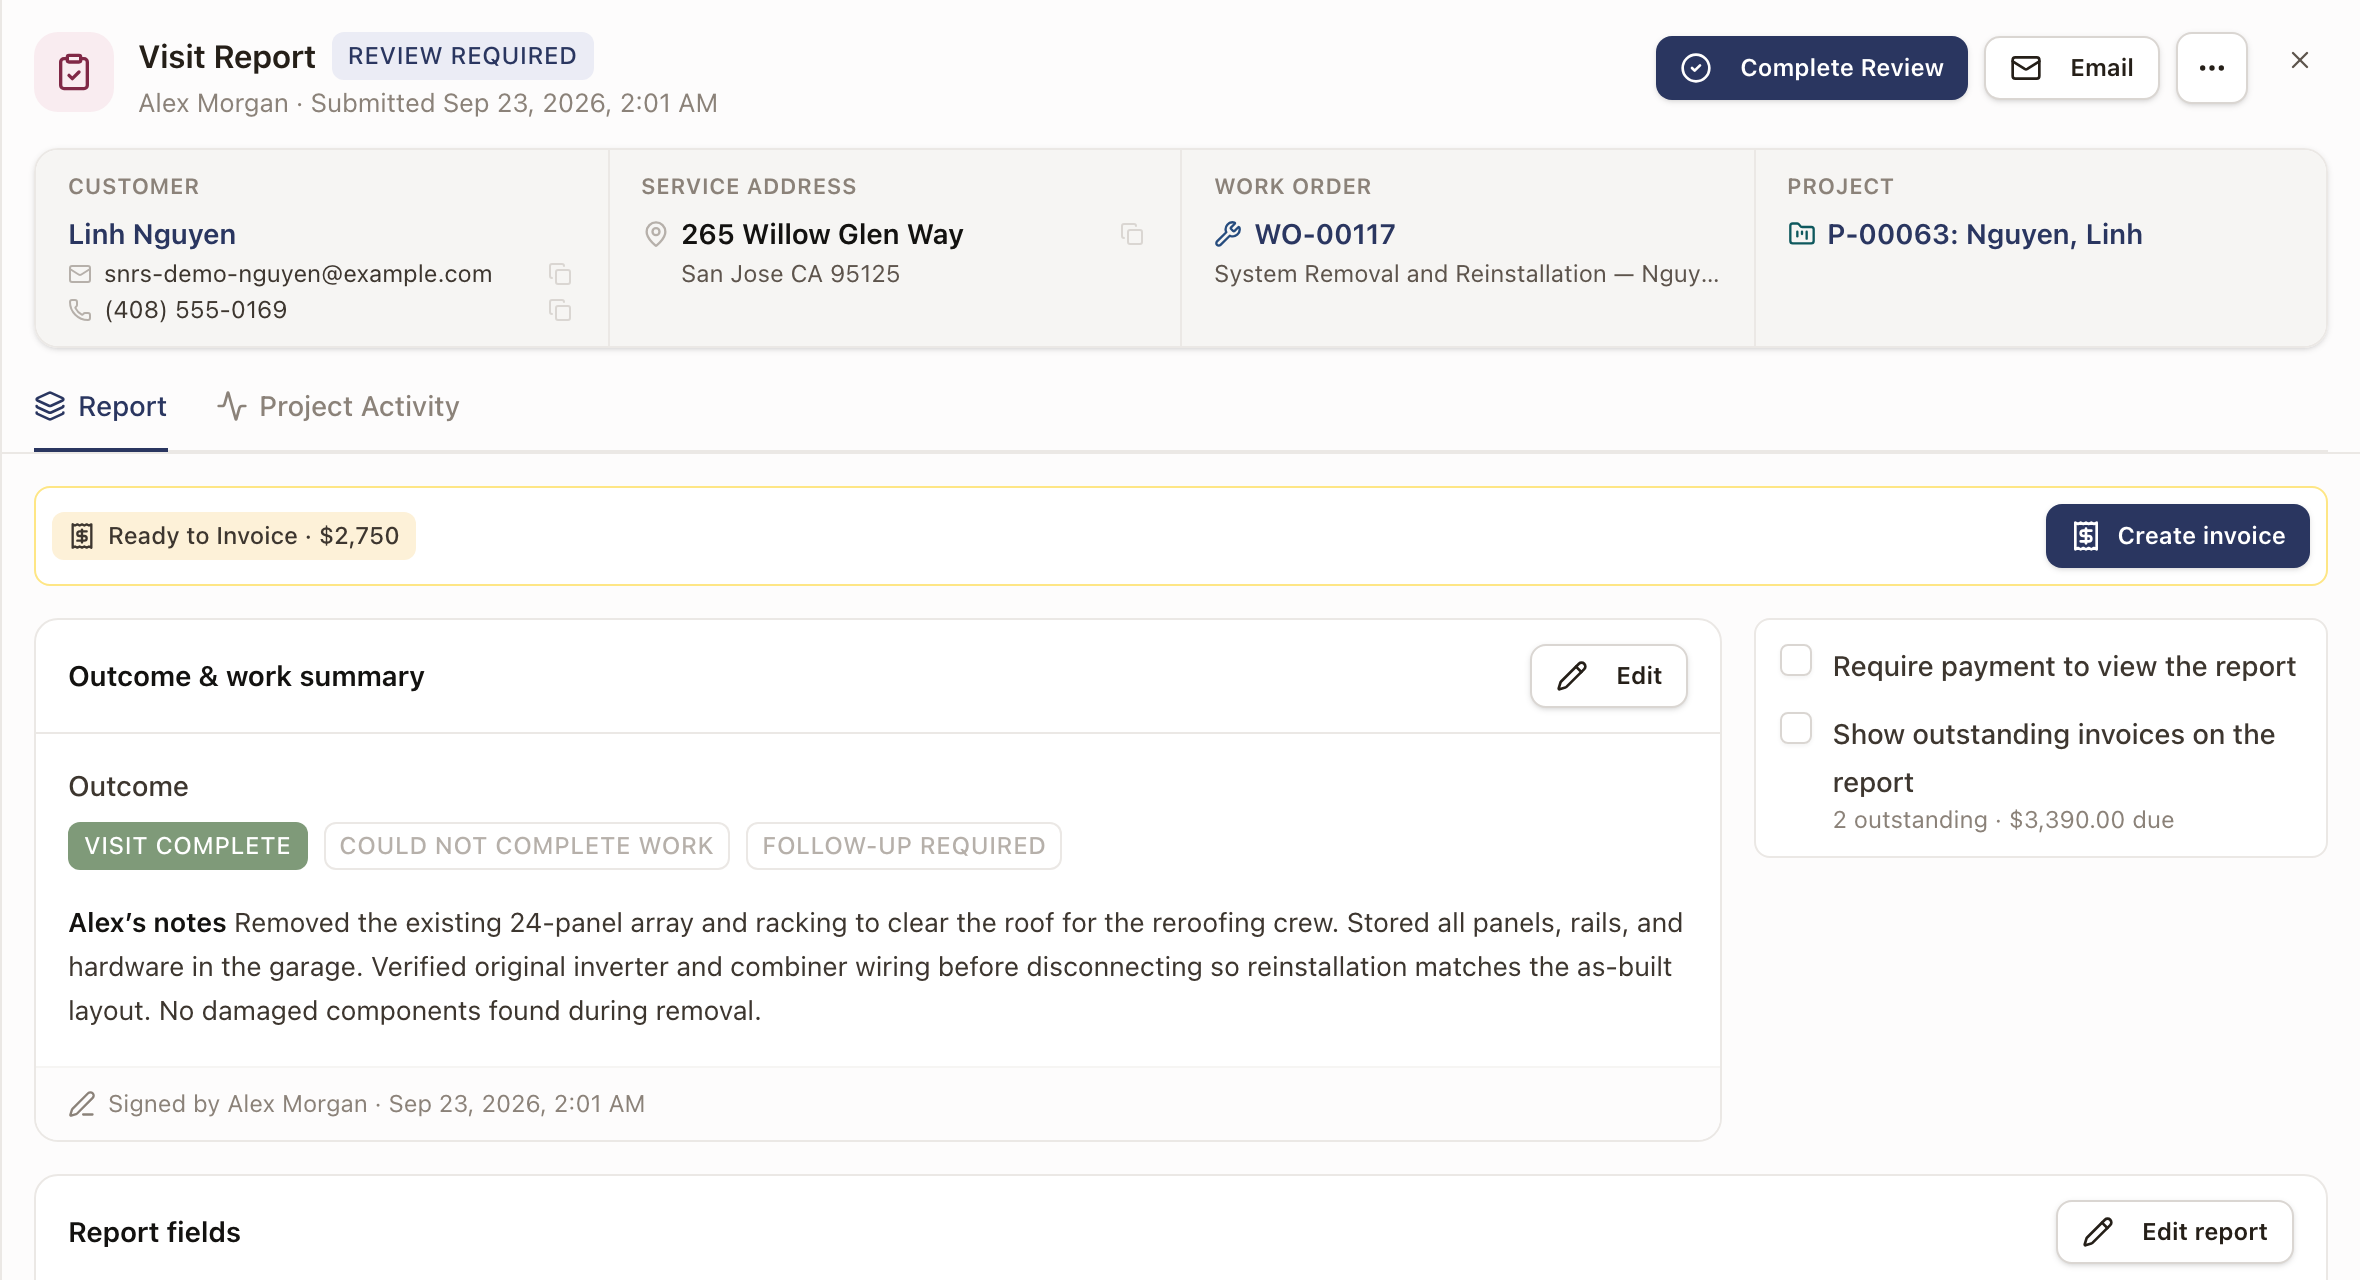
On the Report tab, from the top:
- A green card appears after a review. It names who reviewed the report and when, shows the reviewer notes, and lists the actions taken, such as a quote created or each email sent.
- Ready to Invoice appears when the project has a payment waiting to be invoiced. See Start the invoice below.
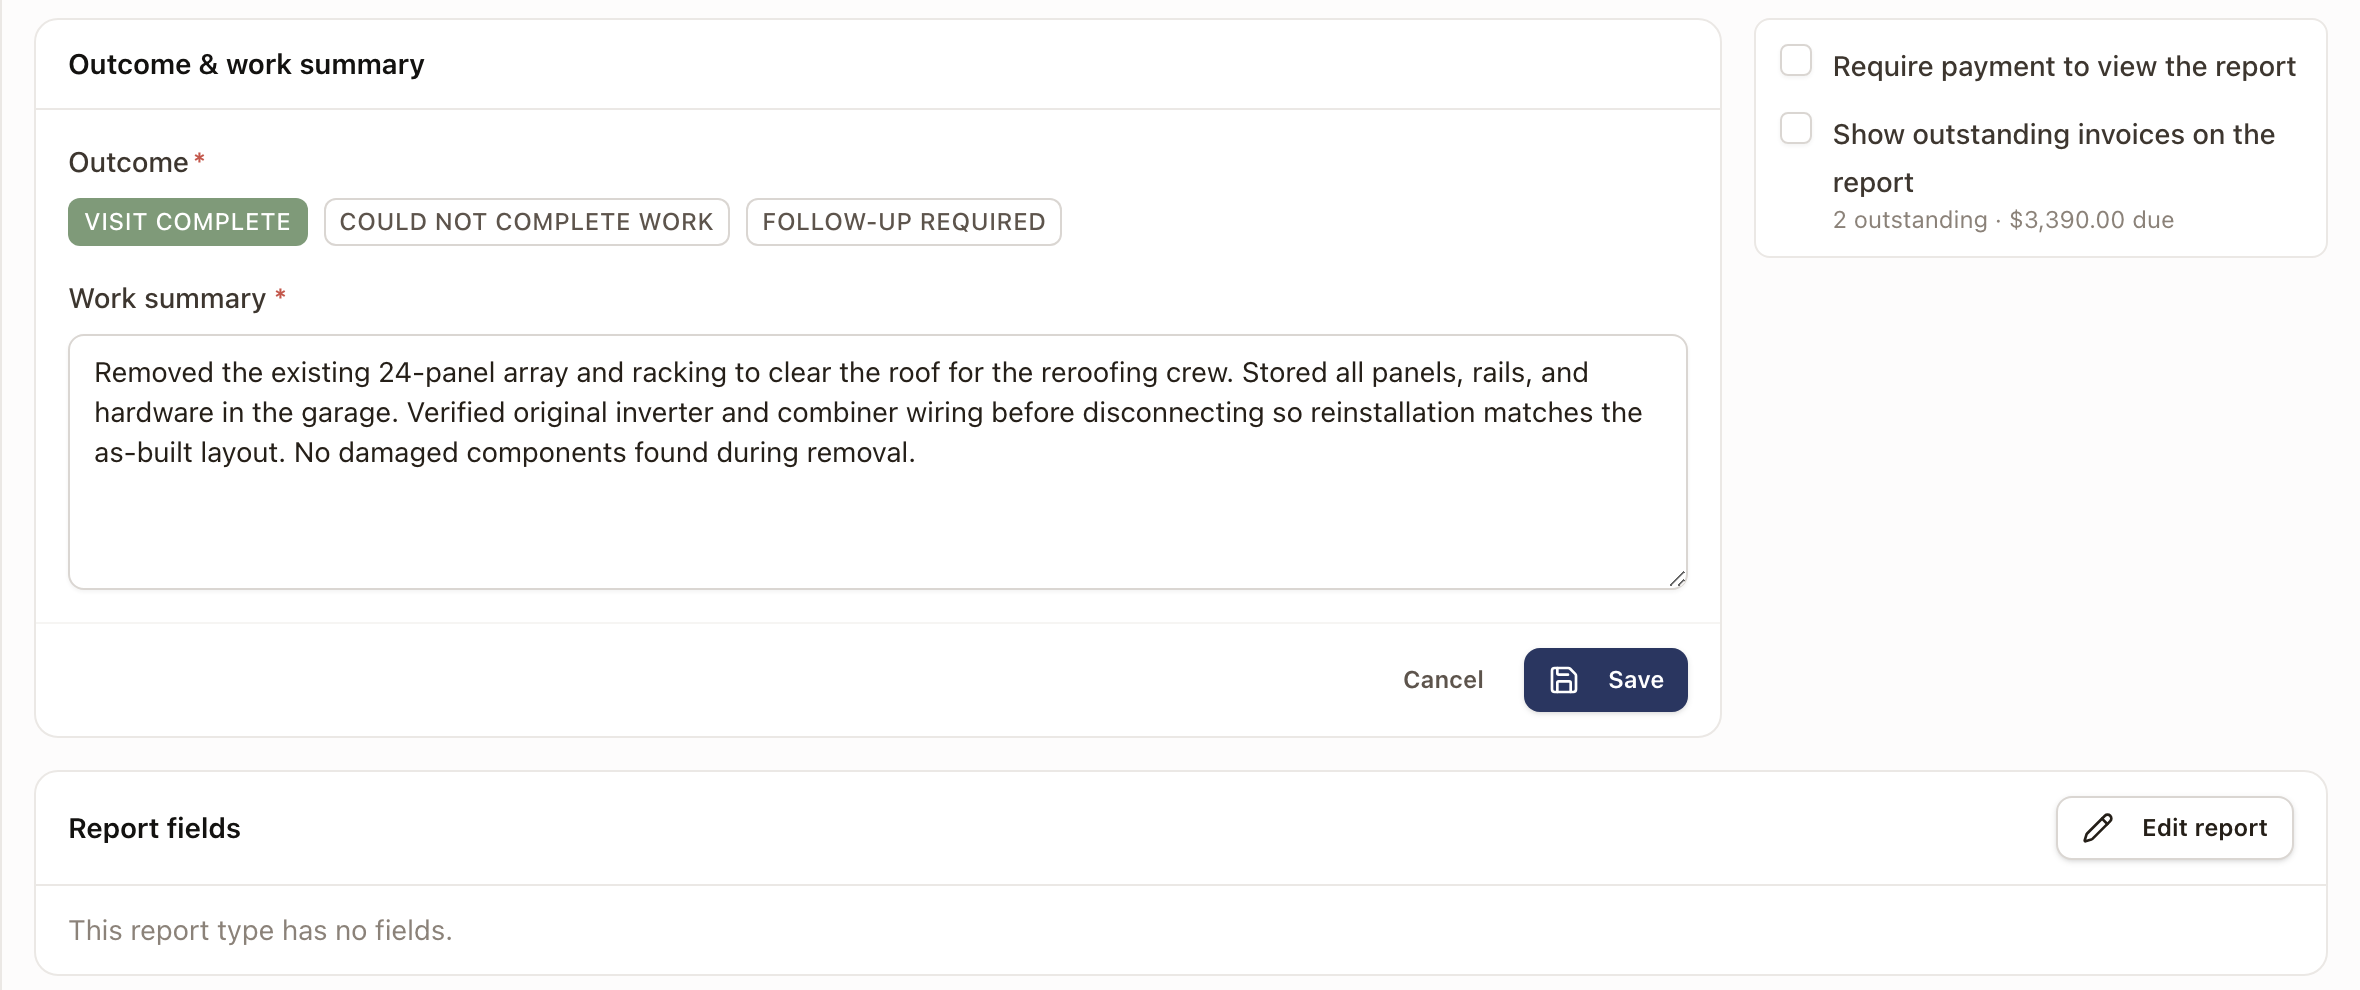
- Outcome & work summary shows the outcome and the technician's notes. The payment choices for the customer's copy sit beside it. See Get paid before the customer sees the report.
- Report fields holds the answers the report type asks for.
- Photos holds the report's photos.
Complete a review
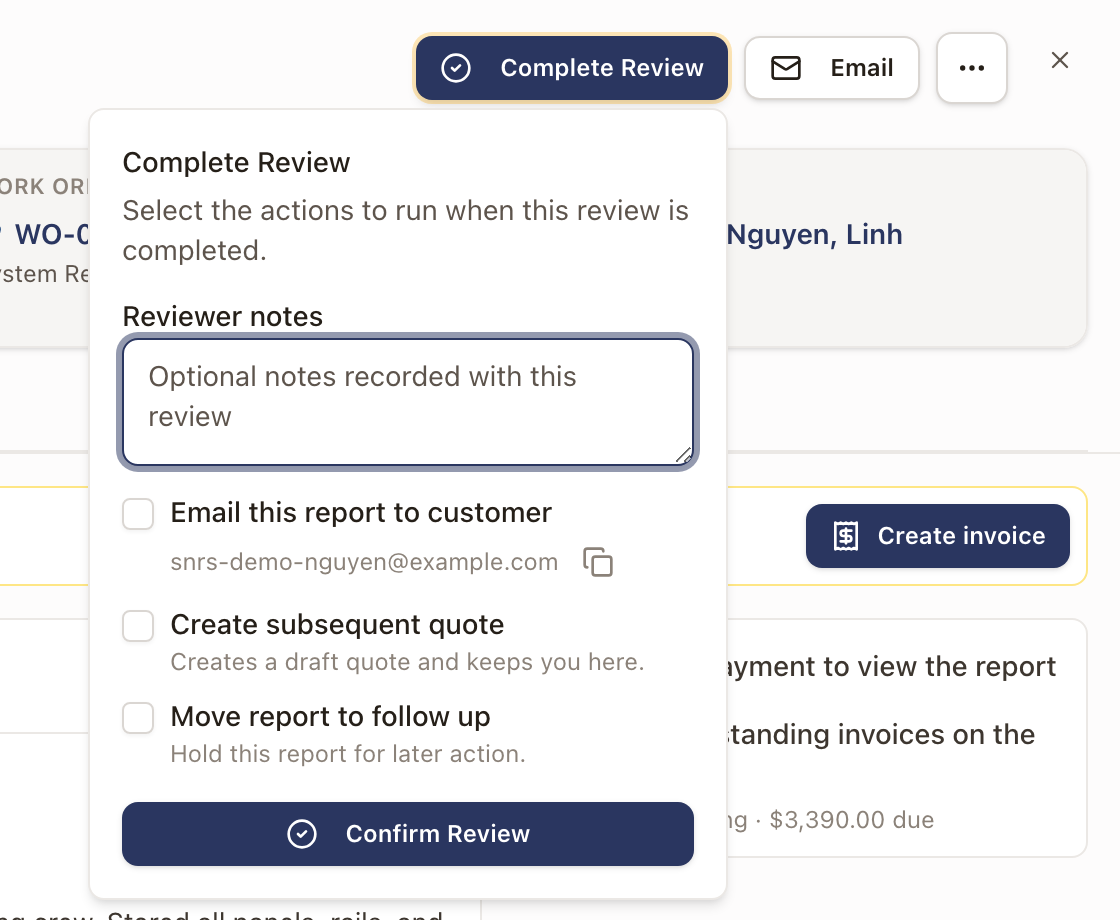
- Open the report and click Complete Review.
- Add Reviewer notes if useful.
- Tick what you want to happen with the review:
- Email this report to customer sends the customer the report. It's unavailable when the customer has no email address.
- Create subsequent quote creates a draft quote from the report and keeps you in the drawer. Pick the quote template to use. It's unavailable when the report already has a quote, or when your role can't create quotes from reports.
- Move report to follow up holds the report for later action. It's offered while the report is Review Required, and it turns off the other two choices.
- Click Confirm Review.
If you ticked Email this report to customer, the email opens for you to check. Click Send Email & Complete Review to send it and finish the review.
After the review, the green card shows what you did.
Change the outcome and work summary
- In Outcome & work summary, click Edit.
- Pick the Outcome. The choices come from the report's type.
- Change the Work summary. Both the outcome and the work summary are required.
- Click Save, or Cancel to leave the card as it was.
To change the answers to the report's fields, click Edit report under Report fields. On a permit inspection report with a Fail or Conditional pass, editing also lets you add, change, and remove its corrections. A correction the office has already scheduled can't be removed. To add photos, click Add photos under Photos. Its ⋯ menu adds photos from the work order or the project, and sets a link to a photo folder.
Start the invoice
When the work earns a payment that's ready to bill, a Ready to Invoice strip shows the amount. For a payment billed by the hour, it reads Hours worked until the invoice is made.
- Click Create invoice on the strip. The invoice for that payment opens.
- Check it, then create it. See Create and send an invoice.
Check it worked
The report's status reads Reviewed, the Complete Review button shows the review date, and the green card shows your notes and what you did. On Operations → Reports, the report counts under Reviewed.
Common problems
- Complete Review is gray. The report is still a Draft, or it's already reviewed. A review needs a submitted report.
- There's no Complete Review or Email button. Your role can't review or email reports.
- Email is gray. The report is still a Draft, or the customer has no email address.
- There's no Ready to Invoice strip. The project has no payment ready to invoice, or your role can't create invoices.
Review submitted reports
Use Review Work to follow finished visits through Visit, Review, Follow-up, and Billing, and mark a technician's report reviewed.
Get paid before the customer sees the report
Hold a report until the customer pays an invoice, or list their unpaid invoices above the report with a way to pay.