
Schedule a service visit
Book an appointment on a work order and assign one or more technicians to it.
Schedule an appointment on a work order and assign a technician to it. You can do this from the work order itself, or from the Dispatch Board's sidebar.
Before you start
- The Owner, Admin, Operations Manager, or Operations User role.
- A work order to schedule against. An appointment is always scheduled against a work order, not created on its own.
Steps
1. Open the Schedule Appointment drawer
From the work order's detail page, find the Schedule card and click Schedule visit.
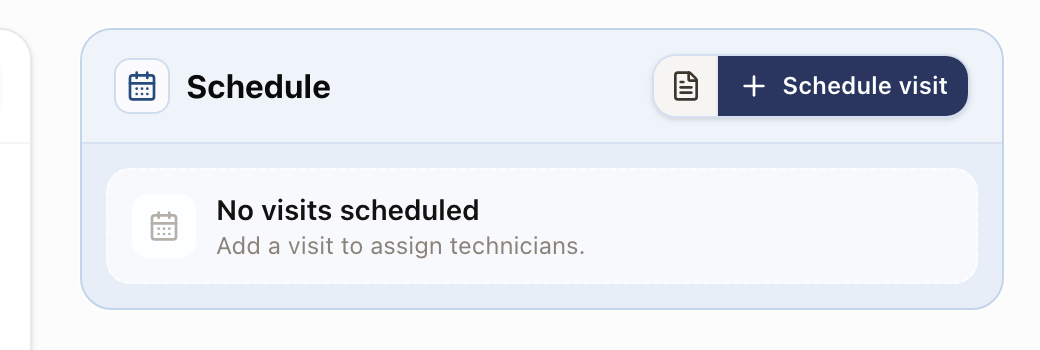
You can also start from Operations → Dispatch Board. Work orders that aren't scheduled yet are listed under Ready to schedule in the sidebar. Click a card to expand it, then click Schedule. See Work the Dispatch Board sidebar.
2. Set the date, time, and technicians
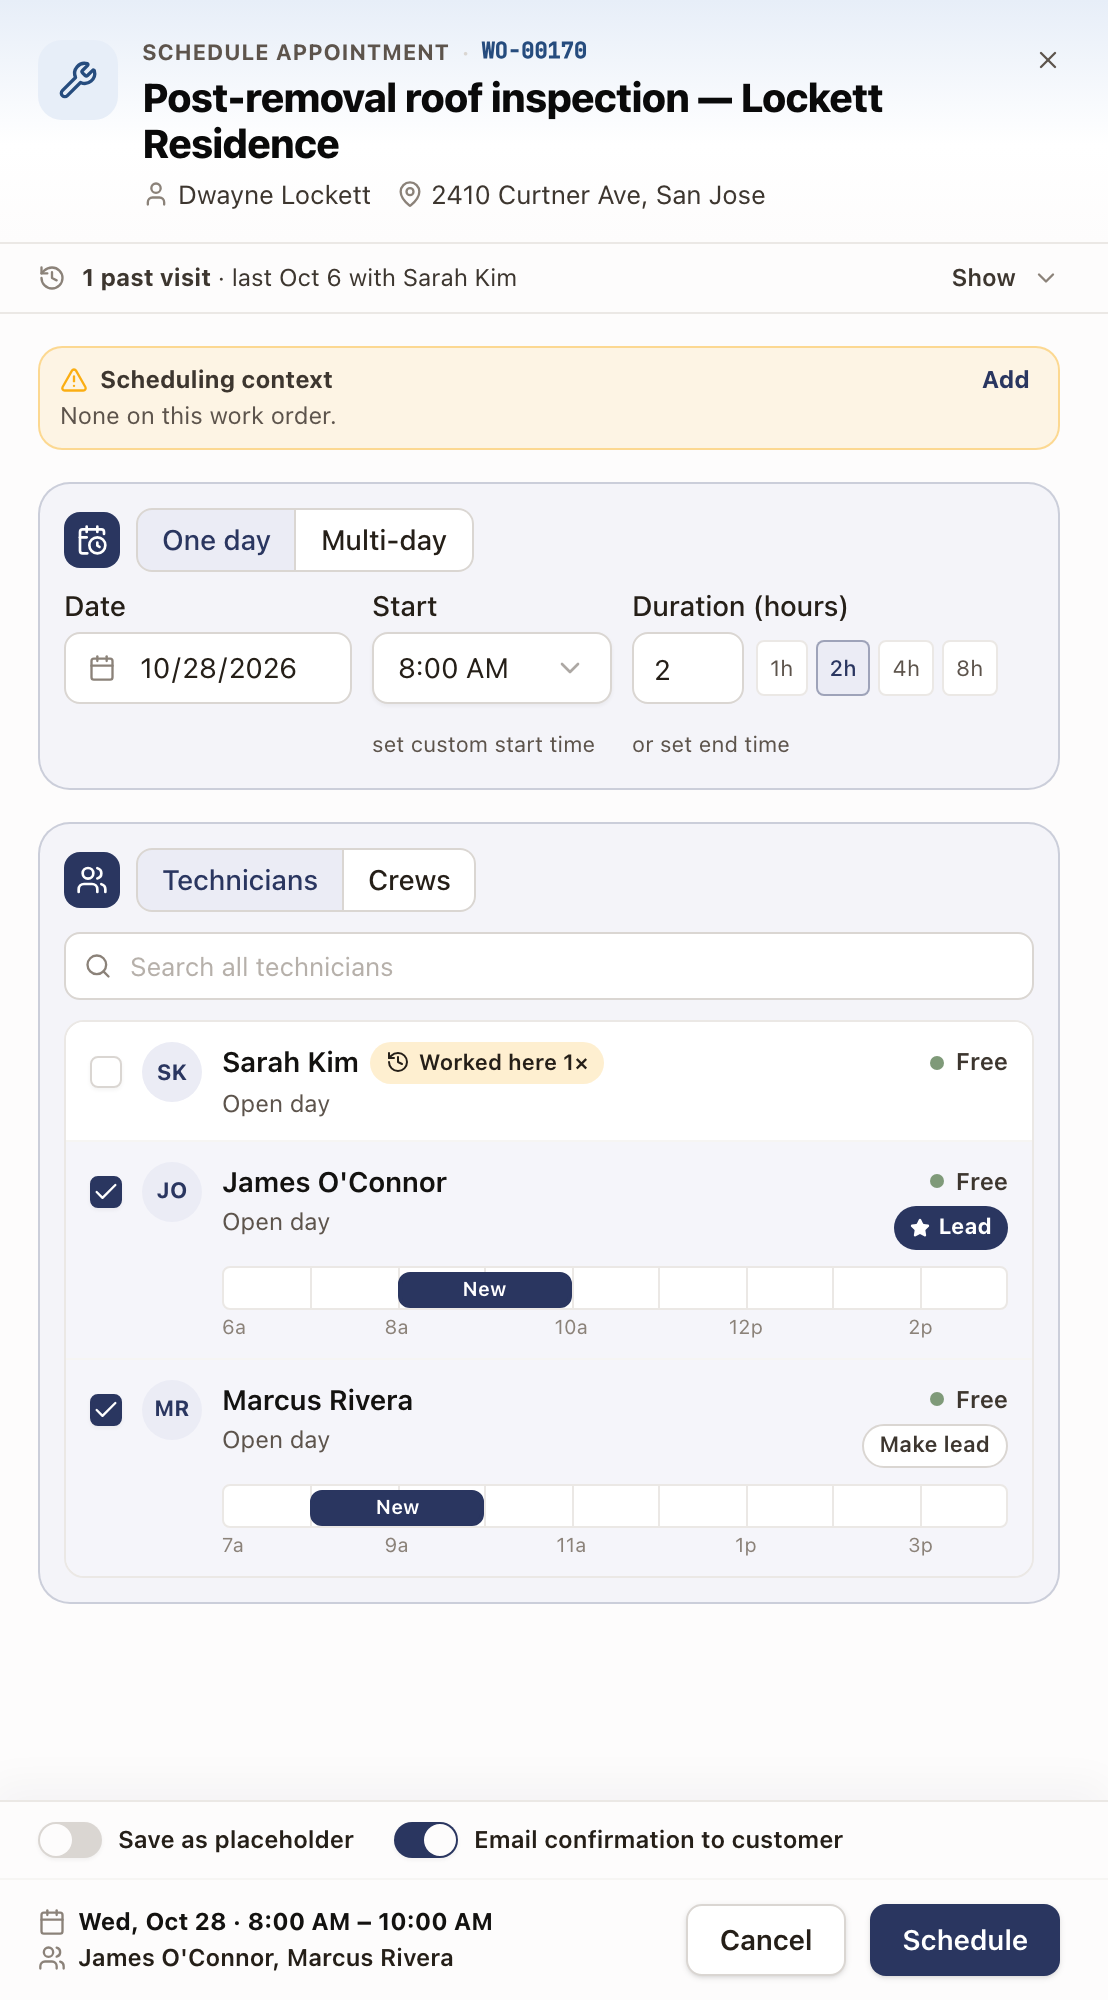
- Scheduling context is at the top of the drawer. It shows the timing or coordination details saved on the work order, such as a preferred time or who to call to set up the visit. Technicians don't see it. Click Add or Edit to change it. What you write is saved to the work order when you schedule.
- If the customer has unpaid invoices, a pill under Scheduling context reads, for example, 2 unpaid invoices · $1,240.50. Click it to see each invoice with its balance, due date, and days past due. An invoice opens in a new tab, so the drawer keeps what you typed. The pill covers the customer's invoices at every property, and it never stops you from scheduling. You see it only if your role has billing access. The Edit Appointment drawer shows the same pill.
- Choose One day or Multi-day. For one day, set the Date, the Start time, and the Duration (hours). Start opens at your company's default start time, which you set under Settings → Operations → Dispatch (see Dispatch settings). A time you picked on the calendar before opening the drawer is kept. Type the hours or click 1h, 2h, 4h, or 8h. To set an exact start time or an end time instead, click set custom start time or or set end time. For a multi-day job, set the First day, Last day, and Daily start, which also opens at the default. The drawer tells you how many appointments it will create.
- Under Technicians, tick one or more names. Each row shows whether the technician is Free, Busy for a stated window, or has the Day off. When they're busy, Next open shows their next free time. Click it to move the visit there. A tag such as Worked here 2× means they've visited this property before.
- The first technician you tick is the lead. Click Make lead on another to change who leads the visit.
- Under each ticked technician, a strip shows their day with the new visit in place, so you can see what's before and after it. If you tick two or more technicians who share an opening, the drawer offers it with Use this time.
- To find someone, use Search all technicians. If the work order sits in an Operations territory, the list starts with technicians who cover it. Click the territory tag to show everyone.
- Turn on Save as placeholder to hold the slot without notifying the customer or showing it to the technician yet. A placeholder never emails the customer, and the email switch then reads Placeholders never email.
- Turn on Email confirmation to customer to preview the email once the visit is booked. It starts from your company setting. After you click Schedule, the Send Confirmation dialog opens so you can check the recipients, add a note, or skip it. Nothing is sent until you click Send Confirmation in that dialog. On a multi-day job the switch reads Email confirmation (first day) and the dialog previews the first day's visit. See Send an appointment confirmation.
If a technician you picked already has a conflict on that date, for example a day off or another visit, the summary at the bottom of the drawer warns you. This doesn't block scheduling, it just makes sure you saw the conflict before you double-book someone on purpose.
3. Submit
Click Schedule. The button's label changes with what you're doing: Save Placeholder if you turned on Save as placeholder, or Schedule N Days / Save N Placeholders for a multi-day job.
Assign a crewBeta
Contact solarOS support to turn it on for your company.
With crews on, the technician list has Technicians and Crews buttons above it. Click Crews and pick a crew to fill in its members. Switch back to Technicians to change who goes. See Crews.
Other ways to schedule
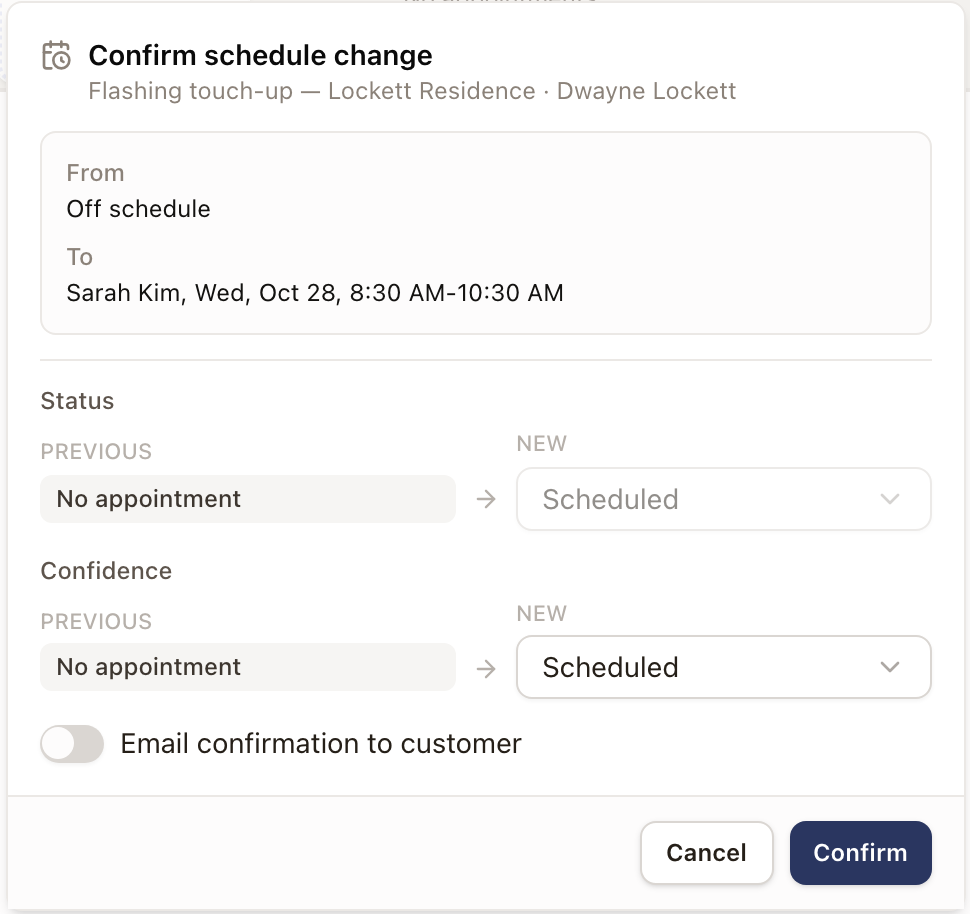
Drag from the Dispatch Board. Instead of opening the drawer, drag a card from Ready to schedule onto a technician's slot in Day or Week view. A Confirm schedule change dialog shows the technician, date, time, status, and the Email confirmation to customer switch before it saves.
From the map. In Map view, click a white pin to slot the job into a technician's route. See Slot in work from the map.
Check it worked
The appointment shows status Scheduled on the work order's Schedule card, on the Dispatch Board's calendar, and on the assigned technician's Schedule tab.
Common problems
- You scheduled a technician who's already busy and didn't mean to. The drawer and the drag confirmation both warn before you submit. If you missed it, open the appointment and reassign or reschedule it: see Reschedule or reassign an appointment.
- The technician doesn't see it on their schedule. Confirm you didn't leave Save as placeholder on. A Placeholder appointment doesn't show up for the technician until it's promoted to Scheduled, unless your company shows placeholders to technicians under Settings → Operations → Dispatch.
- Drag-and-drop isn't doing anything. It only works in Day or Week view, and only for cards under Ready to schedule. Switch out of Month or Map view first.